erv
Well-Known Member
Hi !
I thought I'd share that work here too to get some feedback from the pros.
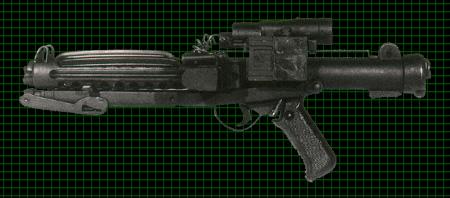
I wanted to make a E-11 for a long time, my customer Pablo and his scratch built did put the scale UP.
I considered screen accurate for a while, but I decided later to go for a custom E-11 since I wanted to add a screen to the blaster, hence non canon (I hope I'm not hurting any feelings).
Rather than scratch built (very tempted to follow that path though), I chose real sterling parts.
Here is the build log with many pics, I though that might interest some of you.
SHORT CUT : here's the video
E-11 model X Custom Blaster - 3 videos
The sterling came in chopped pieces which is the short "cut" )) to disable it. Sure, it won't *ever* work again this way...
The first part of the exercise is to extract all the bits and parts then clean/Shave them and re install them on the main body that will be scratch built. The rest I hope to have as many vintage parts as possible on that blaster. The scope is missing but it is on my way as I'm typing this.

cutting the read sight and the removable butt cap


Building the main body. The PVC BBC templates are for a 42mm OD tube matching some plumbing supplies. The real sterling is made out of a 1"1/2 OD tube. I managed to find the right diameter and correct wall too, on ebay.co.uk, tubes being sold as coolant pipes. Made of sturdy 6063 T6 aluminium from what I remember.
The downsizing of the templates are an exact 10%. I shrunk only the width to match the perimeter, holes are oval but since I know what the size is supposed to be (7/16" and a few of 1/2"), so I just needed the alignment and spacing, aside the front stock lock groove that was measured on the original part and cut accordingly.


I'm so happy I have those stepped drill bits. (In inches :thumbsup)

Many centers and drills later...

Cutting the long groove

Done. Jump for joy. Cool yourself down. And wash your dirty hands you dirty boy.

Some sanding to clean the outside. I used a file to clean the sharp metal edges inside, then cleaned the wall of each hole with a sharp knife, then finally put some sand paper on a piece of blade to get a nice finish inside.
Then, some threaded rod and a piece of aluminium matching the ID, with sand paper taped on it => drilling machine => clean shave of the inside of the tube.

I was impressed to see that the bolt is perfectly fitting in that tube !

I don't want to have a huge post with everything inside, I'll keep posting the rest of the various stages of the built later !
I thought I'd share that work here too to get some feedback from the pros.
I wanted to make a E-11 for a long time, my customer Pablo and his scratch built did put the scale UP.
I considered screen accurate for a while, but I decided later to go for a custom E-11 since I wanted to add a screen to the blaster, hence non canon (I hope I'm not hurting any feelings).
Rather than scratch built (very tempted to follow that path though), I chose real sterling parts.
Here is the build log with many pics, I though that might interest some of you.
SHORT CUT : here's the video
E-11 model X Custom Blaster - 3 videos
The sterling came in chopped pieces which is the short "cut"
The first part of the exercise is to extract all the bits and parts then clean/Shave them and re install them on the main body that will be scratch built. The rest I hope to have as many vintage parts as possible on that blaster. The scope is missing but it is on my way as I'm typing this.

cutting the read sight and the removable butt cap


Building the main body. The PVC BBC templates are for a 42mm OD tube matching some plumbing supplies. The real sterling is made out of a 1"1/2 OD tube. I managed to find the right diameter and correct wall too, on ebay.co.uk, tubes being sold as coolant pipes. Made of sturdy 6063 T6 aluminium from what I remember.
The downsizing of the templates are an exact 10%. I shrunk only the width to match the perimeter, holes are oval but since I know what the size is supposed to be (7/16" and a few of 1/2"), so I just needed the alignment and spacing, aside the front stock lock groove that was measured on the original part and cut accordingly.


I'm so happy I have those stepped drill bits. (In inches :thumbsup)

Many centers and drills later...

Cutting the long groove

Done. Jump for joy. Cool yourself down. And wash your dirty hands you dirty boy.

Some sanding to clean the outside. I used a file to clean the sharp metal edges inside, then cleaned the wall of each hole with a sharp knife, then finally put some sand paper on a piece of blade to get a nice finish inside.
Then, some threaded rod and a piece of aluminium matching the ID, with sand paper taped on it => drilling machine => clean shave of the inside of the tube.

I was impressed to see that the bolt is perfectly fitting in that tube !

I don't want to have a huge post with everything inside, I'll keep posting the rest of the various stages of the built later !
Last edited:


