DREDD 2012 Lawgiver (unique) Kit

Buy now for 345 USD
You don't have the permission to purchase
Temporarily pausing my plans for a Lawgiver to make room for another project.

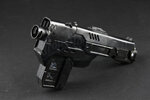
This kit is accurate and printed on professional machine (same type ILM and other prop houses use).


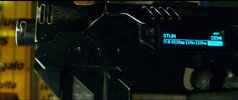
Designed to be built either as a functional (shooting) airsoft OR as a non-shooting replica with electronics, working trigger, moving slide, etc. and I've never seen ANY other parts kit be able to do both. (I haven't tried making a shooter as I was going for a static build with elecs.) Made to take an airsoft or replica Glock (NOT INCLUDED- this listing is for the Lawgiver addon parts ONLY). Also designed so that a couple key parts can be screwed on for better stability!

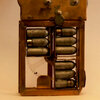
These parts are painted, weathered and ready. (You can weather more if you want. It has a metallic undercoat and a satin black top coat. If you scrape away the black, more of the metal will be revealed.)

Photos show a "dry assembly".
image2.jpeg

image3.jpeg

image0.jpeg


Asking LESS than I normally would to print a set of these in raw form! NOTE that if I manage to finance my other project by other means I will withdraw this listing!

If interested, SEND ME A PM and DO NOT use the buy-it-now button!
Also, NEVER mention "blasters", guns or weapons in a paypal message- even if it's a toy or replica! You can get both accounts locked!
 
Last edited:
Out of curiosity, was it printed from the Props3D files?
No, this is entirely my own model. It's a (massively) reworked version of the files I did back in 2012/13 when Morganthirteen cast up what was then regarded as the most accurate copy out there, based on my master. It eventually ended up being the most used Lawgiver of all costumers in the Dredd costume groups back then. As new reference materials have been made available over the years, I've gone through a few revisions- not with the intent of ever offering it really, just wanting one myself since I sold the one I had years ago. If I remember correctly, the Props3D files, though official (I think?) were actually not as accurate as many fan-made copies because they weren't based on the final screen model. (Or maybe I'm remembering it wrong... it's been ages!) Now of course, there are a few accurate models out there, so when I went to remaster it for the umpteenth time I figured I'd make it unique somehow, hence the dual functionalty prospect. I was on 'finally assembly' of what was to be my new copy with functional electronics (personalized to me, so those I can't sell), moving slide and such, but decided I needed to fund some other stuff and let these parts go. (I'll make another... some day...)
Lovely looking work!
Thank you!
 
So how do the pieces stay on an airsoft Glock? I would think a couple of blowbacks from the slide would detach even the most securely glued/epoxied add-on. I know you mentioned there are a few places screws can be used: are these on the blowback/slide parts?

I have one of the You/Shawn versions, and was thinking of ways to cut it up for the electronics and what not. I got the electronics from someone on here (can't remember who, too long ago for my old brain) who made them when you released the solid version: and they're really sweet. I even bought the gas airsoft Glock 17. Your kit would obviously be an easier way to incorporate all of it. But like I said, I'm just curious how the parts would stay on a working airsoft version.

Also, do you have the rear sight (looks like you have the front one and the long thing that goes in the middle)? What about the thin cog wheel that goes in the magazine? (see attached photo)This is something I've NEVER seen anyone produce.

Thanks in advance and hope all is well! :)

Chris
 

Attachments

  • MinusGlockB04.jpg
    MinusGlockB04.jpg
    560 KB · Views: 6
Last edited:
So how do the pieces stay on an airsoft Glock? I would think a couple of blowbacks from the slide would detach even the most securely glued/epoxied add-on. I know you mentioned there are a few places screws can be used: are these on the blowback/slide parts?

Also, do you have the rear sight (looks like you have the front one and the long thing that goes in the middle)? What about the thin cog wheel that goes in the magazine? (see attached photo)This is something I've NEVER seen anyone produce.

Chris
I'm not gonna hijack this post with my nonsense but I scratch built a MK2 back in 2012 that worked perfectly just hot glued onto a gas blowback AND had the cog wheel. :) All visible on my instagram @petetheopropstuff
 
So how do the pieces stay on an airsoft Glock? I would think a couple of blowbacks from the slide would detach even the most securely glued/epoxied add-on. I know you mentioned there are a few places screws can be used: are these on the blowback/slide parts?

I have one of the You/Shawn versions, and was thinking of ways to cut it up for the electronics and what not. I got the electronics from someone on here (can't remember who, too long ago for my old brain) who made them when you released the solid version: and they're really sweet. I even bought the gas airsoft Glock 17. Your kit would obviously be an easier way to incorporate all of it. But like I said, I'm just curious how the parts would stay on a working airsoft version.

Also, do you have the rear sight (looks like you have the front one and the long thing that goes in the middle)? What about the thin cog wheel that goes in the magazine? (see attached photo)This is something I've NEVER seen anyone produce.

Thanks in advance and hope all is well! :)

Chris
The main body can be screwed into the front of the trigger guard of the Glock. There's a "channel" that goes from the back of the magwell to where the trigger guard meets the body. (I stuck a cottons swab or something through it with some paint to mark the drill point in the trigger guard. After that it'd be just a matter of tapping that hole. The entire backpiece (separate like on the screen versions) can be screwed into the back of the slide. (You can see the screw holes in the photo.) If I remember correctly, I actually got that idea from one of the screen props. Other than that, I'd just use some very strong epoxy on the other parts. I've found that JB Weld PLASTIC BONDER (not Plastic Weld) is pretty much the best epoxy for resin prints. Once it cures, it can be sanded, but is also stays just a tiny, tiny bit flexible, which helps it absorb shocks and vibrations. You just have to be sure that when you assemble, there is enough clearance between the parts. (Resin pieces smashing into other resin pieces during a blowback action would not be very good!) If I were making an airsoft firing version, I'd probably also reinforce the insides in some places with the same JB weld by "lining it", possibly incorporating some aluminum car body mesh... but I'd have to gauge that as I was assembling it.

**edit** The rear sight is the loose piece. The front sight is printed into the front cowl. It can be seen in the second photo.

A functional gear was never actually in any of the screen guns as I recall... it was a printed paper cutout. They did make a revolving/cycling prototype of the magazine interior, though... but it was never used.
 
Last edited:
Thanks for ALL the info. Figured you'd have answers.

I attached a couple screenshots where you can just make out the cog/gear. No idea if it was on all of them. And the heros I've seen from PropStore did have them too.

Baron, I wasn't able to get on Instagram to see your work. I'm not a member there, so I guess they won't let me see things.

Chris
 

Attachments

  • LawgiverMagInt02.jpg
    LawgiverMagInt02.jpg
    395.4 KB · Views: 6
  • screenshot_lawgiver_6.png
    screenshot_lawgiver_6.png
    3 MB · Views: 6
I attached a couple screenshots where you can just make out the cog/gear. No idea if it was on all of them. And the heros I've seen from PropStore did have them too.
Unless I'm remembering completely wrong (it's been 13 years after all), what you're seeing is a photocopied paper cutout glued to the insides of the magazines. I think the story was that they tried to make a functional, cycling magazine, but it was too much trouble so they just scrapped the idea and stuck photographs behind the plastic screens in the mags.

Here's a shot from one of the Propstore-sold copies where you can see that it looks pretty flat:
1749339434768.png


On film, no one would ever suspect it, and it was a low-budget movie after all.


Here's a photo of the functional rotating interior that they scrapped:
1749339744615.png


Oh, and regarding the rear sight.... I had a momentary brain-lapse earlier. The rear sight is actually the loose piece in the photos, next to the mid-sight. The front site is printed into the top cowl, not loose. (You can see it in one of the photos.) It works as kind of a "key" to when you assemble the front/back cowl.


Another fun thing. Here's a magazine that was in all probability FDM-printed! It has all the tell-tale signs of a non-cleaned up print- layer lines, under-extrusion and even some vibration artifacts!
1749339957528.png
 
Here's a photo I got from somewhere (maybe the RPF) of another version of "functional" magazine interior. It looks a little different than the one you obtained. The cog/gear looks almost transparent, like plexiglass. The ones in screengrabs and PropStore auctions look like they tried to make it a silver or metal for the final version.

Just wanted to post it for reference for others that might be planning a build (even though this is a Junkyard thread).
 

Attachments

  • LawgiverMagInt01.jpg
    LawgiverMagInt01.jpg
    40.9 KB · Views: 5
Back
Top