PB Props
Active Member
Very kindly, I've been given permission to mould up and cast duplicates of this copy of John Friedlander's original 1976 sculpt for Hieronymus' mask from the Doctor Who story, The Masque of the Mandragora.
I wanted to capture not just the sculpt, but all the moulding and casting defects that were present on the screen used costume piece, just for purity's sake.

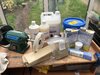
These are the supplies I'll be using.

The first task was to clay the mask up.

Laying down the print coat in several thin layers to pick up all the detail and avoid getting air trapped in my moulding material.

Next up, building the body of the mould by thickening the silicone... You know the drill with this stuff. Looks as ugly as sin, like a topographical map of the Himalayas.

Starting to smooth everything out.

Adding some registration keys.

Then claying up my support shell's dividing wall.

Using Plasti Paste II. It's nice stuff, but I'm not 100% convinced that I would use it all the time.

The support shell is completed and splits down the centre line with added registration keys to prevent it from wandering off.

This is the first slush pour in resin where I was just starting to get to know this mould and how it needs to be approached.

And these are the first two test pulls.
Lots of lessons learnt here such as quantities of resin required and to wear my glasses during the process, that way I can spot stuff and not make school boy errors - I couldn't see down into the mould well enough to spot some clumped brass powder that ended up creating defects on the nose, brow and cheek of the one seen on the right here. I'll catch this next time!

This is a better view of the second pull and shows the brass colour quite well. Just the right amount of resin for a sturdy wall thickness, a decent amount of brass powder so that it buffs up well and it's got quite some gravity to it too, it's rather hefty in hand.

The reverse side is very tidy too for a slush cast. Anyone would think that I actually know what I'm doing!

As this is what it could look like hanging on a wall.

Over all, this took about a week from start to this point. I still have a way to go with testing, but up to now, it's been a fun and enjoyable project.
Thanks for looking.
I wanted to capture not just the sculpt, but all the moulding and casting defects that were present on the screen used costume piece, just for purity's sake.
These are the supplies I'll be using.
The first task was to clay the mask up.
Laying down the print coat in several thin layers to pick up all the detail and avoid getting air trapped in my moulding material.
Next up, building the body of the mould by thickening the silicone... You know the drill with this stuff. Looks as ugly as sin, like a topographical map of the Himalayas.
Starting to smooth everything out.
Adding some registration keys.
Then claying up my support shell's dividing wall.
Using Plasti Paste II. It's nice stuff, but I'm not 100% convinced that I would use it all the time.
The support shell is completed and splits down the centre line with added registration keys to prevent it from wandering off.
This is the first slush pour in resin where I was just starting to get to know this mould and how it needs to be approached.
And these are the first two test pulls.
Lots of lessons learnt here such as quantities of resin required and to wear my glasses during the process, that way I can spot stuff and not make school boy errors - I couldn't see down into the mould well enough to spot some clumped brass powder that ended up creating defects on the nose, brow and cheek of the one seen on the right here. I'll catch this next time!
This is a better view of the second pull and shows the brass colour quite well. Just the right amount of resin for a sturdy wall thickness, a decent amount of brass powder so that it buffs up well and it's got quite some gravity to it too, it's rather hefty in hand.
The reverse side is very tidy too for a slush cast. Anyone would think that I actually know what I'm doing!
As this is what it could look like hanging on a wall.
Over all, this took about a week from start to this point. I still have a way to go with testing, but up to now, it's been a fun and enjoyable project.
Thanks for looking.