mburkit
Well-Known Member
Greetings everyone!
You may know my buddies and me; you may not. What I would say is that my friends and I have been building Ghostbusters props for years. After years and years of building movie gear, we realized that we wanted to be a little different, so we set upon a 12 month process. Out of those 12 months, Mr. Jack Doud and I got together every weekend from January until New York Comicon in October for this project, minus 1 or 2 weeks. Needless to say, there was a lot of work put into these packs. Let me walk you through our journey. I hope you are excited to wade through a fraction of the 100’s of photos we took!

Building the Master
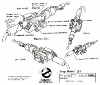
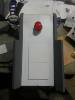
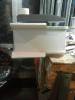
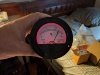
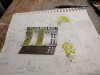
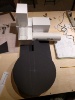
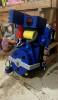
First and foremost, we needed reference. Jack Doud and myself took to screen capping from the show itself, but we quickly realized that the size of the packs changed CONSTANTLY. Because of that, we ended up sticking to the production images done for the show Bible, such as this one:

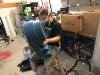
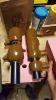
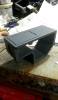
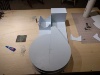
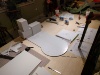
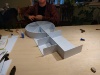
With our source material squared away, we then did a quick mock up in an evening with foamcore, so we could figure out our dimensions. . .


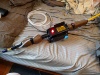
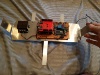
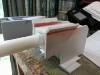
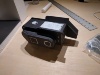
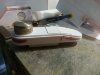
We also worked out the body of the wand as well.


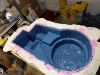
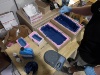
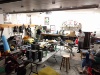
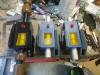
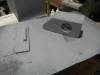
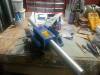
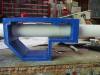
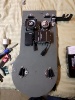
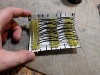
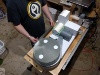
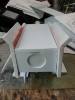
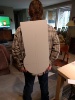
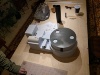
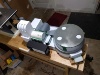
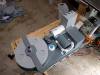
Once we had our dimensions worked out, we then set upon a 2 ½ month period of scratch building the master out of 0.125 styrene. It took us almost 3 months to create the master because we wanted it as smooth as possible so we had as little clean up as possible on the casts.


As you look at these build photos of the master, I would like to point out that we added an extra inch of material to the overall depth of the pack, for molding purposes. This would then let us make a clean cut with a rotary tool on our fiberglass casts.


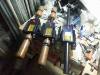
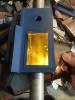
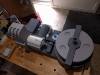
After we finished up the master for the pack shell, Jack then moved onto making a master for the wand.


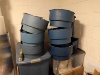
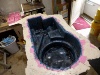
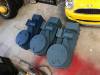
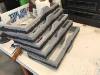
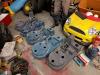
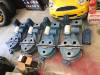
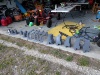
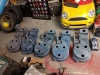
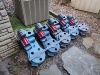
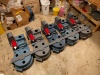
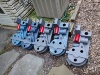
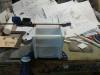
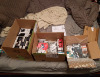
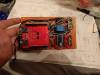
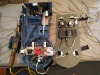
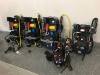
For sake of cutting out a good chunk of the build process, I am not going to really go into the molding process. We made silicone molds and made resin, fiberglass, and/or foam casts from for our build.
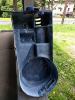
You may be asking yourself, “Okay, so they cast that pretty styrene master, but after they made the molds, what did they end up doing with the master!?” Good question. . .
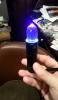
We painted it and used it to celebrate July 4th!


My next post will consist of the building up of our actual gear. Until next time!
You may know my buddies and me; you may not. What I would say is that my friends and I have been building Ghostbusters props for years. After years and years of building movie gear, we realized that we wanted to be a little different, so we set upon a 12 month process. Out of those 12 months, Mr. Jack Doud and I got together every weekend from January until New York Comicon in October for this project, minus 1 or 2 weeks. Needless to say, there was a lot of work put into these packs. Let me walk you through our journey. I hope you are excited to wade through a fraction of the 100’s of photos we took!
Building the Master
First and foremost, we needed reference. Jack Doud and myself took to screen capping from the show itself, but we quickly realized that the size of the packs changed CONSTANTLY. Because of that, we ended up sticking to the production images done for the show Bible, such as this one:
With our source material squared away, we then did a quick mock up in an evening with foamcore, so we could figure out our dimensions. . .
We also worked out the body of the wand as well.
Once we had our dimensions worked out, we then set upon a 2 ½ month period of scratch building the master out of 0.125 styrene. It took us almost 3 months to create the master because we wanted it as smooth as possible so we had as little clean up as possible on the casts.
As you look at these build photos of the master, I would like to point out that we added an extra inch of material to the overall depth of the pack, for molding purposes. This would then let us make a clean cut with a rotary tool on our fiberglass casts.
After we finished up the master for the pack shell, Jack then moved onto making a master for the wand.
For sake of cutting out a good chunk of the build process, I am not going to really go into the molding process. We made silicone molds and made resin, fiberglass, and/or foam casts from for our build.
You may be asking yourself, “Okay, so they cast that pretty styrene master, but after they made the molds, what did they end up doing with the master!?” Good question. . .
We painted it and used it to celebrate July 4th!
My next post will consist of the building up of our actual gear. Until next time!
Attachments
-
 22343542_10210326028447576_1849057508_o_zpswekqqmm4.jpg129.4 KB · Views: 102
 -
 8898fa72311fed0bf632c761a9853902_zpsttrussva.gif103.1 KB · Views: 147
 -
 IMG_20161203_144045_zps19tnjvc1.jpg242 KB · Views: 147
 -
 IMG_20161203_165321_zps9yokam76.jpg246.1 KB · Views: 151
 -
 IMG_20161203_180255_zpsfq1v34k4.jpg220.1 KB · Views: 145
 -
 IMG_20170108_171850_zpshpby2pj8.jpg192.8 KB · Views: 147
 -
 IMG_20161203_181802_zpsqcecb1fw.jpg283.5 KB · Views: 146
 -
 IMG_20170108_171904_zpsqamucz4d.jpg204.6 KB · Views: 154
 -
 IMG_20170129_165322_zpspp7d1v3e.jpg213.8 KB · Views: 150
 -
 IMG_20170129_165012_zps1n2vipp1.jpg216.6 KB · Views: 138
 -
 IMG_20170205_204624_zps3kf4pg7u.jpg186.1 KB · Views: 143
 -
 IMG_20170212_201516_zpsofzdt765.jpg263.4 KB · Views: 142
 -
 IMG_20170225_165952_zpswqjt6uim.jpg273.3 KB · Views: 154
 -
 IMG_20170225_215553_zpsxtkp4hze.jpg270.2 KB · Views: 135
 -
 17692319_10113382165175604_438116430_o_zps7s5f66ue.jpg80.4 KB · Views: 92
 -
 17759150_10113382164521914_2026864008_o_zpscs4tuwvp.jpg98.8 KB · Views: 90
 -
 18676382_10101146290292258_664797967_o_zpsjwj7w5vi.jpg65.8 KB · Views: 94
 -
 18644297_10101146290257328_2038361347_n_zpsji7hogxu.jpg67.3 KB · Views: 92
 -
 18601649_10101146290252338_610336427_n_zpsxtzbwhwg.jpg50.2 KB · Views: 95
 -
 19451540_10101175946236508_460581545_o_zpsnhipzqct.jpg80.8 KB · Views: 95
 -
 18788863_10101155258699498_1507438846_n_zpsr6zomlub.jpg102.8 KB · Views: 91
 -
 19449244_10101177732142538_1893239584_o_zpsap6ml50h.jpg85.2 KB · Views: 105
 -
 22343542_10210326028447576_1849057508_o_zpswekqqmm4.jpg129.4 KB · Views: 109
 -
 8898fa72311fed0bf632c761a9853902_zpsttrussva.gif103.1 KB · Views: 153
 -
 IMG_20161203_165321_zps9yokam76.jpg246.1 KB · Views: 153
 -
 IMG_20161203_144045_zps19tnjvc1.jpg242 KB · Views: 132
 -
 IMG_20170108_171850_zpshpby2pj8.jpg192.8 KB · Views: 131
 -
 IMG_20161203_181802_zpsqcecb1fw.jpg283.5 KB · Views: 139
 -
 IMG_20161203_180255_zpsfq1v34k4.jpg220.1 KB · Views: 125
 -
 IMG_20170129_165322_zpspp7d1v3e.jpg213.8 KB · Views: 132
 -
 IMG_20170129_165012_zps1n2vipp1.jpg216.6 KB · Views: 127
 -
 IMG_20170108_171904_zpsqamucz4d.jpg204.6 KB · Views: 130
 -
 IMG_20170205_204624_zps3kf4pg7u.jpg186.1 KB · Views: 131
 -
 IMG_20170225_165952_zpswqjt6uim.jpg273.3 KB · Views: 139
 -
 IMG_20170212_201516_zpsofzdt765.jpg263.4 KB · Views: 138
 -
 IMG_20170225_215553_zpsxtkp4hze.jpg270.2 KB · Views: 131
 -
 17692319_10113382165175604_438116430_o_zps7s5f66ue.jpg80.4 KB · Views: 79
 -
 17759150_10113382164521914_2026864008_o_zpscs4tuwvp.jpg98.8 KB · Views: 85
 -
 18676382_10101146290292258_664797967_o_zpsjwj7w5vi.jpg65.8 KB · Views: 90
 -
 18644297_10101146290257328_2038361347_n_zpsji7hogxu.jpg67.3 KB · Views: 104
 -
 19451540_10101175946236508_460581545_o_zpsnhipzqct.jpg80.8 KB · Views: 94
 -
 18788863_10101155258699498_1507438846_n_zpsr6zomlub.jpg102.8 KB · Views: 92
 -
 18601649_10101146290252338_610336427_n_zpsxtzbwhwg.jpg50.2 KB · Views: 107
 -
 19449244_10101177732142538_1893239584_o_zpsap6ml50h.jpg85.2 KB · Views: 113
Last edited by a moderator: