CONSTANTINE SERIES LIGHTER

DrConstantine

Sr Member
RPF PREMIUM MEMBER
So let's start, at the beginning.

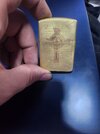
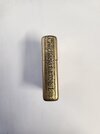
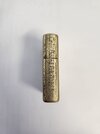
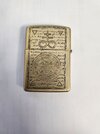
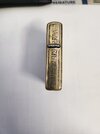
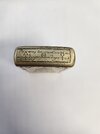
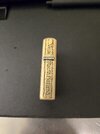
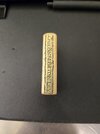
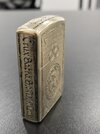
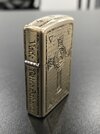
I am a blond nerd with ADHD who used to smoke. about a month ago I was cleaning my car, and found my old lighter, it was a zippo style lighter (the manufacturer is ZORRO) with three sides engraved or moulded/stamped inspired by the Lighter used in the Constantine film.

This sent me down a rabbit hole, I picked up some lighter fluid and remembered how much fun it is to fidget with a lighter. The ones that I bought didn’t have the best hinges so I would buy them in bulk.


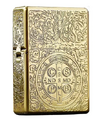
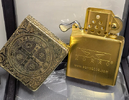
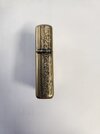
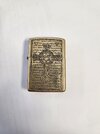
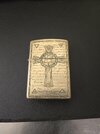
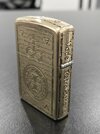
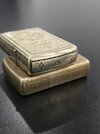
So we went to AliExpress, and the rabbit hole got deeper, there are a ton of different lighters based on the Constantine movie design. I ended up looking into Zorro as a brand and they have two primary models the 902(S) and the 912(S) the “s” in brackets refers to their Zippo Armor equivalent.


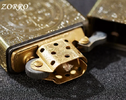
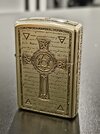
The 902 is more or less equivalent to the Zippo Armor but heavier and about 2mm taller.

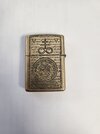
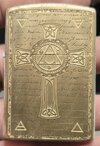
The 912 is a completely different beast, it’s machined out of solid brass and is twice the weight at 146 grams.


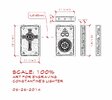
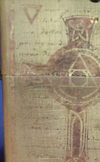
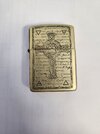
I ended up buying some Zippos and Zorros to take them somewhere to get engraved, doing some digging I discovered that Production Designer Dave Blass posted the design on Twitter on December 20th, 2023, the tweet is linked at the bottom of this post. The design wasn't the best quality so I ran it through an Upscaler I found online.


Then I had another dumbass idea, I’ll buy a laser engraver from Amazon and do it myself.


I ended up getting the ELEGOO PHECDA 10w laser.


I then discovered that this laser cannot engrave brass. However, it can cut out a mask that I can use electrolysis to etch into the brass.


I first tried to use a Pastidip-like material but getting everything lined up correctly was a pain. If it wasn’t lined up properly then I would waste a day painting the lighter, so I went to Reddit. I found that Kapton tape was a highly recommended masking material, so I ended up ordering some on amazon which is expected to be delivered today!


Attachments

  • constantine_lighter2_upscaled.jpg
    constantine_lighter2_upscaled.jpg
    1.7 MB · Views: 293
  • constantine lighter.jpg
    constantine lighter.jpg
    117.4 KB · Views: 218
  • Constantine 912-2.png
    Constantine 912-2.png
    260.2 KB · Views: 203
  • Constantine 912-1.png
    Constantine 912-1.png
    304.2 KB · Views: 168
  • Constantine 902.png
    Constantine 902.png
    307.4 KB · Views: 212
Last night I tested the Kapton Tape and the electrolysis etching.

In this test I discovered that the hurdle with both the laser and the tape is the residue from the adhesive, it requires some scrubbing to get down to the brass. With scrubbing, we run into the risk of the tape pealing given how fine the details are.

So we are scraping the tape, and going back to the Plastidip.

From earlier tests, the masking was cleaner, but the application was far more time-consuming.

The tests are going to be the front design of the lighter as it has the finest details.
 

Attachments

  • TEST ONE.jpg
    TEST ONE.jpg
    142.7 KB · Views: 119
  • Screenshot 2024-06-06 074359.png
    Screenshot 2024-06-06 074359.png
    189.8 KB · Views: 122
it's about 1.5" in diameter. You print it on a laser printer in reverse and then transfer it to the metal with heat. An iron will work. I have a laminator that I use for flat stock and mini iron that I use for curved surfaces.
 
it's about 1.5" in diameter. You print it on a laser printer in reverse and then transfer it to the metal with heat. An iron will work. I have a laminator that I use for flat stock and mini iron that I use for curved surfaces.
That's good to know! I'll see how my next laser test goes and formulate a plan
 
That was electro-chemically etched using HCL and PH-down mixture if I recall correctly. I can find the recipe if you need it.
 
You cal always use the spray paint method for masking.

Spray the whole part in black spray paint, then use the laser engraver to burn off the paint in the areas you want etched. That way you won't have to deal with any residues from the kaptan tape and will resort in a cleaner mask.
 
You cal always use the spray paint method for masking.

Spray the whole part in black spray paint, then use the laser engraver to burn off the paint in the areas you want etched. That way you won't have to deal with any residues from the kaptan tape and will resort in a cleaner mask.
Thats what I'm gong to be testing either tonight or tomorrow, debating on how it turns out I might rework the graphic so i can get cleaner lines and more of the detail
 
So I spent the weekend testing out a variety of paints for masking, curing time and durability. I haven't found one that I think will work quite right.

There are two more that I want to test, a mechanic paint pen, and nail polish—those I will be testing over the next few days.

In addition to that, I also want to test a clear coat of nail polish because why not.

Over the weekend I went through the image and re-did all the background text and some of the lines, as the upscaling I did washed out some of the finer details.

1718116106723.png
 
SO!

Over the weekend I was able to get some progress made on these lighters.

On test one, I painted all sides and lasered off the mask. Not all sides were perfectly centered but hey it was a test.

For the electrolysis, my plan was to go with the Q-tip method, but that was taking far longer than I was hoping for. Luckily I ordered some Ferric Chloride as a backup. I quickly got the bottom painted and set it in the acid for an unknown amount of time.

Here are the results

I did some research on acid etching and everything I read said the ferric chloride would eat the hinge, but that turned out not to be true (see Picture test 1.4) I went back into the file and added a blank space to accommodate the hinge. For these test, I got three identical Zippos and on this lighter the spacing on the hinge to the lower body has a ridiculous gap which I can only assume didn't help with the acid bath,
 

Attachments

  • test 1.5.jpg
    test 1.5.jpg
    65.4 KB · Views: 138
  • test 1.4.jpg
    test 1.4.jpg
    91.7 KB · Views: 155
  • test 1.3.jpg
    test 1.3.jpg
    149.7 KB · Views: 150
  • test 1.2.jpg
    test 1.2.jpg
    78.1 KB · Views: 126
  • test 1.1.jpg
    test 1.1.jpg
    154.8 KB · Views: 136
Last edited:
For test two I was more cautious about my alignment, and covering the hinge adequately with paint.

As I mentioned in the previous post, I modified the design to accommodate the hinge.

Once I was happy with the placement the lighter went into the acid, I had it soaking in the acid for 40 min and I think turned out quite nice.

The etch isn’t as deep so the next one will probably go in for a full hour.

I still want to go over it with some Brass Black to make it pop a bit more, and in doing so see how it reacts with the Methyl Hydrate paint thinner I am using to remove the mask paint and will give it a good polish after the fact.

The defect on this Zippo is the lid is deformed so it closes tight but doesn’t open as smoothly.
 

Attachments

  • TEST 2.1.jpg
    TEST 2.1.jpg
    177.1 KB · Views: 109
  • TEST 2.2.jpg
    TEST 2.2.jpg
    83.1 KB · Views: 102
  • TEST 2.3.jpg
    TEST 2.3.jpg
    170.9 KB · Views: 105
  • TEST 2.4.jpg
    TEST 2.4.jpg
    83.8 KB · Views: 95
  • TEST 2.5.jpg
    TEST 2.5.jpg
    84.4 KB · Views: 94
Nice work, I would have expected etch through blemishes with the paint but it looks very clean. Interested in seeing what happens with the longer etch.
 
on test one, there were some blemishes in the top, if you look at picture test 1.5 on the left hand side you can see a few spots
 
I was just looking at the references and I apparently have to front and back faces reversed according to the dave blass post.
But every replica i can find has the orientation is the same as mine

1718652976028.png
 
While I was getting the third lighter painted and prepped for the laser, I took the liberty to coat the second lighter with some Brass Black. After some light sanding to remove the excess, this is how it came out!

1718718917016.png
1718718935231.png


1718718950252.png
1718718966597.png
1718719000819.png


All in all it looks great. I will say that lighter three definitely will need to soak longer so I gan get deeper details on the front of the lighter.
 
I got a new fibre laser for this because I wasn't a big fan of the acid etching and I tested this on one of my last Zorro 902 lighters.

I re-did the art again, and I think I have a total of 80 hours in just re-doing the graphic, but this time I did it in a vector file to work better with the laser, and I'm happy with the results, I have some tweaking to do with the alignment and dimensions of the graphic.

The first picture is right after I pulled it off the laser bed, the rest are just with a basic polish
 

Attachments

  • 20250127_081252.jpg
    20250127_081252.jpg
    1.2 MB · Views: 65
  • 20250127_081245.jpg
    20250127_081245.jpg
    1.4 MB · Views: 55
  • 20250127_081236.jpg
    20250127_081236.jpg
    1.4 MB · Views: 57
  • 20250127_081223.jpg
    20250127_081223.jpg
    1.6 MB · Views: 58
  • 20250127_081217.jpg
    20250127_081217.jpg
    1.5 MB · Views: 55
  • 20250125_233722.jpg
    20250125_233722.jpg
    921.7 KB · Views: 61
I fixed the alignment and dimensions, and dialed in the perimeters, gave it a close to mirror finish.
Let me know what you think!
 

Attachments

  • 20250203_073712.jpg
    20250203_073712.jpg
    1.1 MB · Views: 55
  • 20250203_074123.jpg
    20250203_074123.jpg
    835.6 KB · Views: 54
  • 20250203_074135.jpg
    20250203_074135.jpg
    919.2 KB · Views: 57
  • 20250203_074200.jpg
    20250203_074200.jpg
    889.4 KB · Views: 53
  • 20250203_074258.jpg
    20250203_074258.jpg
    963.3 KB · Views: 58
That looks excellent! A very nice, deep etch. How many passed did you have to do?
 
Back
Top