4str0m3ch
Well-Known Member
My daughter asked me to make a belt like Ahsoka's for her lightsaber. She loves the character (as do I) and so we started looking at images of her various costumes. The live action one caught my eye as something achievable, so I started digging into some reference photos and found some that I could work with.
So, what would I need? First things first, a suitable belt as a base. I needed something leather like, but with a rustic feel. Looking at photos, the back of this amazon find would work well. Initially I was thinking the bow would work to secure it, but I soon realised my daughter's waist size was way too small.

Next I'd need some dark cotton webbing for the lace. I went with a dark blue 20mm which is nice and thin while still having heft.

Next I'd need a metal hoop for the front. I figured 50mm would be roughly the same width as the belt. I was right, and when I sanded down to give it some weathering, I discovered it's actually a copper colour underneath which made it unique.

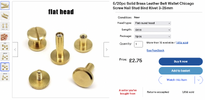
Finally, we need some studs to secure the ribbon to the belt. Brass, of course. I've recently fallen in love with Chicago screws. They are great for securing things, and can look very at home in Star Wars.

First thing I did was measure up how much of the belt I'd need on my little model, then trim off the laces, and sew down the raw edge. Then I lay out where all the screws would go, and cut out holes ready. I measured equidistance from the front to the back and 10mm from top and bottom for the two crossover screws. I then cut two slits at the back on each end to feed the four cotton laces through.

Next, I figured a drybrush of black and burnt umber acrylics would take the edge off the bright brown pleather effect, which aged it and made ti look more like the original belt.

I strapped up the ring, held in place with their own holes in the belt, and then fed through zig zagging the other Chicago screws and then through the slits at the back.

I was very happy with the end result. It's a surprisingly simple build, but very effective. The last thing I did was add a d-ring hook to hang her lightsaber.


And here it is modelled, with my lightsaber, to demonstrate the final working product!

Down the line, I'm hoping to add some white embroidery floss, saddle stitched across the top and bottom as well, but that needs new equipment which I have in my queue of future purchases.
So, what would I need? First things first, a suitable belt as a base. I needed something leather like, but with a rustic feel. Looking at photos, the back of this amazon find would work well. Initially I was thinking the bow would work to secure it, but I soon realised my daughter's waist size was way too small.
Next I'd need some dark cotton webbing for the lace. I went with a dark blue 20mm which is nice and thin while still having heft.
Next I'd need a metal hoop for the front. I figured 50mm would be roughly the same width as the belt. I was right, and when I sanded down to give it some weathering, I discovered it's actually a copper colour underneath which made it unique.
Finally, we need some studs to secure the ribbon to the belt. Brass, of course. I've recently fallen in love with Chicago screws. They are great for securing things, and can look very at home in Star Wars.
First thing I did was measure up how much of the belt I'd need on my little model, then trim off the laces, and sew down the raw edge. Then I lay out where all the screws would go, and cut out holes ready. I measured equidistance from the front to the back and 10mm from top and bottom for the two crossover screws. I then cut two slits at the back on each end to feed the four cotton laces through.
Next, I figured a drybrush of black and burnt umber acrylics would take the edge off the bright brown pleather effect, which aged it and made ti look more like the original belt.
I strapped up the ring, held in place with their own holes in the belt, and then fed through zig zagging the other Chicago screws and then through the slits at the back.
I was very happy with the end result. It's a surprisingly simple build, but very effective. The last thing I did was add a d-ring hook to hang her lightsaber.
And here it is modelled, with my lightsaber, to demonstrate the final working product!
Down the line, I'm hoping to add some white embroidery floss, saddle stitched across the top and bottom as well, but that needs new equipment which I have in my queue of future purchases.