Mojoatomic
New Member
Hi all, new to the group.
I'm pretty much a Blade Runner freak, so... I started on a replica of the 2049 Binoculars from JON-A-TRON & Empiricus. Excellent models. Outstanding work gents.
I also followed PaulH's build and got some major inspiration. I just completed 3D printing the parts (Whew!) and, after making a few mods - I've settled on some design changes.
I love the overall movie prop, but I wanted to make a few changes for my prop replica (homage?); anyway, you be the judge. The concept was "Make a similar model to Deckard's binoculars, from the same company, but a slightly different model."
Here's what I have fo far -
All parts printed
Some parts sanded/primed (more primer on order)
Settled on design goals (more on that later...)
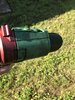
As you can see - there are differences. Just as PaulH did, I added screws to panels - it's a super nice look. I designed a few of my own parts and installed them. The biggest deviation, however, is on the front end - I just NEVER liked the ocular viewing end of the original prop - it seemed an afterthought and a missed opportunity. In my prop, I added a Mamiya M42 lense I had laying around, and I really like the look.
So this is the state of the project as of this evening - some parts as you can see require prep work - but it's all there. More later as progress is made -


I'm pretty much a Blade Runner freak, so... I started on a replica of the 2049 Binoculars from JON-A-TRON & Empiricus. Excellent models. Outstanding work gents.
I also followed PaulH's build and got some major inspiration. I just completed 3D printing the parts (Whew!) and, after making a few mods - I've settled on some design changes.
I love the overall movie prop, but I wanted to make a few changes for my prop replica (homage?); anyway, you be the judge. The concept was "Make a similar model to Deckard's binoculars, from the same company, but a slightly different model."
Here's what I have fo far -
All parts printed
Some parts sanded/primed (more primer on order)
Settled on design goals (more on that later...)
As you can see - there are differences. Just as PaulH did, I added screws to panels - it's a super nice look. I designed a few of my own parts and installed them. The biggest deviation, however, is on the front end - I just NEVER liked the ocular viewing end of the original prop - it seemed an afterthought and a missed opportunity. In my prop, I added a Mamiya M42 lense I had laying around, and I really like the look.
So this is the state of the project as of this evening - some parts as you can see require prep work - but it's all there. More later as progress is made -


")