Griffworks
Well-Known Member
For some reason Im' still not really feelin' it for working on my Moebius Pegasus, being built as the Battlestar Atlantia. So, I decided to pull out one of my Moebius Battlestar Galactica kits and build it, since I don't have one even started - tho do have a Timeslip Creations Galactica that's roughly halfway finished.
Anyhow, I thought I could sort of play around with this particularly build, as I'd like to add some additional armor plates and gun positions to it, sort of like what we saw in "Blood & Chrome" on both Galactica and the other Battlestars she's cruising with at the end of the movie. This will be the Pacifica, however, one of the other TOS battlestar names I've always wanted to build.
For this build, I'm using the ParaGrafix Modeling System Hull Inserts and the name plate and registry number from this Battlestar Galactica Detail Set. I'm going to use some resin cast parts to replace one of the detail pieces that I've obsessed over, as well as will likely use the Timeslip Creations resin Battlestar Turrets. I might change my mind and add some extra Pegasus guns, tho, and I'll explain why....
This is the "Blah, blah, blah!" part that most folks will want to ignore. Just sayin'....
In my lil' BSG 'Verse, Pacifica was one of the original 12 Battlestars built at the beginning of the Cylon War. She's one of three that survived to the end of the war, the others being Atlantia and Galactica. While there were a handful of other ships of the same Jupiter-class (from the series bible) that were built later in the war, those few others which survived had taken heavy damage and were either scrapped or put into Reserve Fleet status within ten years of the end of the war. The original three survivors, however, served honorably for nearly three decades before Atlantia was scrapped and the second of the Mercury-class took her place. Galactica and Pacifica continued their service until only Galactica remained when Pacifica was Retired approximately three years before The Fall of the Colonies. She was officially listed as Scrapped.
But she wasn't.
She became a part of what was called The Shadow Fleet - a top secret operation wherein ships which still had at least a year or heavy combat in them were put into an Operational Reserve Fleet status. The people manning these ships were mostly Retired or recently Honorably Separated Colonial Fleet Officers and Enlisted personnel who served as a sort of beefed-up skeleton crew for these ships, which were hidden in a distant, uninhabitable star system just outside of The Red Line. Pacifica is one of those ships, and one of only four battlestars in the Shadow Fleet. The idea is that these ships can be called upon as a quick replacement fleet in case the Cylon's attacked with a larger force than the Colonial Fleet could easily repel without taking heavy losses with her ships. Instead of having surviving crews that had no ship or had a ship so badly damaged it was going to be in Drydock for months at a time, those Fleet personnel could be shifted to one of these ships.
Start reading again here, "Blah, blah, blah!" is done. You're about to see some purty pikshurs.
So, my rationale for some differences in her lines will be the above back story. I'm thinking of adding a pair of fixed super-frak canons sort of like the two dual canons that the Mercury-class has, but these will be under the chin. She'll definitely get extra gun mounts, but those might end up being Pegasus guns as a sort of "uprate" to her systems.
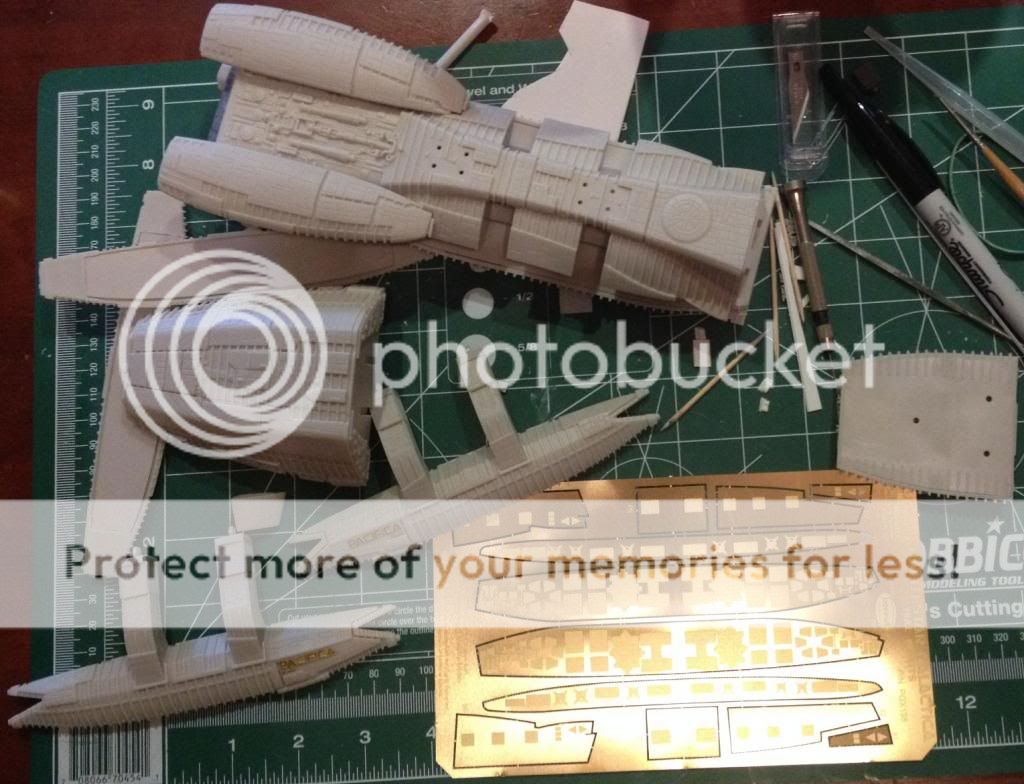
I'd already started on the hull components before I thought to start taking pics. This is one of the "hand-me-down" kits that I picked up from someone selling theirs and had already been started - the top and bottom portions of the Gator Head were glued together. I added the PGMS name plate and registry plate, then drilled out the RCS thrusters with a fairly small pine-vise drill.

Instead of making a hole as large as the represented opening, I went with something smaller, as I always sort of considered this to be more of a rocket-engine shaped nozzle then just an large exhaust hole. I sort of like how it looks, anyhow. Plus, we never actually saw these thrusters being used - i.e. never saw any flashes of hot gases/exhaust. So, a bit of artistic license has been used.

The PGMS Hull Inserts are great and have a snug fit. Make sure to follow the installation directions, tho, and dry fit the pieces. You'll have to do a bit of bending in a few spots so that they'll fit properly.

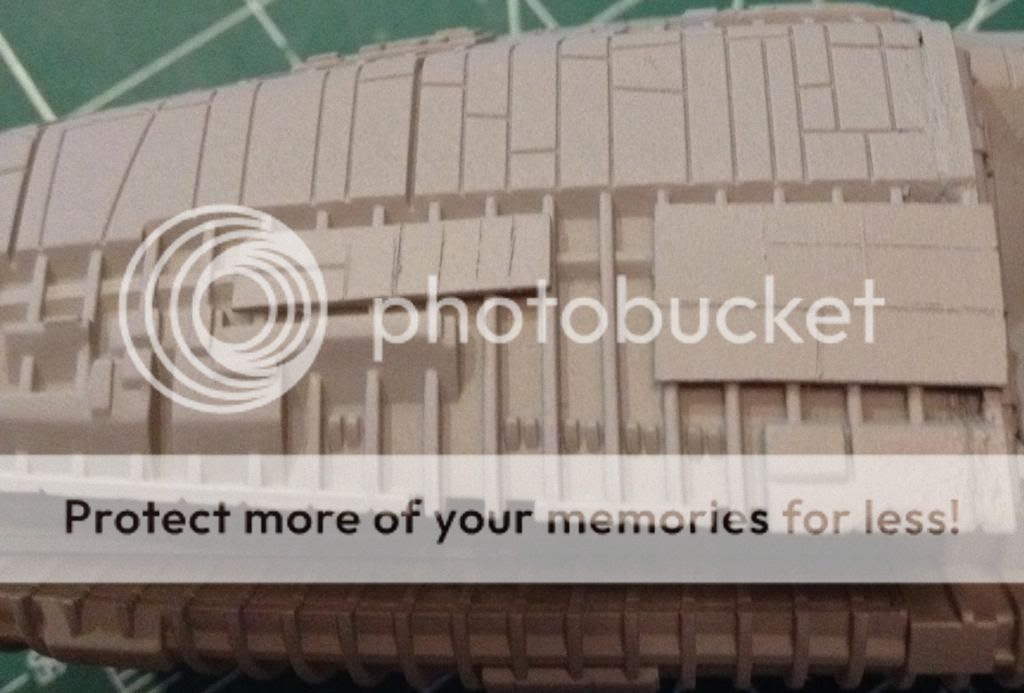
I had considered adding Aptivaboy's guns, but decided I just didn't like them on this hull. They look kick-ass on a Mercury-class, tho!
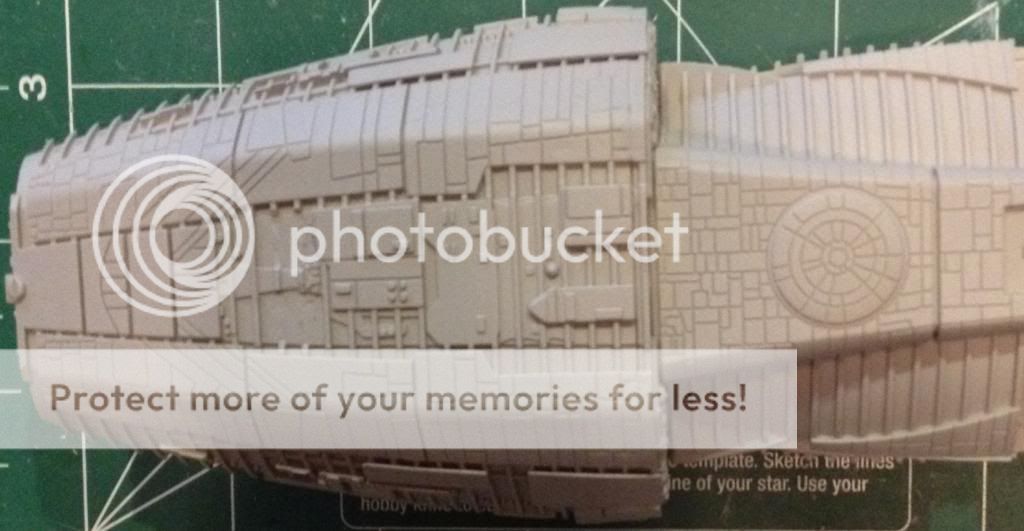
I cut some .010" sheet stock to shape, sanded it an have started adding it to a few locations. I've also cut out some of the ribbing on the top of the Gator Head in anticipation of adding additional guns to those areas.
I tried my hand at scribing panel lines in the additional hull plates I added. I might have to remove these or putty and try re-scribing. I mostly am playing around with this at this point, trying to get an idea of how best to scribe the panel lines. I did these free-hand. Prolly get a larger sheet and use a straight edge or some Dymo tape to scribe them. Then I'll just cut up the larger sections to the sizes that I want.
You can see some more pics in the PhotoBucket Album for Battlestar Pacifica Each individual pic has some additional text added to it, as well, if you click on the individual images.
Anyhow, I thought I could sort of play around with this particularly build, as I'd like to add some additional armor plates and gun positions to it, sort of like what we saw in "Blood & Chrome" on both Galactica and the other Battlestars she's cruising with at the end of the movie. This will be the Pacifica, however, one of the other TOS battlestar names I've always wanted to build.
For this build, I'm using the ParaGrafix Modeling System Hull Inserts and the name plate and registry number from this Battlestar Galactica Detail Set. I'm going to use some resin cast parts to replace one of the detail pieces that I've obsessed over, as well as will likely use the Timeslip Creations resin Battlestar Turrets. I might change my mind and add some extra Pegasus guns, tho, and I'll explain why....
This is the "Blah, blah, blah!" part that most folks will want to ignore. Just sayin'....
In my lil' BSG 'Verse, Pacifica was one of the original 12 Battlestars built at the beginning of the Cylon War. She's one of three that survived to the end of the war, the others being Atlantia and Galactica. While there were a handful of other ships of the same Jupiter-class (from the series bible) that were built later in the war, those few others which survived had taken heavy damage and were either scrapped or put into Reserve Fleet status within ten years of the end of the war. The original three survivors, however, served honorably for nearly three decades before Atlantia was scrapped and the second of the Mercury-class took her place. Galactica and Pacifica continued their service until only Galactica remained when Pacifica was Retired approximately three years before The Fall of the Colonies. She was officially listed as Scrapped.
But she wasn't.
She became a part of what was called The Shadow Fleet - a top secret operation wherein ships which still had at least a year or heavy combat in them were put into an Operational Reserve Fleet status. The people manning these ships were mostly Retired or recently Honorably Separated Colonial Fleet Officers and Enlisted personnel who served as a sort of beefed-up skeleton crew for these ships, which were hidden in a distant, uninhabitable star system just outside of The Red Line. Pacifica is one of those ships, and one of only four battlestars in the Shadow Fleet. The idea is that these ships can be called upon as a quick replacement fleet in case the Cylon's attacked with a larger force than the Colonial Fleet could easily repel without taking heavy losses with her ships. Instead of having surviving crews that had no ship or had a ship so badly damaged it was going to be in Drydock for months at a time, those Fleet personnel could be shifted to one of these ships.
Start reading again here, "Blah, blah, blah!" is done. You're about to see some purty pikshurs.
So, my rationale for some differences in her lines will be the above back story. I'm thinking of adding a pair of fixed super-frak canons sort of like the two dual canons that the Mercury-class has, but these will be under the chin. She'll definitely get extra gun mounts, but those might end up being Pegasus guns as a sort of "uprate" to her systems.

I'd already started on the hull components before I thought to start taking pics. This is one of the "hand-me-down" kits that I picked up from someone selling theirs and had already been started - the top and bottom portions of the Gator Head were glued together. I added the PGMS name plate and registry plate, then drilled out the RCS thrusters with a fairly small pine-vise drill.

Instead of making a hole as large as the represented opening, I went with something smaller, as I always sort of considered this to be more of a rocket-engine shaped nozzle then just an large exhaust hole. I sort of like how it looks, anyhow. Plus, we never actually saw these thrusters being used - i.e. never saw any flashes of hot gases/exhaust. So, a bit of artistic license has been used.

The PGMS Hull Inserts are great and have a snug fit. Make sure to follow the installation directions, tho, and dry fit the pieces. You'll have to do a bit of bending in a few spots so that they'll fit properly.

I had considered adding Aptivaboy's guns, but decided I just didn't like them on this hull. They look kick-ass on a Mercury-class, tho!

I cut some .010" sheet stock to shape, sanded it an have started adding it to a few locations. I've also cut out some of the ribbing on the top of the Gator Head in anticipation of adding additional guns to those areas.

I tried my hand at scribing panel lines in the additional hull plates I added. I might have to remove these or putty and try re-scribing. I mostly am playing around with this at this point, trying to get an idea of how best to scribe the panel lines. I did these free-hand. Prolly get a larger sheet and use a straight edge or some Dymo tape to scribe them. Then I'll just cut up the larger sections to the sizes that I want.
You can see some more pics in the PhotoBucket Album for Battlestar Pacifica Each individual pic has some additional text added to it, as well, if you click on the individual images.


