Bandai Speederbike build - COMPLETED

Attirex

Well-Known Member
Hey, guys:

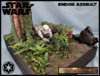
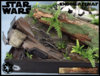
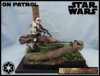
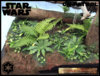
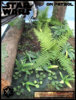
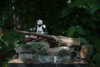
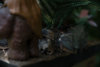
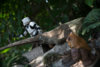
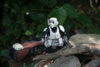
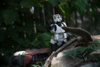
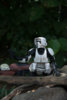
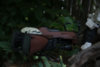
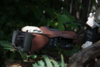
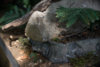
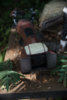
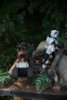
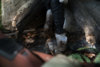
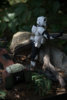
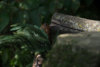
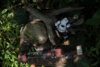
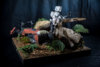
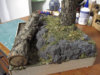
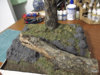
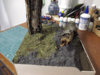
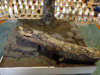
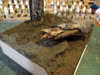
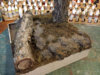
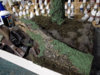
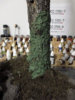
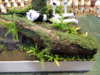
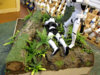
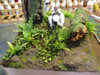
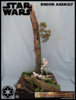
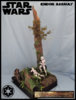
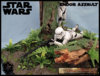
I'm almost done with this kit, just need to do something with that awful base. I want to dress it up with some in-scale landscaping, but have no experience with model RR type foliage. I'd like to add some grass and dirt, a few ferns and maybe another plant. Any recommendations? Note that finding something in 1/12 scale is probably a challenge, and unfortunately I don't have time to create any plants from scratch (I think some RR modelers do this?). Is there a shapeways for scale foliage lol? Probably a stretch...

Thanks so much!
 
Look for dollhouse stuff since that tends to be around 1/12 or so

for example


Michaels or AC Moore probably has a section with stuff like that in it

also found these...


combine that with some sticks you find outside to represent logs

I also find stuff like Orchid planting material to give some nice bits for miniature bases
 
Thanks for suggestions! Appreciate it. I hadn't thought about dollhouse stuff. And there's a Michael's within walking distance. Hm.
 
Plastic fish tank plants work great and if they are plastic looking I give them washes. I also use 1:1 scale fake ferns from the local craft store and cut the tops off for scale and real tree branches work great as well.
 

Attachments

  • ea12.JPG
    ea12.JPG
    175.5 KB · Views: 256
  • ea13.JPG
    ea13.JPG
    186.2 KB · Views: 252
  • op1.JPG
    op1.JPG
    133.7 KB · Views: 252
  • op12.JPG
    op12.JPG
    204.5 KB · Views: 224
  • op16.JPG
    op16.JPG
    207.2 KB · Views: 242
Bingo! That's def one of those "why didn't I think of that" suggestions. All sorts of good plastic aquarium plants online. Thanks! Those are some awesome builds, too.

Now just need to figure how out how to do ground cover. I'm guessing that RR grass/dirt that you pour onto glue would work? Doesn't have to be anything to complex.
 
A lot of the garage kit figure modelers us the RR ground cover (ballast) and grass.
And yes, lay down some glue with a spray bottle and sprinkle on, usually a couple layers in a mix of colors.
 
Plastic fish tank plants work great and if they are plastic looking I give them washes. I also use 1:1 scale fake ferns from the local craft store and cut the tops off for scale and real tree branches work great as well.
Wow great dioramas, I really like the Endor Assault
 
Here's my speeder dio. I just used dirt from the yard, really fine dirt. Brought it inside put it on a cookie sheet in the oven at 200 degrees to make sure it was good and dry then sprinkled it down and sprayed it with a mixture of white glue and water. Once that was done I used dried leaves and put them in the coffee grinder and repeated the same application process. I used real rocks, some had moss already on them, and real branches. The elevated section of rock, with the branch on it, was done with a Woodland Scenics Rock Faces learning kit. The plants are the tips from a plastic fern I bought at Michael's craft store. After I was finished I made sure to clean any evidence from the cookie sheet and coffee grinder lest my girlfriend find out what I'm doing with all of the kitchen utensils. I also 3d printed an Ewok and other forest creatures to add interest. I loved working on this dio, it was my first of hopefully many!
 

Attachments

  • SpeederBike-1.jpg
    SpeederBike-1.jpg
    4.1 MB · Views: 221
  • SpeederBike-2.jpg
    SpeederBike-2.jpg
    3 MB · Views: 237
  • SpeederBike-3.jpg
    SpeederBike-3.jpg
    3.3 MB · Views: 219
  • SpeederBike-4.jpg
    SpeederBike-4.jpg
    2.1 MB · Views: 195
  • SpeederBike-5.jpg
    SpeederBike-5.jpg
    3 MB · Views: 207
  • SpeederBike-6.jpg
    SpeederBike-6.jpg
    2.9 MB · Views: 213
  • SpeederBike-7.jpg
    SpeederBike-7.jpg
    2.6 MB · Views: 208
  • SpeederBike-8.jpg
    SpeederBike-8.jpg
    2.6 MB · Views: 211
  • SpeederBike-9.jpg
    SpeederBike-9.jpg
    2.1 MB · Views: 196
  • SpeederBike-10.jpg
    SpeederBike-10.jpg
    2.4 MB · Views: 193
  • SpeederBike-11.jpg
    SpeederBike-11.jpg
    4 MB · Views: 169
  • SpeederBike-12.jpg
    SpeederBike-12.jpg
    3.9 MB · Views: 167
  • SpeederBike-13.jpg
    SpeederBike-13.jpg
    3.1 MB · Views: 181
  • SpeederBike-14.jpg
    SpeederBike-14.jpg
    3.1 MB · Views: 174
  • SpeederBike-15.jpg
    SpeederBike-15.jpg
    2.2 MB · Views: 169
  • SpeederBike-16.jpg
    SpeederBike-16.jpg
    3.1 MB · Views: 170
  • SpeederBike-17.jpg
    SpeederBike-17.jpg
    2.9 MB · Views: 167
  • SpeederBike-18.jpg
    SpeederBike-18.jpg
    2.5 MB · Views: 174
  • SpeederBike-19.jpg
    SpeederBike-19.jpg
    3.5 MB · Views: 184
  • SpeederBike-20.jpg
    SpeederBike-20.jpg
    4.1 MB · Views: 196
  • SpeederBike-1-2.jpg
    SpeederBike-1-2.jpg
    3.6 MB · Views: 211
Your dio looks awesome, RP.

So I guess another option is to use actual grass, dirt, rocks, etc. Much cheaper, too. :D
 
Bingo! That's def one of those "why didn't I think of that" suggestions. All sorts of good plastic aquarium plants online. Thanks! Those are some awesome builds, too.

Now just need to figure how out how to do ground cover. I'm guessing that RR grass/dirt that you pour onto glue would work? Doesn't have to be anything to complex.

Hope the dio is going well and if you haven't already started on the ground cover as of yet I use a mix of bark, very thin sticks, lichen moss, dried leaves and throw them al into a old blender and give it a few rotation until I'm happy with the result. Once I'm happy I pour the mix into a container then apply sand, dirt and static grass and then mix al then together.

When applying the ground cover I just use PVA glue and once dry remove the excess back into the container for other projects and then use Vallejo's Chocolate Brown and apply it over the mix with a medium wash. A medium wash is when you have the paint watered down but not totally thinned out by the water. Here are pics of the process of one of my Endor dios for the ground cover.

Pic 1, 2 & 3 - is when the ground cover has been applied and dried with the excess removed.

Pic 4, 5 & 6 - is the was of Vallejo's Chocolate Brown was it has dried.

Pic 7 & 8 - Is the moss attached to the tree's which was done by mixing two tablespoons of fine sand and one and half tablespoons of spakfilla and a teaspoon of PVA mixed together and with a small amount of mixed in to give you a thick pancake type consistency then applied on with a brush. Once dry I used medium watered down Vallejo's light green to get the colour I wanted.

Pic 9, 10 & 11 - the plastic plants are attached along with static grass clumps from Army Painter.

Pic 12, 13 & 14 - are just a few pics of the completed dio.

Ron
 

Attachments

  • end3.JPG
    end3.JPG
    182.6 KB · Views: 112
  • end2.JPG
    end2.JPG
    196.7 KB · Views: 101
  • end4.JPG
    end4.JPG
    164.3 KB · Views: 99
  • IMG_3404.JPG
    IMG_3404.JPG
    183.3 KB · Views: 104
  • IMG_3405.JPG
    IMG_3405.JPG
    183 KB · Views: 107
  • IMG_3406.JPG
    IMG_3406.JPG
    204.3 KB · Views: 97
  • IMG_3409.JPG
    IMG_3409.JPG
    179.6 KB · Views: 103
  • IMG_3410.JPG
    IMG_3410.JPG
    148.7 KB · Views: 109
  • IMG_3432.JPG
    IMG_3432.JPG
    194 KB · Views: 115
  • IMG_3434.JPG
    IMG_3434.JPG
    207.9 KB · Views: 116
  • IMG_3435.JPG
    IMG_3435.JPG
    209.5 KB · Views: 102
  • ea1.JPG
    ea1.JPG
    125.8 KB · Views: 113
  • ea6.JPG
    ea6.JPG
    124.3 KB · Views: 115
  • ea12.JPG
    ea12.JPG
    175.5 KB · Views: 105
  • ea10.JPG
    ea10.JPG
    170.3 KB · Views: 124
Thanks for the awesome info, Ron! Unfortunately, I already finished the build. As you can see, nowhere near as involved (or as good) as what you do lol; I just wanted to dress up Bandai's provided base, which is bland and ugly. But I will keep your tips on file for next time. :p

I decided to punt on re-doing the bed roll, and scratched some small comms/sensor boxes for the back. I'm not sure why you never see different types of equipment back there--so many possibilities.

Broke off the right handlebar braces while taking photos. Oops. I scratched a new one, but too lazy to retake photos. :p

Also, found a good deal on the Sideshow R5 in Japan via eBay. Thought the red panels were too orange/pink, so repainted them and added a heavier grime wash.

Thanks for looking and as usual, sorry for the crappy smartphone photography. One day I'll get proper lighting.......

c37b4uw.png


Z3wrxRt.png


gM5I5EO.png


iqonYk5.png


G2oUtok.png


bDE9U6X.png


olCdSdU.png


0GorT0G.png


4P94gj8.png


AF2ciKu.png


DNwBzbG.png
 
Back
Top