You are using an out of date browser. It may not display this or other websites correctly.
You should upgrade or use an alternative browser.
You should upgrade or use an alternative browser.
Bandai 1/72 Millennium Falcon
- Thread starter Roboted
- Start date

Hunk a Junk
Sr Member
I couldn't help myself and started work on the back wall
View attachment 751919
Not sure how the little holes and details on this piece could work with 3d printing, since this will be pretty small.
Oh sweet! Can't wait to see this finished.
Hunk a Junk
Sr Member
Cool.I've started this but haven't decided if I want to bother. Maybe I'll devote my energy to making a proper ANH full sized set model and leave it at that.
If it helps push you, nkg, then please bother!
Maybe this is getting on the right track.
View attachment 746788View attachment 746789View attachment 746790
You were right, this is definitely how it was done. This actually helped me a lot when modeling.
I had to make the Morgan part unmodified and then cut into it and added various shapes to get here:

Hunk a Junk
Sr Member
I had to make the Morgan part unmodified and then cut into it and added various shapes to get here:
View attachment 752054
That's looking spot on. What I might do is scratch build the cockpit interior 1:1 to the studio model in cardboard just to get a sense of the shapes and angles so that building it in 1:72 will be easier. I wish I had access to a Morgan kit, but your CG representations are the next best thing.
That's looking spot on. What I might do is scratch build the cockpit interior 1:1 to the studio model in cardboard just to get a sense of the shapes and angles so that building it in 1:72 will be easier. I wish I had access to a Morgan kit, but your CG representations are the next best thing.
I can easily upload these to Shapeways, just as soon as they are done and I know the diameter of the Bandai's cockpit.
JoeCS is doing such a fine job - I don't feel I need to compete.
I could assemble the 2D graphics perhaps.
And thanks! I've been using some of your resources from https://sites.google.com/site/millenniumfalconnotes/five-foot-cockpit, I don't want to act like these designs came out of thin air.
Well we're all assembling this stuff from all over the place!
I've already done a first round at the Morgan seats. But I don't have the tools to do a truly accurate model - mine is a fairly crude representation. However I figure when it's printed out at 1:72 it'll be pretty small and thus acceptable. It'd be cool if Maruska were to release his beautifully crafted models, but I obviously have no idea what his plans are for those. He's chosen to release some of his work to the community, but not everything.
I've already done a first round at the Morgan seats. But I don't have the tools to do a truly accurate model - mine is a fairly crude representation. However I figure when it's printed out at 1:72 it'll be pretty small and thus acceptable. It'd be cool if Maruska were to release his beautifully crafted models, but I obviously have no idea what his plans are for those. He's chosen to release some of his work to the community, but not everything.
For the Morgan base that the seats sit on, there is a moment in that youtube review of the kit where he holds the part parallel to the camera, so I took a screenshot of that and made a model. This meant that the length and width of the part's base and details were proportioned correctly, just not the height. I then took this model and aligned and scaled it with my photogrammetry model mentioned earlier ^^^ so that I could adjust the height to be proportioned correctly with the other dimensions.
I did not, however, make the curvature of the center console accurate (yet) because most of it will be covered up with the seats and other parts.
I would also like to say that I am pretty much making these models for 3d printing. I do not feel that they are as accurate as one might want for studio scale. Like nkg mentioned, where my model may be off a few millimeters in studio scale really makes no difference in the tiny 1/72 scale of the Bandai. Nevertheless, I will try to make the models public when they are done, for whoever wants to look at them.
Also:

I'm working pretty fast, it's addicting
I did not, however, make the curvature of the center console accurate (yet) because most of it will be covered up with the seats and other parts.
I would also like to say that I am pretty much making these models for 3d printing. I do not feel that they are as accurate as one might want for studio scale. Like nkg mentioned, where my model may be off a few millimeters in studio scale really makes no difference in the tiny 1/72 scale of the Bandai. Nevertheless, I will try to make the models public when they are done, for whoever wants to look at them.
Also:
I'm working pretty fast, it's addicting
Last edited:

Hunk a Junk
Sr Member
The nice thing about this cockpit is that it almost completely exists inside the dimensions of the cockpit cone (except for the "fan" visible through the rear wall opening). That gives me hope that I can make a swappable cockpit that fits in front of the rear walls of the Bandai live action set cockpit interior that extends into the tube arm structure. Pop off the cockpit cone, remove the studio miniature module, replace with Han and Chewie and viola! (I hope)
astroboy
Master Member
Because I can't wait until christmas, I want to start prepping my system now...
1.- Battle damage with dremil and with blade
2- use maskol for damage showing bare plastic
3- Flat black rattlecan
4-wiring
5-assemble model components
6- As-20 base coat with erratic squiggles (Using airbrush)
7-some salt technique in certain damaged areas
8-thinned AS-20 top coat
9-Taping panels
10-maskol and salt for damage
11-paint panels
12-decals
13-light sand to reveal bits of basecoat on edges
14-gloss clear topcoat.
15-oils. (blues, greys, starship filth, whites) not really large wash. Just in spots and then blended
16-gloss clear topcoat
17-oils. more specific rust bits
18-Flat clear topcoat
19-. Streaking using pigments q-tip. Possibly airbrush as well if I'm feeling confident. USE tape for straight lines
20-. Flat clear topcoat
21-Spatter. (three colours. Light grey, grey, and yellow/beige) VERY thin with wide floppy flat brush. Limp wristed. like small rain drops
22.- Flat clear topcoat
23- Engine exhaust using pigments and q-tip. (note that exhaust on 5 footer goes straight back
24- Final top coat.
I'm going to have to experiment with the clear coat layers. I didn't realize until lately that if you use gloss coats, the oils go on much nicer. And apparently, if you use flat at the end, it gets rid of the shine
Will your battle damage include warping and bending of some of the overhanging panels? If so, what is going to be your approach? I know with the 1/144 you could just bend them with needle nose pliers. The plastic Bandai uses seems pretty pliable in general.Because I can't wait until christmas, I want to start prepping my system now...
1.- Battle damage with dremil and with blade
astroboy
Master Member
Absolutely!Will your battle damage include warping and bending of some of the overhanging panels? If so, what is going to be your approach? I know with the 1/144 you could just bend them with needle nose pliers. The plastic Bandai uses seems pretty pliable in general.
We'll have to see when they come. I think I used my teeth on the 1/144
Attachments
Roboted
Well-Known Member
Absolutely!
We'll have to see when they come. I think I used my teeth on the 1/144
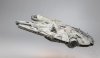
That is a truely beutiful looking falcon you did there. If i could get my 1/72 PG falcon even halfway to how good that looks i would be forever proud,Awesome stuff!!!!!!
astroboy
Master Member
Thank you to give the photographer some serious credit. It doesn't look at all that good in personThat is a truely beutiful looking falcon you did there. If i could get my 1/72 PG falcon even halfway to how good that looks i would be forever proud,Awesome stuff!!!!!!
Roboted
Well-Known Member
Thank you to give the photographer some serious credit. It doesn't look at all that good in person
Like me, im sure you are your own worst critic
I only tend to see the flaws in the finished models i built.It takes a year or so to forget the mistakes and appreciate what i have done good.
I think I will just keep updates on this thread, since I am basically making this for the Bandai kit and there should only be a handful more.
Seats done:

I think it's interesting that the normal orientation for the Morgan chairs is flipped in the falcon, so that the backs are now down. I also had no idea that the seats were elevated so much, but I guess it makes sense because the front consoles would have otherwise covered them up.
Seats done:
I think it's interesting that the normal orientation for the Morgan chairs is flipped in the falcon, so that the backs are now down. I also had no idea that the seats were elevated so much, but I guess it makes sense because the front consoles would have otherwise covered them up.
Similar threads
- Replies
- 11
- Views
- 1,021
- Replies
- 4
- Views
- 1,636
- Replies
- 9
- Views
- 1,964