sethhendrix
New Member
*** This is my first time posting to the forums, so please forgive any newbie mistakes I make. Thank you! ")
So my girlfriend (Raychul Moore) has recently gotten me into cosplay and prop/armor building. Since then, I have built tons of armor/weapons/accessories and have also joined the 501st Legion with my recently completed ANH Stormtrooper armor. Big thanks to Raychul for getting me into all of this awesomeness! Anyway, last year she decided to start doing an Assassin's Creed Ezio cross-gender cosplay and needed a really good belt/buckle combo to complete her outfit. She had previously purchased one off of Etsy, but it was way oversized for her torso and kinda of flimsy/crappy overall. So I decided to build her a belt/buckle combo that would fit right, look legit, and last a long time. So here's how I did it:
PHASE 1: Sculpting the Buckle
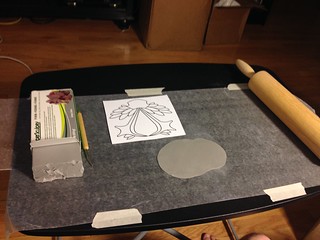
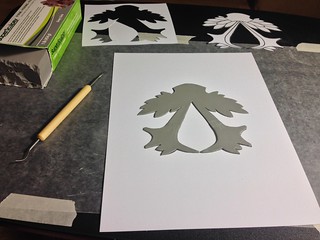
I decided to start with the buckle. I found an official image through Google search of Ezio and the belt. I downloaded it and pulled it into Photoshop on my computer. I measured Raychul's torso so I would know the proper size/scale for the buckle. I then isolated the buckle, created an outline template, and adjusted it to the proper size. I printed this template out so I could sculpt on top of it for size/shape reference.
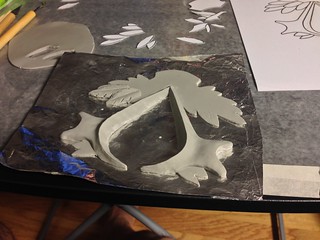
I decided to use firm Sculpey (grey) to do the sculpt - as I knew there would be many layers for the leaves and detailing and I wanted to be able to bake/harden it in phases, so that it wouldn't lose its shape as I added to it.
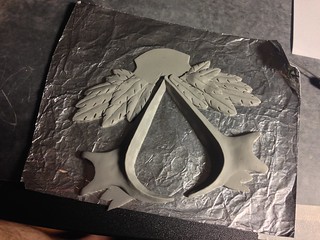
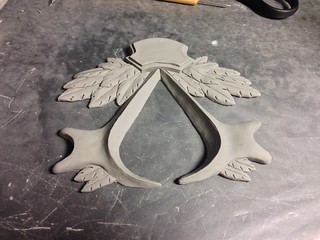
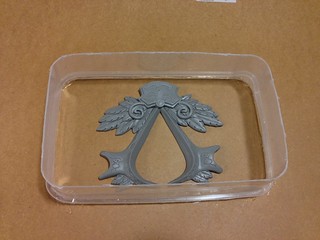
I began by sculpting a flat base in the shape of the buckle that would serve as a foundation for the rest of the detail work. I baked that. Then I made the wishbone section - paying special attention to the height and sharpness of the angles. I baked that. I moved on to the leaves next, making each one individually and layering them on top of each other to match the reference pictures. I baked that. Then I added to top section and the red jewel platform - which took quite a bit more work than expected, as everything needed to stack just right and maintain sharp angles. I baked all of that.
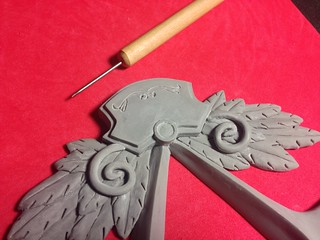
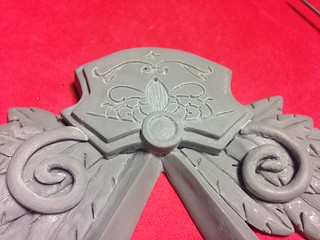
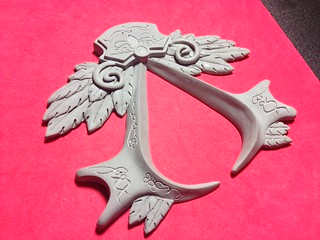
Next it was time to do the fine detailing. Everything has been baked to hardness at this point, so I decided to etch the designs with a sharp tool. The exact design was difficult to make out from the reference pictures, so I did my best at etching something that looked as close as possible. Once the designs were etched into the buckle, I gave it a light sanding with 800 grit sandpaper and sprayed it will acrylic spray to prepare it for molding.
PHASE 2: Creating the Mold
Sculpey is great to create a prototype or maybe even a final art piece for display. But this buckle needed to be sturdy, slightly flexible, and long-lasting. Plus, I was so proud of it - I knew I was going to want to make multiple copies. So I decided to mold it and cast it in hard resin. This was my very first time molding something... and frankly, my first time even sculpting something, too! So I did my research as best I could on how to do it and what to use, mostly by watching YouTube videos. I don't know how people learned anything before YouTube! Haha!
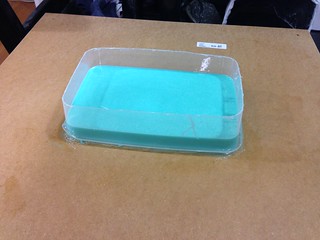
First, I took a flat board and hot-glued a piece of tupperware onto it to serve as the mold reservoir. I sealed the edges so no rubber could leak out. I then hot glued (so it wouldn't shift while the rubber was curing) the finished buckle onto the board in the center of the tupperware. FYI, there's lots of ways to do this - but I just kinda winged it with what I had.
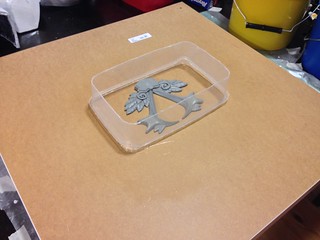
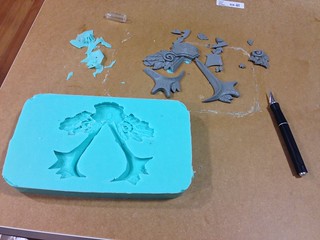
The molding rubber I used was Mold Star 15 SLOW from Smooth-On. It was recommended to me from a salesman at Reynolds Advanced Materials in Burbank (where I purchased it) because it cures slowly and has very low bubble issues. I let the mold cure overnight. Sadly, when I tried to remove the prototype buckle from the mold - it broke apart into many pieces. Good news though - the mold came out excellent! A little trimming of the edges and I was ready to mix some resin!

PHASE 3: Casting the Resin Buckle
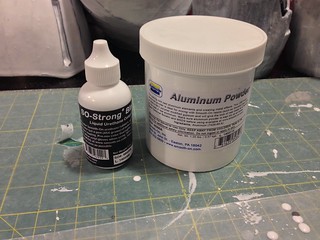
Now that I had a solid mold for the buckle - it was time to make one! Because the "real" buckle is made of metal - I decided to use a blend of Smooth-Cast 325 Colormatch clear resin, aluminum powder, and SO-Strong Black Tint to make the final product. The exact blend can be found on YouTube in a Smooth-On tutorial for cold-casting metal art pieces. I sprayed the interior of the mold with release agent and then poured (over-poured actually... oops) the mixture into the mold.
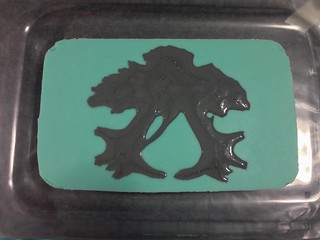
I waited about an hour, popped it out, and here's the rough resin casting of the buckle (after cleaning up the flashing and doing a little sanding).
PHASE 4: Painting & Detailing the Buckle
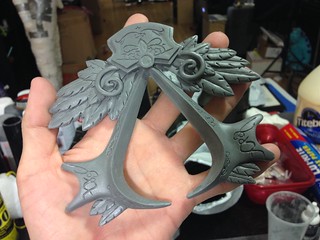
Because I had used aluminum powder in the resin mixture, I thought that I would be able to lightly sand the buckle and use a metal scouring pad to bring it to a metal-like finish. But for some reason, no matter how much I worked at it - it still looked pretty dull to me. So I decided that painting it was a better route. There were lots of options for how to paint it - spray paint, craft paint, metal flaking, etc, etc - but I decided to use Rub'n Buff (Silver Leaf) for the aluminum color. You can find it online or sometimes at your local Michael's store. It comes in like 30 different shades/colors and you rub it on with your finger. It also dries almost instantly, which is awesome! But FIRST, before painting on the silver color, I wanted to make sure the etching/details really stood out - and add a lot of aging grit and grime to the buckle overall. I did this by giving it an initial coat of black shoe-polish - and really grinding the polish into the corners and grooves.

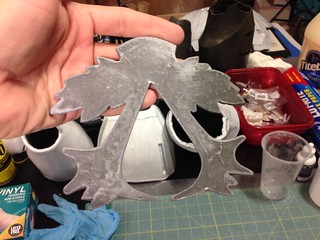
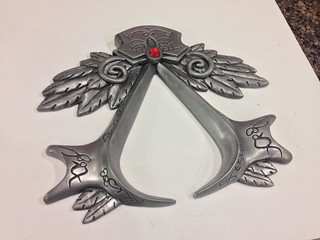
Next, I rubbed on the silver leaf Rub'n Buff (the name of this stuff makes me laugh) and added on the red jewel with a little dot of super glue. The red jewel is from Michael's and comes in a bag of like 500 assorted plastic jewels. Here's the final buckle, worthy of an assassin!
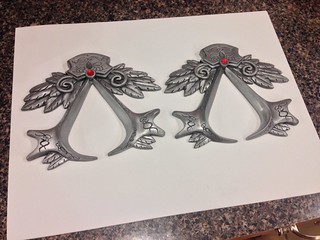
I loved it so much, I decided to make a second one right away! Haha!
PHASE 5: Building the Leather Belt & Red Sash
So now it was time to build the actual leather belt and red sash that Ezio wears underneath the belt. After studying the pictures for hours (literally), I realized that the actual "real" belt was an impossible structure that could not be realistically made. And furthermore, I couldn't attach belt straps & buckles to the resin buckle I just made, because once tension was applied, it would snap apart like a wishbone. So here's what I did...
First, I created an interior structure for the belt out of cheap plastic binders that I got at the 99 Cents Store and a piece of styrene. The purpose of this was so that the belt/sash would always maintain its shape - and the plate could serve as a backing piece for the resin buckle to snap onto.
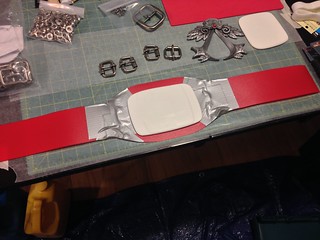
Second, I added snaps to the styrene plate and the back of the resin buckle. I then sprayed the belt interior structure with adhesive and wrapped it with red sash material, making sure to leave folds and ruffling just like Ezio's. I forgot to take pictures of this phase, unfortunately. Whoops!
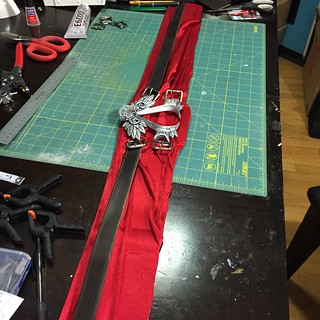
Thirdly, I attached the metal strap buckles with thin wires through holes I drilled into the Styrene. The resin buckle, once attached, will hide the wires and look as if it is connected to the metal strap buckles. I also added white velcro to the ends of the sash part of the belt, so that the whole thing can be put on and taken off very easily without help.
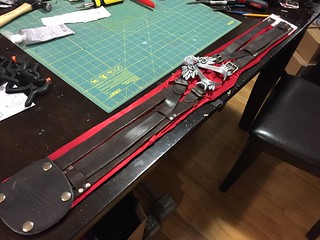
Finally, I cut all of the leather belt straps (1" wide top strap and 2" wide bottom strap) from a shoulder of belt leather that I had aged with some chemicals, sanding, and a little bit of man-handling. I attached the leather straps in pieces (non-functional) with rivets to give an appearance that matched Ezio's belt design. Then I added I back leather plate that attaches with snaps to hide the seam where the belt velcros on. And last of all - I snapped the resin buckle into place on the front plate.

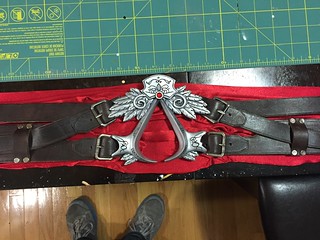
And here it is... THE FINAL Assassin's Creed Ezio Belt & Buckle!
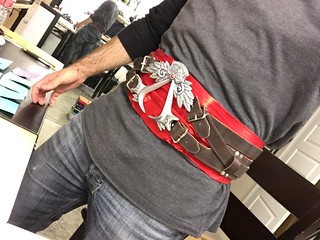
Me trying it on before handing it over to Raychul. (I kinda really wanted to keep it... shhhh)
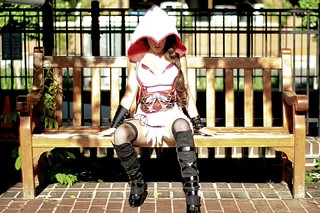
And here's Raychul wearing the belt in her Ezio cosplay! Not bad! :thumbsup
For those of you who are interested, I will be selling a very limited run of the buckles in the Junkyard soon. I'm a new member on TheRPF though, so I have to do all the jumping through hoops before I'm allowed to sell stuff. Send me a PM if you have any questions!
So my girlfriend (Raychul Moore) has recently gotten me into cosplay and prop/armor building. Since then, I have built tons of armor/weapons/accessories and have also joined the 501st Legion with my recently completed ANH Stormtrooper armor. Big thanks to Raychul for getting me into all of this awesomeness! Anyway, last year she decided to start doing an Assassin's Creed Ezio cross-gender cosplay and needed a really good belt/buckle combo to complete her outfit. She had previously purchased one off of Etsy, but it was way oversized for her torso and kinda of flimsy/crappy overall. So I decided to build her a belt/buckle combo that would fit right, look legit, and last a long time. So here's how I did it:
PHASE 1: Sculpting the Buckle
I decided to start with the buckle. I found an official image through Google search of Ezio and the belt. I downloaded it and pulled it into Photoshop on my computer. I measured Raychul's torso so I would know the proper size/scale for the buckle. I then isolated the buckle, created an outline template, and adjusted it to the proper size. I printed this template out so I could sculpt on top of it for size/shape reference.
I decided to use firm Sculpey (grey) to do the sculpt - as I knew there would be many layers for the leaves and detailing and I wanted to be able to bake/harden it in phases, so that it wouldn't lose its shape as I added to it.
I began by sculpting a flat base in the shape of the buckle that would serve as a foundation for the rest of the detail work. I baked that. Then I made the wishbone section - paying special attention to the height and sharpness of the angles. I baked that. I moved on to the leaves next, making each one individually and layering them on top of each other to match the reference pictures. I baked that. Then I added to top section and the red jewel platform - which took quite a bit more work than expected, as everything needed to stack just right and maintain sharp angles. I baked all of that.
Next it was time to do the fine detailing. Everything has been baked to hardness at this point, so I decided to etch the designs with a sharp tool. The exact design was difficult to make out from the reference pictures, so I did my best at etching something that looked as close as possible. Once the designs were etched into the buckle, I gave it a light sanding with 800 grit sandpaper and sprayed it will acrylic spray to prepare it for molding.
PHASE 2: Creating the Mold
Sculpey is great to create a prototype or maybe even a final art piece for display. But this buckle needed to be sturdy, slightly flexible, and long-lasting. Plus, I was so proud of it - I knew I was going to want to make multiple copies. So I decided to mold it and cast it in hard resin. This was my very first time molding something... and frankly, my first time even sculpting something, too! So I did my research as best I could on how to do it and what to use, mostly by watching YouTube videos. I don't know how people learned anything before YouTube! Haha!
First, I took a flat board and hot-glued a piece of tupperware onto it to serve as the mold reservoir. I sealed the edges so no rubber could leak out. I then hot glued (so it wouldn't shift while the rubber was curing) the finished buckle onto the board in the center of the tupperware. FYI, there's lots of ways to do this - but I just kinda winged it with what I had.
The molding rubber I used was Mold Star 15 SLOW from Smooth-On. It was recommended to me from a salesman at Reynolds Advanced Materials in Burbank (where I purchased it) because it cures slowly and has very low bubble issues. I let the mold cure overnight. Sadly, when I tried to remove the prototype buckle from the mold - it broke apart into many pieces. Good news though - the mold came out excellent! A little trimming of the edges and I was ready to mix some resin!
PHASE 3: Casting the Resin Buckle
Now that I had a solid mold for the buckle - it was time to make one! Because the "real" buckle is made of metal - I decided to use a blend of Smooth-Cast 325 Colormatch clear resin, aluminum powder, and SO-Strong Black Tint to make the final product. The exact blend can be found on YouTube in a Smooth-On tutorial for cold-casting metal art pieces. I sprayed the interior of the mold with release agent and then poured (over-poured actually... oops) the mixture into the mold.
I waited about an hour, popped it out, and here's the rough resin casting of the buckle (after cleaning up the flashing and doing a little sanding).
PHASE 4: Painting & Detailing the Buckle
Because I had used aluminum powder in the resin mixture, I thought that I would be able to lightly sand the buckle and use a metal scouring pad to bring it to a metal-like finish. But for some reason, no matter how much I worked at it - it still looked pretty dull to me. So I decided that painting it was a better route. There were lots of options for how to paint it - spray paint, craft paint, metal flaking, etc, etc - but I decided to use Rub'n Buff (Silver Leaf) for the aluminum color. You can find it online or sometimes at your local Michael's store. It comes in like 30 different shades/colors and you rub it on with your finger. It also dries almost instantly, which is awesome! But FIRST, before painting on the silver color, I wanted to make sure the etching/details really stood out - and add a lot of aging grit and grime to the buckle overall. I did this by giving it an initial coat of black shoe-polish - and really grinding the polish into the corners and grooves.
Next, I rubbed on the silver leaf Rub'n Buff (the name of this stuff makes me laugh) and added on the red jewel with a little dot of super glue. The red jewel is from Michael's and comes in a bag of like 500 assorted plastic jewels. Here's the final buckle, worthy of an assassin!
I loved it so much, I decided to make a second one right away! Haha!
PHASE 5: Building the Leather Belt & Red Sash
So now it was time to build the actual leather belt and red sash that Ezio wears underneath the belt. After studying the pictures for hours (literally), I realized that the actual "real" belt was an impossible structure that could not be realistically made. And furthermore, I couldn't attach belt straps & buckles to the resin buckle I just made, because once tension was applied, it would snap apart like a wishbone. So here's what I did...
First, I created an interior structure for the belt out of cheap plastic binders that I got at the 99 Cents Store and a piece of styrene. The purpose of this was so that the belt/sash would always maintain its shape - and the plate could serve as a backing piece for the resin buckle to snap onto.
Second, I added snaps to the styrene plate and the back of the resin buckle. I then sprayed the belt interior structure with adhesive and wrapped it with red sash material, making sure to leave folds and ruffling just like Ezio's. I forgot to take pictures of this phase, unfortunately. Whoops!
Thirdly, I attached the metal strap buckles with thin wires through holes I drilled into the Styrene. The resin buckle, once attached, will hide the wires and look as if it is connected to the metal strap buckles. I also added white velcro to the ends of the sash part of the belt, so that the whole thing can be put on and taken off very easily without help.
Finally, I cut all of the leather belt straps (1" wide top strap and 2" wide bottom strap) from a shoulder of belt leather that I had aged with some chemicals, sanding, and a little bit of man-handling. I attached the leather straps in pieces (non-functional) with rivets to give an appearance that matched Ezio's belt design. Then I added I back leather plate that attaches with snaps to hide the seam where the belt velcros on. And last of all - I snapped the resin buckle into place on the front plate.
And here it is... THE FINAL Assassin's Creed Ezio Belt & Buckle!
Me trying it on before handing it over to Raychul. (I kinda really wanted to keep it... shhhh)
And here's Raychul wearing the belt in her Ezio cosplay! Not bad! :thumbsup
For those of you who are interested, I will be selling a very limited run of the buckles in the Junkyard soon. I'm a new member on TheRPF though, so I have to do all the jumping through hoops before I'm allowed to sell stuff. Send me a PM if you have any questions!