EyeofSauron
Master Member
Well its been quite a while since i posted anything on here, but i am quite proud of this, and thought id share it with you.
In december i decided to make an Arkham knight batsuit with the ultimate goal to make the best version out there. And since the most notable thing about batman is always his cowl, i started with this.
so heres my build for the mask:

first of all, i made a pep file after ripping the 3d model from the game. i debated if i wanted to actually 3d print it, but decided against it because its supposed to be a perfect fit and having no headscan makes it kind of impossible

first attempt at the mask with my makeshift foam headcast, obviously too big
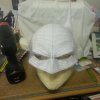
second try looking much better
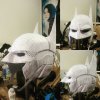
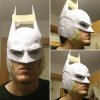
happy with the fit, its time for paper mache. Reason for paper mache is that i cant dump resin on my head, and since i glued the mask to my face around the nose area for a perfect fit, paper mache works in keeping it in that shape perfectly without killing me
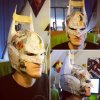
also made a chin insert for the mask for stability reasons. This was made seperately by wrapping my lower face in cling film, then masking tape on top, and then paper mache. once its dried, i put the mask on ontop of it, drew out the allignment, took everything off, and glued it together. who needs a headcast anyway

filling in the ears because i cant paper mache the inside (since my fingers dont taper to the top ) expanding foam works like a charm
View attachment 701703
once i was satisfied with the coverage and stability of my paper mache (1 layer outside, 3 inside), i covered the thing in paperclay (drywall filler is also fine, but paperclay is more resistant). Top half first so i can still set it down without having to fear warpage, bottom half once top is dry
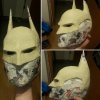
once everything is dry, i draw out all the lines and details for sanding...
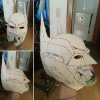
sanding is fun, yeeey. 4 hours later all the mayor details are in, obviously not even close to finished with huge potholes and symetry issues
View attachment 701706
second pass with paper clay and sanding, slowly getting closer
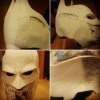
after a while i noticed that the ears were not symetrical. so i added a bit onto one ear (also small adjustments all over still)
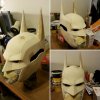
after im happy with the basic shape, its time for finetuning. for this i use sprayfiller (3 layers to start out) top part is what it looks like presanding, bottom is after
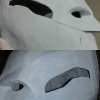
since there was no way i could do the inlay perfectly by hand, i decided to lasercut it. so i drew up the design in illustrator, and off to the lasercutter we went
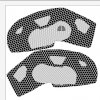
originally i wanted to use acrylic, but since the helmet has rounded shapes, i didnt feel like heatforming the acrylic in layers and fit everything together perfectly. so i came up with the idea of cereal box cardboard, since its laminated and shiny on one side, easy to glue, and bendable. and a coat of paint makes it perfect.
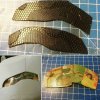
once im happy with the basic surface, its time to get rid of all those pinholes - spotfiller to the rescue!

after i was actually finished, i was shocked to see one ear was shorter than the other. so i sanded it back down, more filler and shaping!
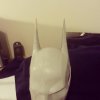
then the first unlucky thing happened, this was supposed to be the final primer coat, but then the can decided to drip...
View attachment 701714
and as if that wasnt unlucky enough, over night, the mask decided to fall off its stand that its been sitting on through the entire build, and trying to commit suicide. this was the aftermath. i was heartbroken, but i fixed it...
and there you have it, the final result, i really love it. Its still gonna get molded and cast in urethane, but thats the boring part everyone has seen millions of times. I hope you enjoyed this (slightly) alternative build, and heres the finished pictures!


View attachment 3dzVkJJ.jpg
View attachment B4aAtuq.jpg
View attachment ueRGt6g.jpg
In december i decided to make an Arkham knight batsuit with the ultimate goal to make the best version out there. And since the most notable thing about batman is always his cowl, i started with this.
so heres my build for the mask:

first of all, i made a pep file after ripping the 3d model from the game. i debated if i wanted to actually 3d print it, but decided against it because its supposed to be a perfect fit and having no headscan makes it kind of impossible

first attempt at the mask with my makeshift foam headcast, obviously too big

second try looking much better


happy with the fit, its time for paper mache. Reason for paper mache is that i cant dump resin on my head, and since i glued the mask to my face around the nose area for a perfect fit, paper mache works in keeping it in that shape perfectly without killing me

also made a chin insert for the mask for stability reasons. This was made seperately by wrapping my lower face in cling film, then masking tape on top, and then paper mache. once its dried, i put the mask on ontop of it, drew out the allignment, took everything off, and glued it together. who needs a headcast anyway

filling in the ears because i cant paper mache the inside (since my fingers dont taper to the top
View attachment 701703
once i was satisfied with the coverage and stability of my paper mache (1 layer outside, 3 inside), i covered the thing in paperclay (drywall filler is also fine, but paperclay is more resistant). Top half first so i can still set it down without having to fear warpage, bottom half once top is dry

once everything is dry, i draw out all the lines and details for sanding...

sanding is fun, yeeey. 4 hours later all the mayor details are in, obviously not even close to finished with huge potholes and symetry issues
View attachment 701706
second pass with paper clay and sanding, slowly getting closer

after a while i noticed that the ears were not symetrical. so i added a bit onto one ear (also small adjustments all over still)

after im happy with the basic shape, its time for finetuning. for this i use sprayfiller (3 layers to start out) top part is what it looks like presanding, bottom is after

since there was no way i could do the inlay perfectly by hand, i decided to lasercut it. so i drew up the design in illustrator, and off to the lasercutter we went

originally i wanted to use acrylic, but since the helmet has rounded shapes, i didnt feel like heatforming the acrylic in layers and fit everything together perfectly. so i came up with the idea of cereal box cardboard, since its laminated and shiny on one side, easy to glue, and bendable. and a coat of paint makes it perfect.

once im happy with the basic surface, its time to get rid of all those pinholes - spotfiller to the rescue!

after i was actually finished, i was shocked to see one ear was shorter than the other. so i sanded it back down, more filler and shaping!

then the first unlucky thing happened, this was supposed to be the final primer coat, but then the can decided to drip...
View attachment 701714
and as if that wasnt unlucky enough, over night, the mask decided to fall off its stand that its been sitting on through the entire build, and trying to commit suicide. this was the aftermath. i was heartbroken, but i fixed it...

and there you have it, the final result, i really love it. Its still gonna get molded and cast in urethane, but thats the boring part everyone has seen millions of times. I hope you enjoyed this (slightly) alternative build, and heres the finished pictures!


View attachment 3dzVkJJ.jpg
View attachment B4aAtuq.jpg
View attachment ueRGt6g.jpg
