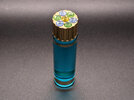
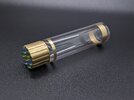
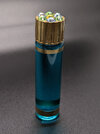
Some time ago, RPF users chubsANDdoggers and cjunco1937 worked together to produce a couple of nice Antidote Vials from Indiana Jones and the Temple of Doom.
They're back, this time as updated, affordable kits!
RUN 1 RESERVATIONS:
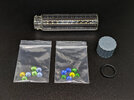
You will receive the following:
Each kit is available for USD $18, shipping included in the Continental United States. For outside this area, please expect us to add $10 to the entire order.
NEW!!!!
I am now also offering FINISHED VIALS for USD $50, shipping included CONUS, $60 overseas. These will come with the gold rings painted on the glass, the cap painted and slightly weathered, and decorated with gems of your choice! Please DM me with your color choice of gems!
(Yes, cjunco1937 and chubsANDdoggers are collecting design commissions for every kit sold!)
ORDERING:
To order and get on the list, send a Private Message to Astyanax with your desired quantity of kits and your mailing address. This will reserve your place on the list for one week. You'll get a response with a PayPal payment address and total cost for your order. Once payment has been received, your kit will be shipped right away. Your status will be updated on the list as your kit is prepared and shipped. If payment is not received within a week, your reservation will be removed and someone else will get your slot in the run.
ABOUT THE RESIN PRINTED CAP:
The caps are 8K resolution prints, which is a very, very fine resolution. Most resin printers in circulation are 4K, some are 8K, and relatively few are 12K. You will find that the lines are sharper and the detail is finer than most resin-cast kits!
There are a few minor flaws here or there. In addition to very fine layer-lines, there are the occasional micro dimples or pimples or single cross-lines or scuffs. These are normal, caused by the printing process or by support structure that held the model in place while printing. The supports have been placed in areas that will not be seen, so no filling should be necessary: it all depends on how much of a stickler you want to be.
The resin is relatively soft; sanding should take seconds on each surface! The entire sanding process and filling process (apart from drying time) should not be more than 5-10 minutes.
We will do our very best to get you parts that are have the minimum of these above artifacts.
ASSEMBLY:
Note: This prop is seen only briefly, and is somewhat weathered in most available photography. Don't feel like you have to be too precise!
![Indiana Jones and the Temple of Doom.mkv_snapshot_00.06.40_[2024.06.07_13.43.11].jpg Indiana Jones and the Temple of Doom.mkv_snapshot_00.06.40_[2024.06.07_13.43.11].jpg](https://therpf-f28a.kxcdn.com/forums/data/attachments/1470/1470669-c3c9c8e0f267acf90566102855d636b0.jpg)
![Indiana Jones and the Temple of Doom.mkv_snapshot_00.08.29_[2024.06.07_13.44.15].jpg Indiana Jones and the Temple of Doom.mkv_snapshot_00.08.29_[2024.06.07_13.44.15].jpg](https://therpf-f28a.kxcdn.com/forums/data/attachments/1470/1470670-3ec45d2553564ae0c37e2925808d6894.jpg)
![Indiana Jones and the Temple of Doom.mkv_snapshot_00.09.02_[2024.06.07_13.45.31].jpg Indiana Jones and the Temple of Doom.mkv_snapshot_00.09.02_[2024.06.07_13.45.31].jpg](https://therpf-f28a.kxcdn.com/forums/data/attachments/1470/1470671-7720e0128a6fee81995e864015e144fb.jpg)
![Indiana Jones and the Temple of Doom.mkv_snapshot_00.11.41_[2024.06.07_13.47.54].jpg Indiana Jones and the Temple of Doom.mkv_snapshot_00.11.41_[2024.06.07_13.47.54].jpg](https://therpf-f28a.kxcdn.com/forums/data/attachments/1470/1470672-c81f05660c184765e80d64caa44b7ff4.jpg)
ENJOY!
They're back, this time as updated, affordable kits!


RUN 1 RESERVATIONS:
- Sanjuro (shipped)
- Jamesfett (shipped)
- Kroenen77 (shipped)
- Kroenen77 (shipped)
- MadCardigan (shipped)
- zort173 (shipped)
- brandons84 (shipped)
- Don93 (shipped)
- mrwax (shipped)
- aeseven7 (shipped)
- archybean (shipped)
- MCINTOSH275 (shipped)
- Pascal Kurosawa (shipped)
- Keiko (shipped)
- probablyjarrett (shipped)
- Bert Fink (shipped)
- jchristman (shipped)
- Aldo The Apache (shipped)
- goldcylon (shipped)
- kurtyboy (shipped)
- darthpaul (shipped)
- JANDERS10 (shipped)
- doriang (shipped)
- 281rm55 (shipped)
- 281rm55 (shipped)
- Fallen21 (shipped)
- TomVDJ (shipped)
- TomVDJ (shipped)
- TomVDJ (shipped)
- lmc3 (shipped)
- kevin926 (shipped)
- Jintosh (shipped)
- NewYorkJones (shipped)
- teecrooz (shipped)
- 281rm55 (shipped)
- 281rm55 (shipped)
- jubjub86 (shipped)
- RedFox79 (shipped)
- ronski (shipped)
- shinema (shipped)
- glottis - FINISHED (shipped)
- glottis - FINISHED (shipped)
- Remote People (shipped)
- MSDHILLS (shipped)
- MSDHILLS (shipped)
- MichaelFuji (shipped)
- jubjub86 (shipped)
- moffeaton (shipped)
- Bootlegger137 (shipped)
- EagleScout (shipped)
- ETSY - BJ (shipped)
- sandbags - FINISHED (shipped)
- ETSY - CL (shipped)
- ETSY - FG (paid)
- ETSY - AH (shipped)
- ETSY - AA (shipped)
- ETSY - RL (shipped)
- ETSY - MK (shipped)
- ETSY - WC (shipped)
- ETSY - JK (shipped)
- juliusjammer (shipped)
- ETSY - RS (shipped)
- ETSY - BJ (shipped)
You will receive the following:

- 6-dram glass vial & original lid.
- Resin 3D-printed threaded cap.
- Rhinestone gems (bold colors).
- Rhinestone gems (subtle colors).
- O-ring seal.
Each kit is available for USD $18, shipping included in the Continental United States. For outside this area, please expect us to add $10 to the entire order.
NEW!!!!
I am now also offering FINISHED VIALS for USD $50, shipping included CONUS, $60 overseas. These will come with the gold rings painted on the glass, the cap painted and slightly weathered, and decorated with gems of your choice! Please DM me with your color choice of gems!
(Yes, cjunco1937 and chubsANDdoggers are collecting design commissions for every kit sold!)
ORDERING:
To order and get on the list, send a Private Message to Astyanax with your desired quantity of kits and your mailing address. This will reserve your place on the list for one week. You'll get a response with a PayPal payment address and total cost for your order. Once payment has been received, your kit will be shipped right away. Your status will be updated on the list as your kit is prepared and shipped. If payment is not received within a week, your reservation will be removed and someone else will get your slot in the run.
ABOUT THE RESIN PRINTED CAP:
The caps are 8K resolution prints, which is a very, very fine resolution. Most resin printers in circulation are 4K, some are 8K, and relatively few are 12K. You will find that the lines are sharper and the detail is finer than most resin-cast kits!
There are a few minor flaws here or there. In addition to very fine layer-lines, there are the occasional micro dimples or pimples or single cross-lines or scuffs. These are normal, caused by the printing process or by support structure that held the model in place while printing. The supports have been placed in areas that will not be seen, so no filling should be necessary: it all depends on how much of a stickler you want to be.
The resin is relatively soft; sanding should take seconds on each surface! The entire sanding process and filling process (apart from drying time) should not be more than 5-10 minutes.
We will do our very best to get you parts that are have the minimum of these above artifacts.
ASSEMBLY:
Note: This prop is seen only briefly, and is somewhat weathered in most available photography. Don't feel like you have to be too precise!
- To prepare the cap, sand the bottom rim lightly with 800-grit sandpaper. This works best if you rub the bottom of the cap against the sandpaper on a hard surface. Also, sand the outer surfaces LIGHTLY with 800-grit sandpaper, if you think it needs it.
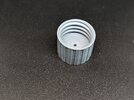
(The tiny hole inside the cap is for you to use something like a skewer or a pencil to suspend the cap for painting.)
- Paint the cap. We used Rustoleum Metallic Gold over black gloss for the finish, and then clear-coated in a water-based gloss. After that, the cap was weathered lightly in a raw umber acrylic wash, which was 99% wiped off. Tamiya TS-21 Gold works really well for the finish as well!
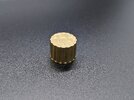
- Choose your rhinestones. There are bold colors and subtle colors provided. You can use either, or even mix and match!
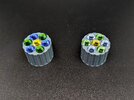
- Glue the rhinestones to the painted cap with a SMALL (1mm) dab of CA glue (superglue) placed in the center of each of the 7 indentations. They are sized to prevent your rhinestones from slipping!
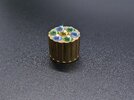
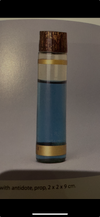
- Paint gold rings on the vial. We accomplished this by masking at the below measurements. If you have a small rubber band, placing that around the vial at the key heights will help you line up your masking tape. Again, Rustoleum Metallic Gold or Tamiya TS-21 work nicely here.
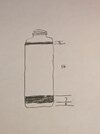
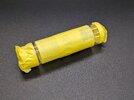
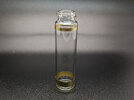
(Dimensions in the drawing above are in millimeters.)
- Place the o-ring inside the cap. It will be a tight fit.
- Fill the vial with your fluid of choice. Listerine Cool Mint mouthwash is a great color match, and it won't grow fungus over time. You can also use food coloring in a 50-50 mix of isopropyl alcohol and water, with a drop or two of Glycerin to prevent settling.
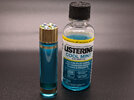
- Screw on the cap very tightly. Be careful not to put fingerprints into the gold cap!
And DO NOT OVER-TIGHTEN, or the cap might crack! You need to find the "sweet spot", where the o-ring is compressed just a little so that the vial remains airtight, but not so far that it puts too much strain on the cap.
A little bit of Vaseline coating the o-ring makes it more effective, and less tightening of the cap will be necessary.
![Indiana Jones and the Temple of Doom.mkv_snapshot_00.06.40_[2024.06.07_13.43.11].jpg Indiana Jones and the Temple of Doom.mkv_snapshot_00.06.40_[2024.06.07_13.43.11].jpg](https://therpf-f28a.kxcdn.com/forums/data/attachments/1470/1470669-c3c9c8e0f267acf90566102855d636b0.jpg)
![Indiana Jones and the Temple of Doom.mkv_snapshot_00.08.29_[2024.06.07_13.44.15].jpg Indiana Jones and the Temple of Doom.mkv_snapshot_00.08.29_[2024.06.07_13.44.15].jpg](https://therpf-f28a.kxcdn.com/forums/data/attachments/1470/1470670-3ec45d2553564ae0c37e2925808d6894.jpg)
![Indiana Jones and the Temple of Doom.mkv_snapshot_00.09.02_[2024.06.07_13.45.31].jpg Indiana Jones and the Temple of Doom.mkv_snapshot_00.09.02_[2024.06.07_13.45.31].jpg](https://therpf-f28a.kxcdn.com/forums/data/attachments/1470/1470671-7720e0128a6fee81995e864015e144fb.jpg)
![Indiana Jones and the Temple of Doom.mkv_snapshot_00.11.41_[2024.06.07_13.47.54].jpg Indiana Jones and the Temple of Doom.mkv_snapshot_00.11.41_[2024.06.07_13.47.54].jpg](https://therpf-f28a.kxcdn.com/forums/data/attachments/1470/1470672-c81f05660c184765e80d64caa44b7ff4.jpg)

ENJOY!
Last edited:
