A Daft Trooper-(TK takes on DP!)

TK9336

Active Member
Hello RPF!

This is my first time posting on these boards. I mostly use this place as a springboard for ideas, so this forum lurker hast come out of the shadows. I catalogue my current Daft Punk build mostly on TDC as it seemed a natural place to start and now here (yes another DP build on these boards...:unsure)

That said, this has been a LONG work in progress, as is anything else in this hobby. Oh the title of the thread? I am the only Stormtrooper I know of who will be doing this project, and I like the moniker. That said, I am also a avid 501st Legionarie and darn proud of it. Also to make ends meet as a college student I am a 11bang bang in the US Army National Guard (eventually getting commissioned in two years :rolleyes). Eventually there will a actual cross over build mashup between the two; but that's when this and 1,000 other things are done first.

Rolling with just a TK/RFT build under my belt I thought I could tackle this, no problem! ...:facepalm

I started with a pepakura Thomas and made one, but not having any experience in pep before it warped. Needless to say it is a easy process once you do it once and learn from mistakes. I also had MrPinksi's beautiful Guy-Man cast but too long in a lacquer paint thinner bath and I learned the properties of polyurethane. It flaked, hardcore. So here I was looking back on a ton of work, blood, sweat and tears; and nothing to show for it. The average guy would take a hint but not this guy! I didn't remake my TK twice over for nothing, it's darn accurate!
[insert video link of Monty Python's castle in the swamp bit.] :behave

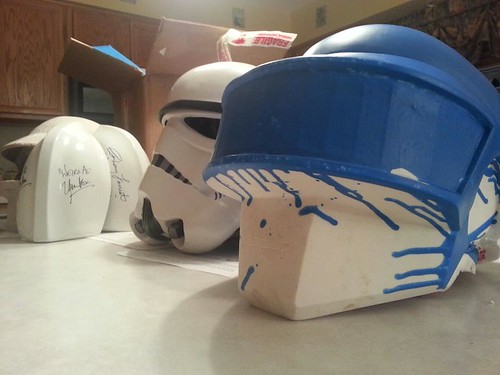
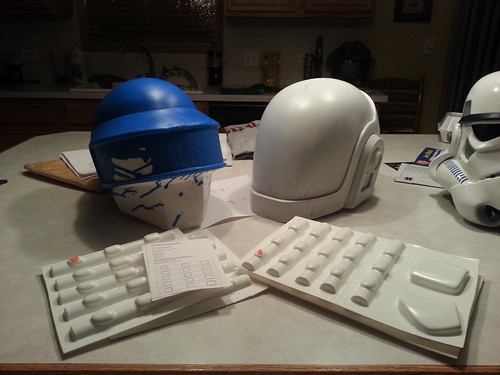
Taking a hint from The Dark Knight Rises a friend of mine asked me what happened when we fall? So I rose up, got two new casts, and re-energized these projects from the ashes of disappointment. What arrived were MrPinksi's Thomas, and Sorenzo's Guy-Man. Also pictured is Firewire's Handplates and of course my TK lid (ATA ANH Stunt...getting RS next year! As proud as I am of my EIB TK that I made at 17 years old, I am itching to work on white armor again [now being 20], especially RS' unbelievable suit! That is if I am not completely broke from this project.) :)

Now, let's get funky.
(Old build pictures are on the flickr, just you know, click the link.)


404038_4591160574227_1657992080_n by TK9336, on Flickr

20121005_231537 by TK9336, on Flickr

20121005_231350 by TK9336, on Flickr

20121005_231619 by TK9336, on Flickr

20121005_223613 by TK9336, on Flickr

20121005_231237 by TK9336, on Flickr


393736_4203193115779_1927063802_n by TK9336, on Flickr


I am incredibly impressed with these new casts. Sorenzo's is the best Guy-Man I've ever seen...he nailed the scale just right. I need to smooth out the dip in Pinski's Thomas' visor but that's not a bigger. Trimming the flash, and filling and sanding is good for the soul. That said I have many other things going on with this build.
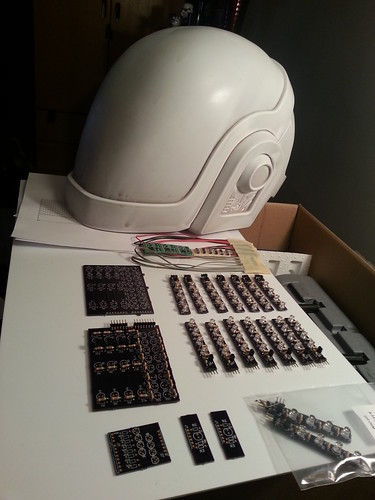
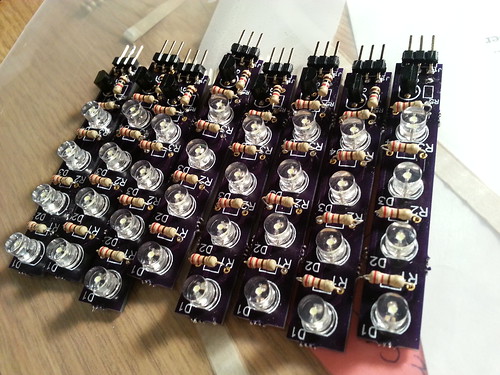
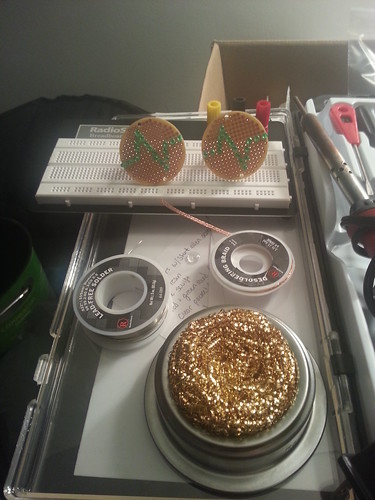
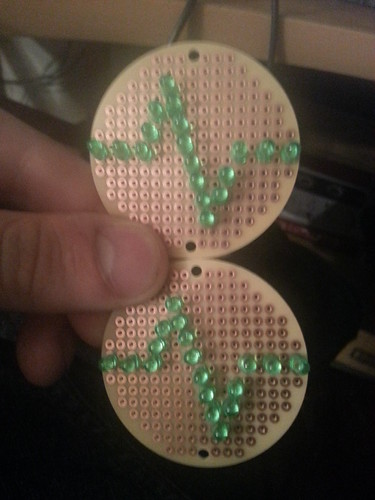
  • Electronics: I will be building Guy Man’s from the ground up starting with Tekparasite’s PCB’s and Donnie’s LED controller for the different sequences. I basically have to put the puzzle together. I need to get LED’s, wires, and resistors. There I am completely lost. Do I get flat tops, or rounds? Is there a big difference? I was told flat top 5mm T1 White clear would do the trick. For Thomas, a fellow from TDC who makes some darn good arrays will be assisting me do Thomas. (I am not trying to re-invent the wheel here. I did pickup two 8 LED controllers for the ear pucks. Volpin’s tutorial is great for it. Though, I am at a conundrum. I have two sets of ear pucks for Thomas…would I be able to switch the cut off tops between lights and having one that’s just the chrome? (In retrospect there would be a line there that would look awful on the overall chrome job, but just food for thought. Because I want to install both light systems in each bucket with rare Earth magnets so they could be removable. Unachievable?) I have my work cut out for me, so I WILL need your help!
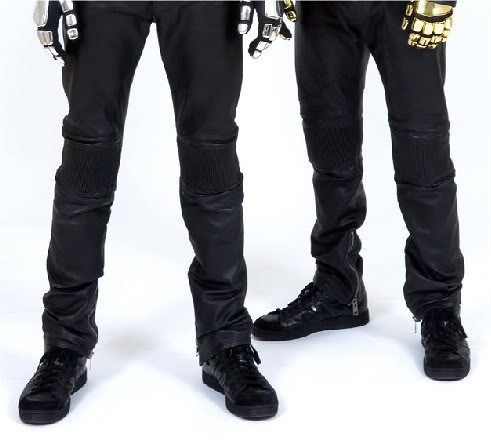
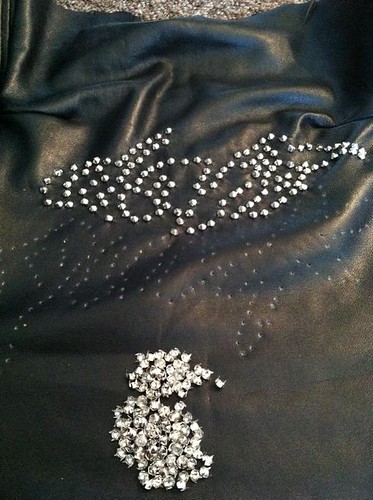
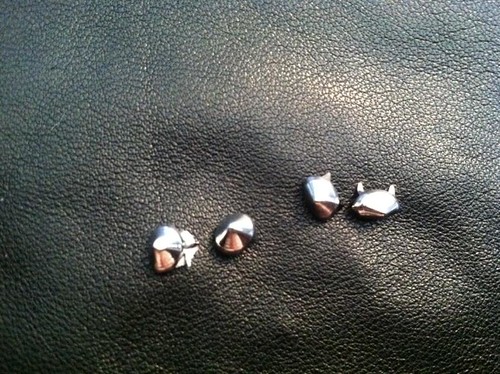
  • Discovery/Human After All Dior Leather suit: Well we’ll never have Dior make us Daft Punk’s leather jacket and pants so I decided to make my own from scratch. Using patterns from QSTQF and over the course of a few months assembled all the needed materials to make this awesome jumper. I thank the site Etsy for having 66ft of Italian lambskin leather from a small farm in Italy available for some dope like me all the way in the US to buy it. It’s beautiful. It will also be done this weekend…huge shout out to my seamstress Heather who also is my 501st trooper sister…where’d I be without the 501st Midwest Garrison!
  • Gloves: Serius Glove inserts will be adorned with Firewire’s vac’d hand plates. Can’t wait for these two to get stuck together!
  • Balaclava: Under Armor.
  • Visors: I will be using RIT dye, and bring water to a temp of no greater than 140 and follow the instructions that others have done before me.
  • Chrome: I am at an impasse. Two chromer’s have come highly recommended, Gary @ Creations’n’Chrome, and Don @ Coat of Chrome. Both have chromed Daft Punk helmets and gloves from artists on here. Is there much of a difference? I might roll with Don based on his excellent customer service as seen on Tek’s build.
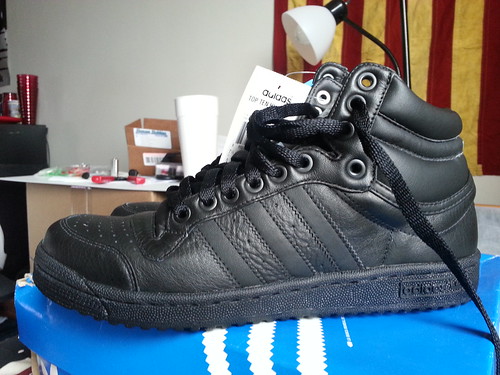
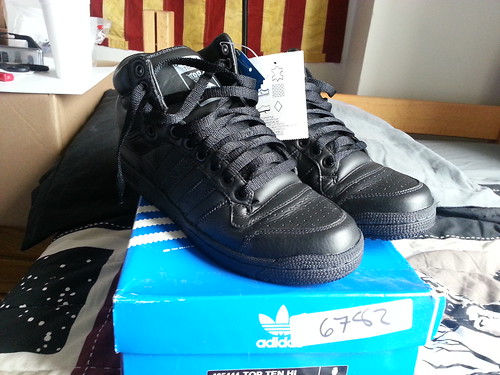
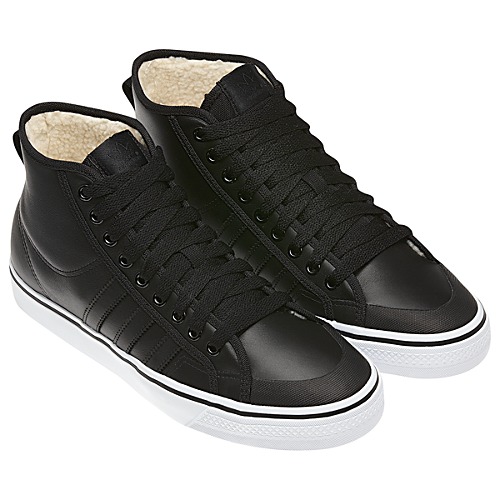
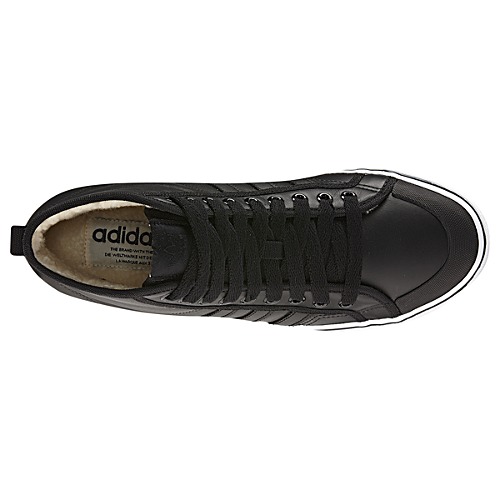
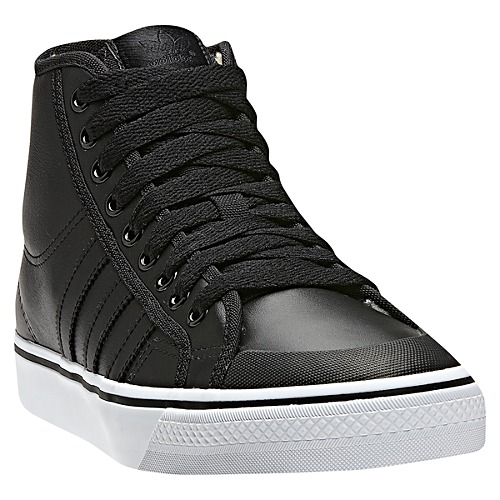
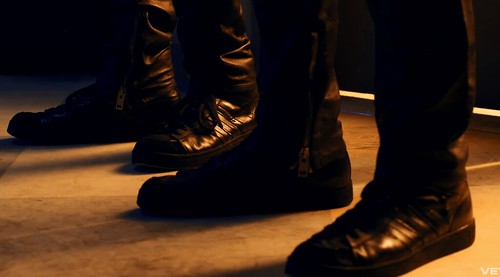
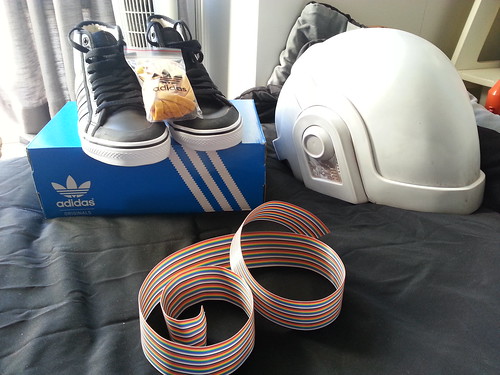
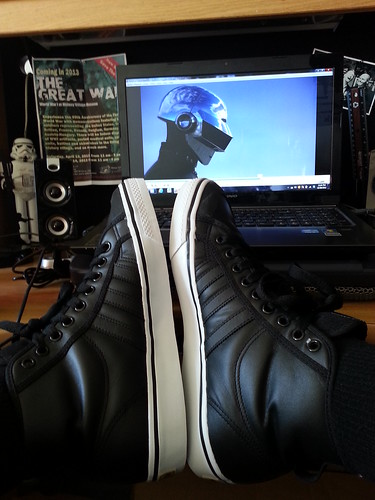
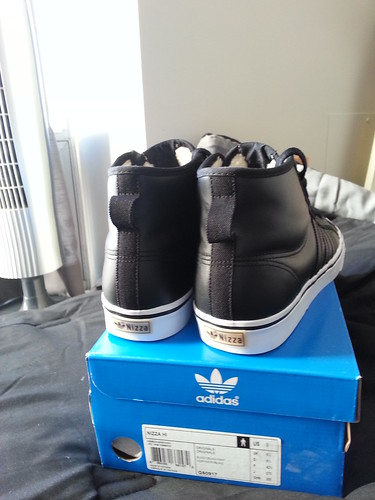
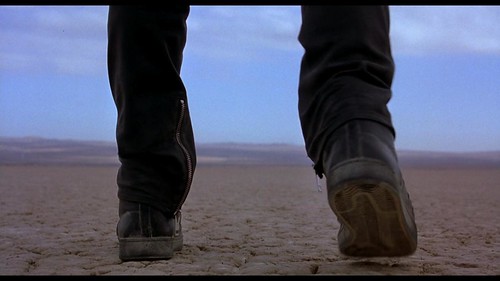
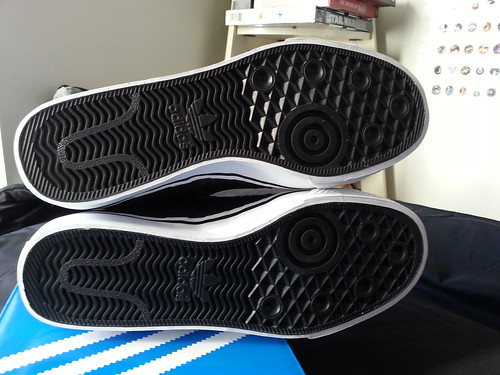
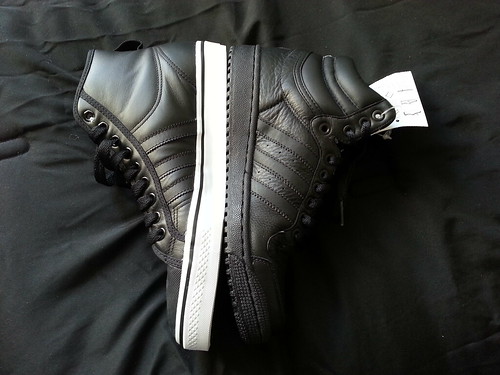
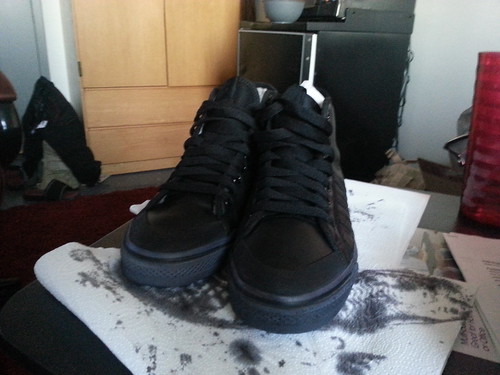
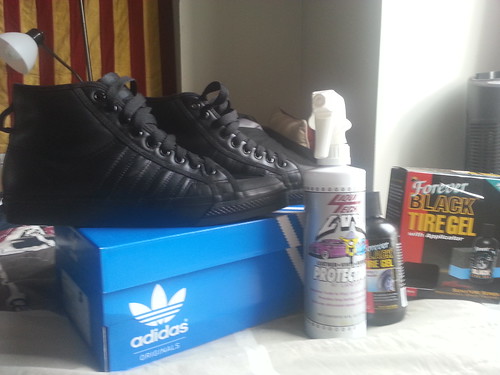
  • Shoes: After launching my own personal manhunt over at TDC, I found Adidas Top-Tens to be the closest representation of the shoes DP’s wears. They wear Adidas sneakers, and while I’d like to make custom shoes to be just like theirs…Adidas won’t be making’em. If I get corrected about my shoes while romping around a con…Hahah.
  • Misc: In addition to the light show going on in the bucket, I will be using my Aker voice amp I use for trooping in my TK to play DP while doing said romping. My only misgiving about that is I have no idea how to program the lights. In a perfect world, I’d be able to make programs that would coordinate to a specific song so it looks totally together as one streamlined system. I’ll be happy at this point to get the electronics done first. Also I want to make the “Digital face” or Circuit board face from Electroma while I am working on electronics and the buckets are getting their chrome on. I already emailed Alterian for source pics, anyone have any idea how to start that? I am thinking those are all real electronics parts instead of greeblies. Being a complete dunce with electronics, having someone recognize those parts would robot rock.
Any and all help/criticisms gladly received.

Stay posted, and funky my friends! -9336
 

electro by TK9336, on Flickr

Electronics

Pictured: Plasmodo PCB's; 16 Color Gels; 200 220ohm resistors; 100 1k resistors; 160 break a way male headers; 200 female crimp pins; 200 flat white 5mm LEDs; 3 LED Chasers by Donnie; 2 RCA female jacks; 2 RCA jacks silver end; solder kit; 2 proto boards; 100 2N3904 NPN General Propose Transistors; and crimp housings 1x8, 1x1, and 1x2.

Still need crimping tool; 100 Red, green and yellow 5mm rectangular color LEDs; 4 blue and green 5mm round tip round LEDs; 2 red and green round 5mm LEDs; 2.54 rainbow cable; 16 3mm LEDs for the EKG; battery box; (maybe chasers for EKG); and a project box that had the on/off switch. Waiting on the 8 LED rings from ebay for Thomas' Ears.

I have no idea what the parts are called to make a project box housing the switches and such. Not sure what battery packs I will need either. Leather jumpsuit should be done this week. Was going to be done last weekend but Darth real life does his evil work! Daft Punk patches also coming (thought the jacket and pants need them on the inside.) Stay tuned. Advice MORE THAN welcomed!
 
Last edited:
I ordered another lovely $52 worth of LED's, selector switch, and rainbow ribbon cable. Only things left to get electronics wise is a project box, battery holder, another one of Donnie's chasers for the EKG's, possible arduino for my own Chin equilizers on Guy that way I can re-use Donnie's chaser on my Thomas side bar lights. Oh, and re-chargable batteries, I have feeling when this is going it will have a appitite for batteries like I do for oreos. I can post links if anyone need's em to get thier own. I will have LED's left over for the EKG and static green and red next the RCA jack on Guy for those who'd like to pursue that as well.

Total (Guy's Center Matrix and Thomas's Main Array not counted [though my Thomas will have 320 5mm in the main array.])

• Rectangular Red 2x5mm LEDs=44
• Rectangular Yellow 2x5mm LEDs=72
• Rectangular Green 2x5mm LEDs=48
• Green Round 3mm LEDs=32
• White Flat 3mm LEDs=18
• White Flat 5mm LEDs=90
• Red Round 5mm LEDs=2
• Green Round 5mm LEDs=2
• Bi-color Round 5mm Blue/Green=8

Guy's LED's

Chin (Rectangular 2x5mm Red=24; Yellow=36; Green=24) (Round 3mm White=18)
o 18 Yellow Rectangular LEDs (36)
o 12 Green Rectangular LEDs (24)
o 9 white flat LEDS 5mm (18)
o 9 white 3mm LEDS (18)
o 12 Red Rectangular LEDs (24)

Center Matrix (All 5mm) bi-color in other versions that produces the smiley face/heart?
o 14x35 Matrix = 490 LEDs
 5x5 Green Matrix = 25 Green LEDS
 4x22 Yellow Matrix = 88 Yellow LEDS
 9x5 Red Matrix = 45 Red LEDS
 5x12 Green Matrix = 60 Green LEDS
 3x5 Red Matrix = 15 Red LEDS
 187 White Clear LED’s (420-233)

Color Bars (all flat 5mm) 8 Bars total
o From Top to bottom-
 Purple, Blue, Light Blue, Dark Green, Green, Yellow, Orange, and Red
o 5 Clear White flat LEDS/Bar (80)
 Tek’s 4 White flat 5mm (64)

EKG (Round 3mm Green=32)
o 16 Green 3mm LEDs (32)

Thomas Side Bars LED's

Color Bars (White flat top=8)
o Red, yellow, green, and blue
 1 flat 5mm white LED per cell. (8)

Equalizer/Chin (Red=20; Yellow=36; Green=24)
o Vertical Bars 2 rows of 4
From top to bottom-
• 2 Red 2x5mm Rectangular LED (4)
• 2 Yellow 2x5mm Rectangular LED (4)
• 2 Green 2x5mm Rectangular LED (4)
o Horizontal Bars 7 rows of 4
From top to bottom-
• 4 Red 2x5mm Rectangular LED (8)
• 4 Yellow 2x5mm Rectangular LED (8)
• 4 Green 2x5mm Rectangular LED (8)

o Center 5mm LEDs (Green=4; Blue=4) (Note in the original it is a bi-color flat top 5mm)
 2 Green 5mm LED Diffused (4)
 2 Blue 5mm LED Diffused (4)
• Bi-Color Green/Blue (8) [What I ended up going with.]
 
A few updates. Darth Real life strikes again! My pursuit of being a US Army helicopter pilot has been more a priority than this project lately but here's some news.

Some new bits. More in the mail. Everything pictured here is for Guy-Man. I need to buy another switch. Grrr. This thing is really adding up far beyond what I have put aside for it. It's like if you give a mouse a cookie it needs x, y, and z. The leather suit went in to have the correct zipper pulls put on. Hopefully it comes through...


New Acquisitions by TK9336, on Flickr

The 3mm LED's are for the Chin equlizers (white) and the EKG's (green.) The red and green diffused LED's are for the sides on Guy man. If anyone wants some just let me know. I have extra, obviously. The crimping tool got in the shot, as did the 8 LED microcontrollers. Video of them below, I am really happy with them. Especially since I that has to be done with them is finding opaque plastic disk to put them in, like Volpin's. Nice little simple video that took few minutes to do, cause everyone loves music in a video! (Yes I see the enter text box, grrr. Whatev's...look at the blinking lights.)

8 LED Microcontroller for Bangalter's Helmet Sides - YouTube
 
Hi all an update.

After getting ripped off by the Chinese supplier getting a sponge instead of my Top Tens I got a refund and tracked a pair down. These are EXTREMELY hard to find. So thinking I could squeeze into a 8 (which I wear for running shoes, but with sz 9-9.5 feet for normal kicks) I eagerly put them on today. They are a tight fit, and after closer review, Nizza Hi Tops in all black are a MUCH better match than Top Ten's. I can't believe I overlooked the Nizzas. I will have to paint the white bottoms but atleast they'll fit :p


20121025_131545 by TK9336, on Flickr


20121025_131524 by TK9336, on Flickr


20121025_123230 by TK9336, on Flickr


20121025_131508 by TK9336, on Flickr

I'd offer them here, but they are $80 and I doubt anyone wants them. Return and burn time baby.

Nizzas- (Need to paint the white part but I am thinking black matte paint would be fine. Also put some shoe polish on them to make them shiny as in the reference pictures.)


G60917_06 by TK9336, on Flickr


G60917_05 by TK9336, on Flickr


G60917_02 by TK9336, on Flickr

The real deal-


shoe_zps590df151 by TK9336, on Flickr


daftpunkadidasproof by TK9336, on Flickr


395036728-1-2 by TK9336, on Flickr


147ce643 by TK9336, on Flickr
 
Finally got working on this project for the first time in a long time. Take that college! Friday at 10:30PM I decided to teach myself how to solder. 5 hours later I was cracking on light bars. I ran out of solder but all the light bars are done, plus one of the chin equilizers has everything on it save the LED's. On the Flickr I did a step by step to making one of the light bars should you make your own using proto board. I plan on making my own PCB's in a program called Express PCB (it's free!) I am making tek's supplied chin equilizers as a back up, but I want my helmet to be unique and seperate from all the others out there, and the accurate chin equilizer is how I am going to do it, and not be just another a copy, paste, and cut replicator. Nice thing about ExpressPCB, is that it calculates and adds connections where you'll need them based on what you create. I don't have a template yet but stayed tuned.


20121027_235934 by TK9336, on Flickr


20121027_035733 by TK9336, on Flickr

Two bars need to get changed because I put the wrong resistor on (220) where a 1k should've gone. Always check and double check your work...not to mention test them.

In related news. I am going back and forth on making the LED's next to the RCA jack on the Guyman helmet 3mm instead of 5mm. I ordered red diffused 3mm LEDs to compare.

I overnighted the Adidas black/black/white Nizza High Tops. They'll be here Monday :/ (turds took more days to process my order and now I wasted $15 bucks.)

My Discovery-HAA leather suit is DONE! YES DONE. Heather was going to hand deliver it today but sadly she had to go to the hospital. She did this project for me with a baby girl growing (I am going to get her a little baby Daft Punk shirt, instant cool kid points.) So I expect to see it soon, but after 9 months in the making the excitment was intense LOL. Since the last third party action to be taken on the suit was replace the zipper pulls (which the only person who has done that is Cathy on Volpin's suit.) The cobler did something to the studs and they all had to be redone by hand with a flathead, since the really thin prongs don't work with the tool to place them in the leather; (which lambskin being the premium is really delicate so you can't roll around and expect it to not look like sandpaper was generously applied to the grain.)


Timely by TK9336, on Flickr


Studs displaced...:/ by TK9336, on Flickr

Be careful when you have studs on your back, least they get caught on stuff and can tear out.


Easy goes it by TK9336, on Flickr

3 Hours to do one word. This is the second time she's done it. I am one lucky guy!

I need to get some stuff for soldering and some more protoboard but I will update as news comes in. Like my Daft Club card which comes next week from England...SCORE! That'll certainly add to the costume factor (like people holding the card if they want a picture. Cool stuff.)
 
The only mashup that I am doing right now is putting the electronics from the Discovery era of the helmets into the Human After All helmets. However when and if this is successfully done first I do plan on taking a Stormie lid and mashing up first Bangalter's helmet putting in the visor on the stormie lid. The Guy version will either go on a different helmet, or another Stormie one.

With that in mind I will do some cool stuff to the overrall armor adding in the famous logo. Maybe even EL wire too.
 

Ones does not simply make one half of daft punk by TK9336, on Flickr

More good news. Like awesomely awesome news.

Scored Electroma and Interstella 5555 in HD. A little while later, I have 121 screen caps, in high resolution. Behold the wallpapers and just fantastic quality! 110 Electroma caps, and 11 caps of DP's cameo in Interstella 5555.

Also the new shoes arrived today and I am EXTREMELY happy with them. If you somehow missed the post above, and my thread "Daft Shoes," they are Nizza High Tops black/black/white. I was bummed because they no longer customize them. However they have white rubber sides. This will be done by dying the white parts in a bath of RIT dye (same as the visors,) using this method http://www.ehow.com/how_8750128_dye-rubber-soles.html

Why ya giving me that weird look? Dye rubber? Well normal paints is like putting a layer of plastic on top of the rubber. When you walk it will crack. I read a sharpie works. I don't want streaks either. This method seems the safest, and easiest. It's been before and I aim to do well on these.

Best part about these kicks? You can order them straight from Adidas in all sizes and variations. Spill your heart out.


More arrivals by TK9336, on Flickr
(Some ribbon cable came today too, woo! I think I will need more...we'll see.)


20121029_124456 by TK9336, on Flickr


20121029_142213 by TK9336, on Flickr


20121029_142224 by TK9336, on Flickr


Electroma 41 by TK9336, on Flickr
(Fresh from my copy of Electroma)


Half the accurate tracks by TK9336, on Flickr
(I thought about correcting the curve like on the actual shoes, but I am happy with the way they are. Makes these personally mine, not a blatant complete rip off DP :) )

So before sending my top tens back, I'd figured I do a comparision of the two. Volpin is the only costumer I know who uses them, since they are rediciously hard to find. I fell in love with the Nizzas since they just hit so many points of the real ones.


Side by Side by TK9336, on Flickr


Nizzas vs. Top Tens by TK9336, on Flickr

Daft Club card not in yet. I am now trying to score the Daft Punk Coca Cola bottles on eBay. I like it since that is just friggin unique and I like the look.

But on a related note my leather suit is now basically done. Thanks Heather's husband's friends in EOD (Army, and I love those guys when they don't take all day to show up,) replaced all the zipper pulls on my suit with the ones provided. I am one happy puppy. Seriously. Italian lambskin leather, each panel corded and sewn individually one by one. Every zipper is the correct style. A labor of love. I am supposed to get this week, and I can't wait to show all you how friggin awesome this turned out. It truely is, one of a kind. Even more so when I make some custom tags to put inside! Oh, and sorry...after doing this she doesn't want to make another based on all the extra work she did with mine (like water proofing, sealing, double stiching, reinforced fabric panels...seriously I love this woman.)

Check out the flickr for the screen caps. You'll be happy.
 
Last edited:
Since Disney bought Star Wars...I've turn completely to doing this project. I'm putting Star Wars aside for awhile. That's all I am saying on that.


20121031_015924 by TK9336, on Flickr (Sorry on the bluriness of the picture!)

I can't say enough about getting copper braid and having that copper sponge with soldering. A wet sponge is bad and destroys the top of your soldering gun pretty quickly. In the background are my prototype EKG's. I will need a arduino make them run. Infact it will do what Slinkytips is doing right now.


20121031_012737 by TK9336, on Flickr

Placing those 3mm LED's took 2.5 hours. It was like a really hard complicated puzzle. The only difference between mine and the actual one is that mine have 2 more LED's in the middle line (I tried for 30 minutes placeing 4 LED's in various patterns to completely replicate the actual ones used. It didn't look right. The actual one has a custom board for it, I am content using protoboard since this is a minor detail. Plus it will do what it needs to do and may even look better?)

Since being a transfer student in college sucks and I have zero parties I will attending it appears we have another night of soldering with me, myself and I!
 
Update time again. This one is all about da shoes. Seems simple enough, I had Nizza Hi tops with white rubber soles (think Chuck Taylors white.) So they needed to be flat black, and thankfully the bottoms were already black as well.

Easy enough right? So after doing more research on the topic than I care to admit scouring a number of message boards (mostly cosplay) about doing it. After reading that acrylics would crack I immediately turned towards doing it with RIT dye, which I am using for dying the visors which is already more than proven to work well. Finding a “How To” with pictured Chuck Taylor’s I followed the instructions and giddy at the mere simplicity of the project. It really was simple enough, prepare a bath of dye and let it sit two hours and bam you’re done.

These were the results on my brand new pair of Nizzas-


20121101_192732 by TK9336, on Flickr

I was really unhappy, as those sat for two hours. However it did say in the tutorial for additional dying sessions to achieve a darker color. Well at this point I was already in so let’s do this. There is absolutely no information on doing this on the soles on a pair of shoes. Dying fabric shoes like Chucks is very straight forward and works well. Not what I was doing. I saw what a fella did for dying plastic wheels for a RC car, it was done over heat.

I was ready to try anything at this point. I wanted nothing more than to finish these shoes so I could 1) replace my worn out shoes and wear these comfy ones (regardless if they are for my Daft Punk costume) and 2) Move onto doing the important parts of the costume.
I bought yet MORE dye and more pans. Did another session at my buddy’s house here on campus (he had a stove). Sat for 30 minutes until a roommate got really hungry. The results were pretty good and I was determined to keep doing this until I got the color I wanted.

Fast forward to past Saturday at another friend’s house. I got more pans at Wal-Mart. One pan was cracked and until it was FULL of dye did I know this; plus this stuff will forever be burned into my memory of its difficulty to clean up. Windex works REALLY well, spray immediately and wipe right after. Otherwise your F*&%’d, this stains WHATEVER it touches except what I actually need it to dye of course. Eventually I used my buddy’s old pans he was going to toss (since the pan was cracked). Important to scrub them with soap and water so not to get unwarranted results in your shoes. Same with the shoes, otherwise you get blotches. You gotta sand that crap, and it looks awful. Thankfully being factory fresh I only had one discoloration.


20121103_210633 by TK9336, on Flickr

This time it was on low heat for 3 hours. Then figuring might as well keep going to get a rich deep pure black color I left them off heat overnight until I awoke 8 hours later. If you like math, it’s 11 hours total. Plus 2.5 more and you have a cumulative 13.5 total hours dying rubber soles. This is the current state of affairs.


20121104_162125 by TK9336, on Flickr

20121104_162052 by TK9336, on Flickr

Do I think a few more dying sessions would eventually reach the color? Sure. But I think the best I will get is a really dark purple/grey and that already black strip between the midsoles and soles will still stick out. This costume when done is getting professionally photographed by 2nd Story Photography by a fellow Punk. Sure would it be acceptable from a distance? Yeah. But up to the scrutiny of the professionalism I going for on the rest of the build (and the amount of money dumped on this project to LOOK professional, well I refuse to skimp out now.)
So I have come up with other solutions- remember, acrylics paints are out.

  • Plasti-Dip: Saw a recommendation on a costume site for a cosplay. I researched heavily into it. Primarily used by car people for rims, exterior logos. Easy to work with but ultimately as the can says- it’s not permanent. Plus if it gets punctured it peels en masse. I bought a can but held back on doing it. I am promptly taking it back. I got really excited since it is rubber but a massive waste of time.
  • VHT Epoxy All Weather paint: Also looks promising. Flexible and used for a myriad of surfaces. Plus it would harden and be impregnable. Give it the cure time it needs and seems really promising. Sadly I cannot find any examples of it actually on something. Not very forgiving it seems, but this seems to be the toughest spray paint out there.
  • Krylon Fusion Paint: After googling “spray painting shoes” and some critical analysis I think I might run with this choice. Little to no prep and on Krylon’s site shows a pair of shoes spray painted with the stuff and looks good. The whole key here will be to give it a crap load of curing time. Basically spray and forget for a month (48 hours will cure, but not touching them for a month, and those will be fully adhered to the top layer of rubber and be fully hardened.) Additionally it’s water resistant, corrosive resistant, etc.
  • Rustoleum Truck Bed: The attendant at Lowes recommended this paint. I read that people liked the results with the Krylon fusion over the Rustoleum. Plus it would leave a texture I am sure. Not looking for that.
  • Sharpie: Thought about it since it be really easy, and permant. Plus who hasn’t taken a sharpie to their Converse Chuck Taylor’s before? While it be cool on fabric, it’s a no go on the rubber (I tested a part of the bottom of the shoe, it looked amateur to me.) Would it work? Possibly. Could it work. Most likely. Do I want to risk my $100 Nizzas? No. Plus it would fade over time and have to be redone (from what I read.) Does it help I have a dark base to go off of? Yes. It could work, and I haven’t fully canceled this out as a viable option…yet. Meaning, if I am going to spray paint them matte black anyways it wouldn’t hurt to try. Holding back for now though.
  • Permanent Paint Pen: Tried. Massive fail. Just too runny and could dry unevenly without it being smoothed out with a paper towel (or used painter’s tape in my case.) I didn’t like it at all on the rubber. On fabric I am sure it work much better. But again, not what I’m trying to do here.
  • Save Your Soles: http://www.saveyoursole.co.uk/shop/shoecare/10 This is really expensive (at 19.99 UK Pounds) but is made for touching up designer shoes. I am not sure those expensive shoes' soles are rubber. I emailed them today with my inquiry. Far too expensive for my tastes for what I am doing (since I will be spray painting, but correctly with alot of cure time). Just tought I'd cover all available bases in the off chance someone does this too.

So where does that leave me? Well. A trip back into town to take stuff back and buy a can of Krylon Fusion Matte Black spray paint. Then a very, very long curing time. I am estimating 2-3 light coats in 15 minute intervals, and then letting it dry FOR-EV-VER and get back to the actual parts of this costume while this is in curing purgatory.

If you have any tips, or advice…or have done this before please don’t be shy! If I am doing this completely wrong…let me know I am not made of money and absolutely want to finish this time vampire.
 
Last edited:
Just wanted to chime in that I'm very interested in following this - I'm not even working on a DP costume, but I really like the way you're documenting things!
 
Thanks man, I really do appreciate that compliment.

Awesome news. The shoes saga should be over now.

Did some research on a product called Forever Black Tire Gel. It is used on automotive tires. It is a dye, for rubber. Plus it comes out in a dull black. PERFECT. Alot of glowing reviews, the only people who didn't like them is that is was dull and not a glossy finish. I am so happy it's dull as that's EXACTLY what I am going for. Lasts 6 months, and just re-apply to get that factory fresh finish. I like my shoes worn in and Daft's shoes are definitely worn. I wish this could help other people get different colors but this only comes in black.

http://www.foreverblack.com/products.html

SUCCESS.

I can't wait to put it on.

Also, getting this. $40 total since there are very few places to get either item but well the things we do for love. Or accuracy. Attempted accuracy.

http://www.finishfirstpolish.com/products/LVR-Protectant/
 
Last edited:
Well, I am crazy. Crazy for trying to use Fabric dye on rubber soles. I put on Paint it Black and got to work immediately after receiving Forever Black Tire Gel in the mail today. No time was wasted.


Before by TK9336, on Flickr


RIT Dye vs Forever Black Tire Dye by TK9336, on Flickr
13.5 Hrs of RIT dye (left) versus Forever Black Tire Dye (1 coat.) (Don't mind the painter's tape, you don't need it. It was on there when I thought spray painting was a awesome idea.)


After by TK9336, on Flickr
The best things in life are simple. The simpler, the better, and usually works better. I took the previously dyed shoes, put on 3 coats of Forever Black, then a coating of LVR Protectant with Lanolin, then another coat of Forever Black on Top of that.


I think it worked. by TK9336, on Flickr

So if you ever want to make the rubber (anything) black, I HIGHLY recommend this product. Lasts 6 months, and lay on a ton of coats and it will last a real long time. If anything should happen, or you want to rejuvinate the factory fresh color, take 5 minutes with the sponge applicator that comes with it and do it. It will seriously take 5 minutes to do BOTH shoes. Well I better start wearing them now. So ends the MASSIVE time vampire, I hope this works for people in the future!

Any other color than black...well I have no clue. I'd still use RIT but only with a white base. It obviously works...but if you can get the color before hand then just get it!

Now...time to get back to working on the real parts of this costume. I am glad ONE part of it is done.

Ciao! (and thank a Vet if your in the US!)
 
After two days the edge of where the rubber hits the pavement is coming off a tiny bit, but wear and tear is expected so I am not crushed. It scuffs like any other shoe would (just remember it's x100 times easier to do so.) I will redo the Forever black on before the photoshoot I eventually do to have clean appearence...though I do like the worn look. I will be wearing them regularily next week and will take a picture or two to show normal wear for you guys. And on that note, I emailed Krylon about using spraypaint on shoes and they said it wouldn't work period (for those of you still thinking Spray painting be a better route.)


Thomas Matrix! by TK9336, on Flickr
Just thought I'd leave that progression picture here being done by Sandiskduo of The Daft Club forums.

Currently my college workload (more along the lines of being behind in school) isn't doing any favors on the progress for this project requiring a re-aligning of priorities (finishing this semseter on a high note and worrying about this in Thanksgiving and over Christmas since studies should be my only priority right now...) Since this project's deadline is in April 2013for C2E2 in Chicago (planned debut.) I hope to have it done January 14th though, which seems most realistic for the Midwest Garrison formal.

In any case I am leaving that much time to finish it since the last thing I am doing is rushing this over the top and expensive project. I hope to get on top of Darth real life so I can continue updating this thread!

Stay tuned.
 
Sorry I spent my weekend trooping with the 501st Legion making countless kids' days. It was alot of fun personally raising more than $1300 for charity with our a shoot a trooper booth. Where kids can for free shot a dummy (like me!) with darts. Or they can donate $5 to charity and shoot the chain dart gun. They go for the head every time! I had so many darts stuck to my armor but it was fun. What also is fun? Going to the zoo as a Stormtrooper, decorate a Star Wars/501st tree, get mobbed by people there and freak the absolute poodoo out of lions. Pics or it didn't happen? They aren't uploaded yet.

Oh, I guess I have one update. Sandisk1duo finished my Thomas display. I am going to do make my own animations on top of that, but I would say this is sufficient.

Daft Punk Thomas 320 LED Display # 11 - YouTube
 
I was on vacation but not at home to work on the helmets. Before returning to university I managed to finally take a stab at the buckets. I spent a hour on cutting on the glove panels for two sets of gloves, and the other two hours covered resin dust. There is a good full day of bondo and sanding left before I can ship all of this to the chromer.


20121125_155630 by TK9336, on Flickr


20121125_163607 by TK9336, on Flickr
I held off cutting the lip off the Sorenzo Guy; I want to mount the visor from inside the helmet but I want to mess with it more first before cleaning it all the way up. Given my limited time I picked parts to sand. I will probably do the wire hair the way Tek did it by cutting slits at the top and bottom. However I want to be anal retentive on being as CLOSE AS POSSIBLE and the ones I have pictures of show it almost as a seperate piece. Again, holding off. Input appreciated, since you can take milk outta the cow, but can't put it back in.


20121125_163349 by TK9336, on Flickr
 
Well I have some real progress to show. I couldn't resist putting Sandiskduos' array behind my new tinted visor. I am pretty happy with it. Imagine it in a chromed lid with sidebars? Woah.

The Animated Visor - YouTube

That said...I dyed the visors and got all the materials needed to sand and finish the helmets. I also bough drill bits that are the preecise size needed for the 3mm LED's and RCA jack that goes on the Guy Man helmet. I will take pictures of that tomorrow so you guys don't need to bring your handy micrometer to the store with you.

My first helmet was a Pinski Guy Man, and I used niteshades to do that visor. VHT niteshades is a very thin paint, and left very tiny blotches on the visor. It wasn't a mirror finish either. Even with the best skill, it will not leave a perfect product, which in our collective case is a Daft Punk visor.

Determined not to run that gamut again with my current Sorenzo and Pinski lids. Instead I wanted to try RIT dye, and hoping it redeem itself with plastic because it failed on my rubber soles (from my Adidas Nizza high tops, which are also for this costume. Another thread in itself.) There are a few threads I found that have tried this method and succeeded. I am proved without a doubt this is the only way to produce such a great result for these visors, save pulling PETG already tinted black. So let's go on.

Materials needed:
-Large pot that can hold your Guy-Man visor (in retrospect find on that hold it standing up vertically, not face down. It can produce burn spots, and a dark spot in your visor. While the dark spot is not visible on the outside, it makes looking out of the visor more difficult than it should be. If I could go back and change the pot I had with the turkey frying pot my pops uses. I might go back and dye my Guy visor in there again to make it a tad darker.)
-Stovetop (or way to heat your pot to 140-150 degrees)
-6-9 Packs of RIT Dye (Available at Wal-Mart, also take into account how much water there is in your pot, I used 9)
-Visors
-2 Wire coat hangers (and something to cut them with)
-Another large pot/tub (to use to pour cold water over the hot visor to seal the ink)
-Plenty of cups with cold water (One cup of water to pour over the visor after a dipping session)


Materials by TK9336, on Flickr

Take every precaution with this. RIT dye is AGGRESSIVE. If you don't get it a droplet wiped off quickly, it will stain; wood floors, ceramic counter tops, tile, clothes. More coverage is better than less coverage and a ruined countertop.


Take every precaution by TK9336, on Flickr

Pour your powder in the pot. Be careful, and do not sneeze unless you want it everywhere.


Looks like I am making a bomb by TK9336, on Flickr

This stuff looks like the black death from Promethus. Be cautious!


This is akin to the black death from Promethus by TK9336, on Flickr

Get it to 140-150 degrees Fahrenheit. Once it's there it will stick there for the time needed for one visor. Simply return it to heat at half power and it will be right back the right temp, then take it off heat. Too much heat will distort the plastic, and depending on you position your visor while being dyed remember that certain areas collect more liquid than others. That means, it will get hotter there and make that spot darker, and may even warp it slightly. Remember to conscious of placement.


~150 degrees by TK9336, on Flickr

Drill two holes in your Thomas visor and in your Guy visor off EXCESS material that will be cut off, or not seen in the final fitting. Use the coat hanger to dunk it, since without any pressure it will float and not dye evenly. I found that 5 minutes submerged, with a cold water pour immediately afterwards works well. Any longer and it WILL warp to some minor degree (dependant upon heat of course.) How many licks to get the center of the tootsie pop? I dunked Thomas 6 or 8 times. After 6 dunks, basically do it until you are your happy. Remember to stop and dry it and do a vision test so you can see out of it. Makes no sense to have something that is to a camera, and up close is black but is really red (but you can see) rather than making it so dark that you can barely see and it looks the same on pictures.

The first visor done was Thomas. It is a simple strip of PETG plastic.


This shows the red tint perfectly, but with no light behind it is black by TK9336, on Flickr

When on the helmet, it is black since there is no light within the helmet to shine through and make it appear dark red, it comes off as a mirror black finish. I then moved onto Guy's helmet, in which I had more reservations about. I drilled two holes but only used one. It took quite a bit longer than the Thomas visor (obviously.) Thanks to it sitting face done, allowing more dye to gather in the middle of the visor. Not visible to the outside but from within the helmet, it is slightly visible at the right angle. Not mention it is right where I will be able to look out of, adding to the difficulty of just seeing out this thing. Alas, I hope my countless hours of Stormtroopin' has prepared me for this lack of vision!


Dark spot by TK9336, on Flickr


I might re-dye Guy's visor, you can see the red tint in this pic by TK9336, on Flickr

The tint is visible in this pic of Guy next to Thomas. Thomas turned out perfectly, I have some incentive to dye it again (thankfully saving the dye!) But again, here's why I posting, I need YOUR input! I had two pictues taken wearing the lid with, and without flash.


No Flash by TK9336, on Flickr


Flash by TK9336, on Flickr

For comparision's sake. On left, Sorenzo Guy visor with RIT Dye (notice the small marks, which are seen at pretty much only this angle.) On right, Pinski visor with VHT Niteshades, buffed with Maguier's Ultimate compound and prepped at 2000 grit beforehand. You be the judge.


Sorezno visor next to a Pinski visor (niteshades) by TK9336, on Flickr

Semester ends in two hours. Then a month to dabble with this project, and yes...FINISH IT! Hope it was helpful.
 
Back
Top