artexpanded
Member
Hey there everyone,
I always told myself I wasn't going to give in and print a Red Hood helmet, but after seeing the Red Hood Rebirth design I couldn't resist. So i decided to model my own version in Cinema4D, print and finish it all before Halloween. I was not going for a screen accurate version, just something close to it, but with my own spin on it. Because of timing, I can't do the whole get up and plus I was undecided if I wanted to model and 3d print the armor or make it out of foam. So for Halloween, I just bought a red hood shirt and will wear all black, I know it's lame LOL but hey thats all I can do for now. So on to the pics, and I did attach the link for the YouTube video build. Any comments or suggestions are more then welcome.
So here is the final design rendered in Cinema4D

Next was time to print. I printed it on my CR-10 at .2 layer height, sliced with Simplify 3D

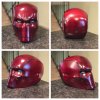
After laying down a coat of XTC3D and sometime sanding and laying down primer filler, it was time for paint and weathering, and here is what I ended up with


And here is the video for the full build
I always told myself I wasn't going to give in and print a Red Hood helmet, but after seeing the Red Hood Rebirth design I couldn't resist. So i decided to model my own version in Cinema4D, print and finish it all before Halloween. I was not going for a screen accurate version, just something close to it, but with my own spin on it. Because of timing, I can't do the whole get up and plus I was undecided if I wanted to model and 3d print the armor or make it out of foam. So for Halloween, I just bought a red hood shirt and will wear all black, I know it's lame LOL but hey thats all I can do for now. So on to the pics, and I did attach the link for the YouTube video build. Any comments or suggestions are more then welcome.
So here is the final design rendered in Cinema4D

Next was time to print. I printed it on my CR-10 at .2 layer height, sliced with Simplify 3D

After laying down a coat of XTC3D and sometime sanding and laying down primer filler, it was time for paint and weathering, and here is what I ended up with


And here is the video for the full build
Last edited by a moderator:
