Thank you for sharing these with us, It's a really good inspiration for what you can do with 3D printed parts. It's hard to tell if they are 3D printed or not! I am curious about your process, though. Would you be up for sharing more about how you get them to look that way? Keep up the great work.
Thank you.
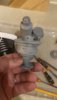
End result, like everything will depend upon what you put in. I started out six months ago with a Hero Luke attempt that used all the parts I liked from various hilts and did'nt really look like a Hero Luke at all. What it did show me though, is to model with the highest poly count I could. 3D prints are not very forgiving and low poly models need a lot of sanding!
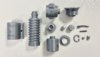
The more I researched designs, and thanks to sites like the RPF, I began to refine my models so they printed better and looked more accurate. When modelling or printing, people will try to model everything in one go. This approach makes it difficult to paint later on as well as providing poor print quality. Parts should be broken down into real world components as much as possible.
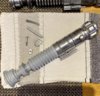
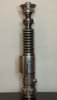
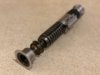
Assembly was a big thing for me as I didnt want to glue anything. I was'nt a fan of 'peg' or 'post' connections either so decided to use threaded joints. Every part of my models can be unscrewed and changed for a newer part. I Also printed small stands with female or male threads so parts could be screwed into them while being painted, avoiding any need to handle the part while wet.
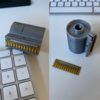
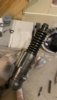
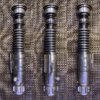
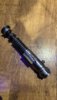
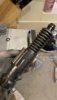
My first Hero Luke print took around 18 hours and was six parts. My latest Hero model takes almost 30 hours and is 12 parts but the results speak for themselves. My V2 is 15 parts, again taking almost 30 hours. Once you have a well modelled hilt, broken down into the individual components and printing well, it time to sand (probably the worst part!). You need to get surfaces as smooth as possible so be patient and get this step right.
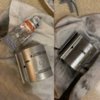
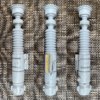
I tried several paint methods as I was obsessed with getting a true 'metal' finish.
I used a quick drying primer, lightly applied every 10 minutes for three coats. A light sand in between helps to fill any imperfections that might have missed when sanding! Once happy with the finish, I applied a gloss black coat using a rattle can. Nothing fancy, just a standard brand from your local hardware store and gave it 30 minutes to be touch dry. At this point, I tried several rattle can finishes with the best being Chrome Silver from Gold but it still looked fake. I then gave Alclad Chrome a try and it all started to come together. Apply very lightly with an airbrush, building the colour slowly. You need to give it 30 seconds or so in between each coat, allowing it to evapourate and leave the metal finish. Lastly, and once left for a few days to dry, I used a clear gloss from Alclad to seal everything. Warning, dont apply unless the other coats are completly dry. It can react badly!
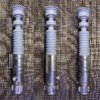
At this point I discovered that while it looked good, it still looked like silver plastic so I went back to searching for a solution. This is when I saw people mention Rub n Buff so I bought an Ebony Black, Silver Leaf, Gold Leaf and a Spanish Copper.
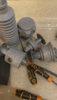
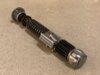
Following the same methods above, I sanded another print but knowing I would be applying any primer, gave it more work starting with an 800 grit paper and working up to 3000 grit. The smooth finish then had black acrylic applied over any recessed areas where dirt would normally settle and was wiped away with a clean cloth before the black ebony wax applied and buffed away almost immediately. This leaves it with a polished iron look (was almost tempted to leave it at this point). I gave it five or ten minutes before repeating the process with the silver leaf. Apply small amounts and build up an even surface. Leave for a few minutes and buff. The result is quite amazing!
The biggest win using this second method is time saving. No waiting for paint to dry and handling a print wont give you a dirtly great fingerprint in the middle of your work! It takes a few days to go completely dry so avoid handling too much during that time or you loose the shine. For the best results, I discovered a second application of silver leaf the following day works perfectly and leaves your print looking 100% metal.
Apologies for the long explainations but hopefully it will show what methods have been tried and what ones work best for me (they dont suit every application I'm sure).
I'm now turning attentions back to my V2 with a remodel. The Hero Luke came out so well, it makes the V2 look a bit small? After that, probably something form Episode 9.