SankaraRaider
Well-Known Member
Repainting a NECA: Gremlins 2 - Brown Gremlin Stunt Puppet Replica
Hey all,
Last month I got my Gremlins 2 - Brown Gremlin Stunt Puppet Replica from NECA.
The replica is great, it’s been cast from an original Rick Baker stunt/prototype puppet, and almost every little detail is preserved.
The puppet suffered from a few defects though, the foam inside had leaked in several places, It had glue spots here and there, and the seamlines were very crude and noticable.
The worst thing about this replica was the factory paintjob, it just didn’t do, the otherwise cool puppet, justice. And I knew I had to repaint it, to fully enjoy it. I’m aware that many are perfectly happy with how NECA painted these, but I wanted something a bit more screen-accurate.
So here follows my repair and repaint of the puppet.
I hope you’ll like it - and maybe get inspired to do something similar to yours. This replica deserves a greater paintjob.")
I wanted mine to look like a cross between the hero Brain-gremlin puppet and the generic background puppets. Tom Spina's Gremlins 2 puppet restorations were great reference for this project.
Here's how my puppet looked when I got it:

Some of the repairs I had to do, before painting:


I started out with a coat of dark brown, covering all the light markings:

Next step - A lighter shade of brown was dry-brushed on top of the dark, to add depth and highlight the details:

The inside of the mouth and teeth were painted with movie accurate colors, as well as the nails and horns:


The light parts of the skin were painted in, and then I added dark stripes and spots:

The markings on the arms, legs, ears, head and back were added, and more high-lighting and shading was added to the face:

The eyes. Instead of adding glass eyes, I decided to just repaint the existing ones. A clear gloss coat was added over the paint, to really make them pop:

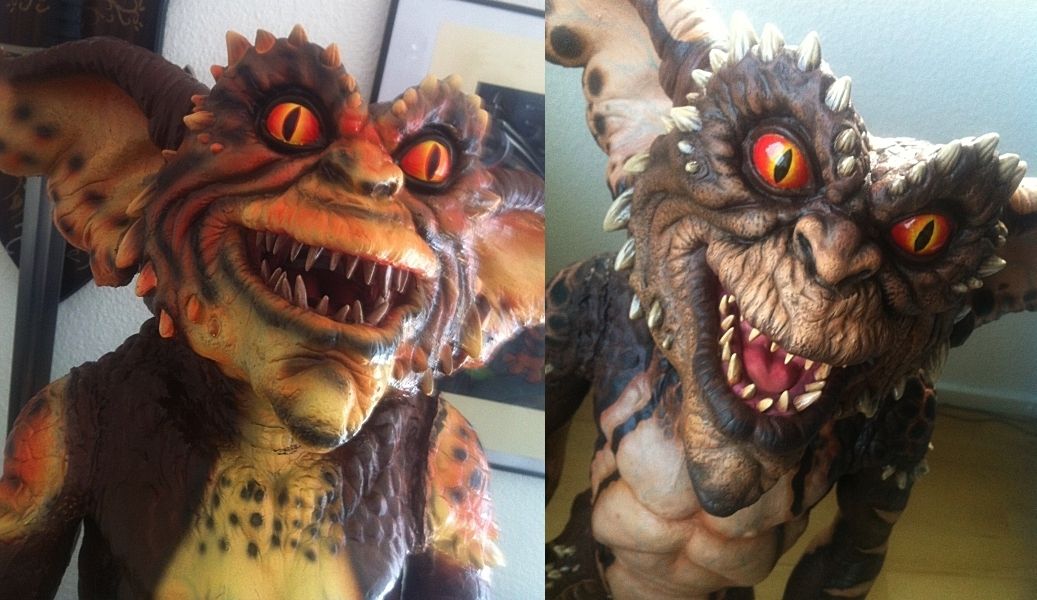
Realistic and accurate weins were added to the light parts of the gremlin’s skin:

The final result. I think this gremlin looks way more accurate and life-like now:

Designing A Plaque
I was quite dissapointed to find that NECA didn't provide any plaque or edition number info on the stand, or the gremlin itself. They had written the edition number (527 out of 1000) on the brown shipper, but I wasn’t going to keep that around. So I designed a plaque myself - inspired by how Master Replicas did theirs:

I couldn't find an accurate Gremlins 2 logo in vector format, so I had to trace it from a movie poster, and find the correct font used for 'The New Batch' title. (ITC New Baskerville)
Hope you guys like what I did. Any critisism is welcome, and I’ll gladly share any tips and tricks.
Thanks for looking.
...
UPDATE - November 2018!
Updating a 6 year old paintjob and fixing a rubber puppet...
So, it’s been 6 years since this repaint.
I’ve recently repainted another gremlin. A brown one from NECA’s recent re-release of 800 pieces. And I thought that I’d just as well give my original gremlin a small overhauling, while at it.
The foam inside has begun to deteriorate!
You can feel quite some space between the skin and foam, when pushing on it. It feels a bit squishy, especially on the body and arms. I guess there’s nothing much I can do about this. I was expecting this, as it’s bound to happen with that material over time. Wasn’t expecting it to happen this fast though.
The legs were beginning to seperate completely from the body as well, and cracks had started to form on the knees and at the leg-joints, due to the weight of the body over the years. So I’ve re-attached the legs with epoxy glue and repainted some areas. I’ve added a bit more gloss to the skin and added a few more details in the eyes. I re-did the nails and horns, and painted the inside of the mouth a bit more accurately, with an added throat for realism.
This is how it looks now:


UPDATE - November 2018
Turning a brown gremlin green...
Hey all,
So six years ago I got my first Gremlins 2 stunt puppet replica gremlin from NECA. A fantastic replica of Rick Bakers design - which suffered from a bad, unrealistic paintjob.
I decided to repaint it and turn it into a more realistic looking creature. I really liked the result - and wanted to tackle NECA’s green version when it was getting released soon after.
Well, due to different reasons it took almost 5 years before I got another gremlin to work on.
It wasn’t until NECA re-released their brown gremlin last year, that I was finally able to realize this dream of mine. Now limited to 800 pieces, (Mine’s number 148) and at a bit higher price-point. But thankfully not as high, as they had gone up on the secondary market.
This time NECA’s assembly quality on the puppets had been greatly improved - no foam leaks, no obscure seamlines, no glue errors, the mouth is more open, and the entire thing feels a bit more sturdy and solid. The factory paintjob had been improved upon as well, now using more dulled down colors, better shading, added veins in the eyes, and the horns were better defined.
But, it was nowhere near the realistic look I wanted. And I’d always wanted to add a green gremlin to my collection. So I pulled out my good old acrylics and brushes..
It took me a while to get the time to do this repaint. But I’ve been working on it this past month, and it’s finally done.
Here’s the NECA factory paintjob:

I started out by putting on of green layer to cover up all the original details and markings. I then added a brown base coat to build the colors on.
I blanked out the eyes, and added some flesh color to the mouth and ears, and added veins to them. I also painted in the teeth, which would later be weathered:

I added a dark green color to the gremlin’s skin, and then dry-brushed a lighter green on top, to highlight every little detail and add some realistic transitions between the flesh tones and the green areas.
Nails and horns were painted in, starting with a brown base:

More shading was done to the skin, and the nails and horns got their final color and a clear coat to make them pop:

I then bagan adding the distinct patterns and spots to the skin.
Thanks to Tom Spina’s great prop-restoration pages, finding reference for the placement and correct look of the spots was easy.
First, a black base layer:
This was such a cool moment, where the creature really began to come to life.

Then a brown shading was added to the center of the markings:

I then added a light aura on the edge of the spots and markings, just like the original puppets had.
I painted in the pupils of the eyes, then the iris and veins and added a clear coat, which really made the eyes come alive.
The teeth were tinted yellow, and the entire gremlin was sealed with a glossy clear coat to add a bit of shine to the skin:

And here it is, my green gremlin:
I’m really happy about how this turned out, the gremlin looks so much more scary and alive, and I can fully enjoy this replica.


I hope you’ll find this walk-through interesting. And if you’ve been wanting to do the same to your gremlins, but been scared to for any reason, I’d say; just go for it. For me, it has been a really fun project to work on. I had a blast watching the transformation as it went from a huge toy-looking lifeless puppet, to a realistic-looking menacing creature.
Thanks for looking.
Hey all,
Last month I got my Gremlins 2 - Brown Gremlin Stunt Puppet Replica from NECA.
The replica is great, it’s been cast from an original Rick Baker stunt/prototype puppet, and almost every little detail is preserved.
The puppet suffered from a few defects though, the foam inside had leaked in several places, It had glue spots here and there, and the seamlines were very crude and noticable.
The worst thing about this replica was the factory paintjob, it just didn’t do, the otherwise cool puppet, justice. And I knew I had to repaint it, to fully enjoy it. I’m aware that many are perfectly happy with how NECA painted these, but I wanted something a bit more screen-accurate.
So here follows my repair and repaint of the puppet.
I hope you’ll like it - and maybe get inspired to do something similar to yours. This replica deserves a greater paintjob.
I wanted mine to look like a cross between the hero Brain-gremlin puppet and the generic background puppets. Tom Spina's Gremlins 2 puppet restorations were great reference for this project.
Here's how my puppet looked when I got it:
Some of the repairs I had to do, before painting:
I started out with a coat of dark brown, covering all the light markings:
Next step - A lighter shade of brown was dry-brushed on top of the dark, to add depth and highlight the details:
The inside of the mouth and teeth were painted with movie accurate colors, as well as the nails and horns:
The light parts of the skin were painted in, and then I added dark stripes and spots:
The markings on the arms, legs, ears, head and back were added, and more high-lighting and shading was added to the face:
The eyes. Instead of adding glass eyes, I decided to just repaint the existing ones. A clear gloss coat was added over the paint, to really make them pop:
Realistic and accurate weins were added to the light parts of the gremlin’s skin:
The final result. I think this gremlin looks way more accurate and life-like now:
Designing A Plaque
I was quite dissapointed to find that NECA didn't provide any plaque or edition number info on the stand, or the gremlin itself. They had written the edition number (527 out of 1000) on the brown shipper, but I wasn’t going to keep that around. So I designed a plaque myself - inspired by how Master Replicas did theirs:
I couldn't find an accurate Gremlins 2 logo in vector format, so I had to trace it from a movie poster, and find the correct font used for 'The New Batch' title. (ITC New Baskerville)
Hope you guys like what I did. Any critisism is welcome, and I’ll gladly share any tips and tricks.
Thanks for looking.
...
UPDATE - November 2018!
Updating a 6 year old paintjob and fixing a rubber puppet...
So, it’s been 6 years since this repaint.
I’ve recently repainted another gremlin. A brown one from NECA’s recent re-release of 800 pieces. And I thought that I’d just as well give my original gremlin a small overhauling, while at it.
The foam inside has begun to deteriorate!
You can feel quite some space between the skin and foam, when pushing on it. It feels a bit squishy, especially on the body and arms. I guess there’s nothing much I can do about this. I was expecting this, as it’s bound to happen with that material over time. Wasn’t expecting it to happen this fast though.
The legs were beginning to seperate completely from the body as well, and cracks had started to form on the knees and at the leg-joints, due to the weight of the body over the years. So I’ve re-attached the legs with epoxy glue and repainted some areas. I’ve added a bit more gloss to the skin and added a few more details in the eyes. I re-did the nails and horns, and painted the inside of the mouth a bit more accurately, with an added throat for realism.
This is how it looks now:
UPDATE - November 2018
Turning a brown gremlin green...
Hey all,
So six years ago I got my first Gremlins 2 stunt puppet replica gremlin from NECA. A fantastic replica of Rick Bakers design - which suffered from a bad, unrealistic paintjob.
I decided to repaint it and turn it into a more realistic looking creature. I really liked the result - and wanted to tackle NECA’s green version when it was getting released soon after.
Well, due to different reasons it took almost 5 years before I got another gremlin to work on.
It wasn’t until NECA re-released their brown gremlin last year, that I was finally able to realize this dream of mine. Now limited to 800 pieces, (Mine’s number 148) and at a bit higher price-point. But thankfully not as high, as they had gone up on the secondary market.
This time NECA’s assembly quality on the puppets had been greatly improved - no foam leaks, no obscure seamlines, no glue errors, the mouth is more open, and the entire thing feels a bit more sturdy and solid. The factory paintjob had been improved upon as well, now using more dulled down colors, better shading, added veins in the eyes, and the horns were better defined.
But, it was nowhere near the realistic look I wanted. And I’d always wanted to add a green gremlin to my collection. So I pulled out my good old acrylics and brushes..
It took me a while to get the time to do this repaint. But I’ve been working on it this past month, and it’s finally done.
Here’s the NECA factory paintjob:
I started out by putting on of green layer to cover up all the original details and markings. I then added a brown base coat to build the colors on.
I blanked out the eyes, and added some flesh color to the mouth and ears, and added veins to them. I also painted in the teeth, which would later be weathered:
I added a dark green color to the gremlin’s skin, and then dry-brushed a lighter green on top, to highlight every little detail and add some realistic transitions between the flesh tones and the green areas.
Nails and horns were painted in, starting with a brown base:
More shading was done to the skin, and the nails and horns got their final color and a clear coat to make them pop:
I then bagan adding the distinct patterns and spots to the skin.
Thanks to Tom Spina’s great prop-restoration pages, finding reference for the placement and correct look of the spots was easy.
First, a black base layer:
This was such a cool moment, where the creature really began to come to life.
Then a brown shading was added to the center of the markings:
I then added a light aura on the edge of the spots and markings, just like the original puppets had.
I painted in the pupils of the eyes, then the iris and veins and added a clear coat, which really made the eyes come alive.
The teeth were tinted yellow, and the entire gremlin was sealed with a glossy clear coat to add a bit of shine to the skin:
And here it is, my green gremlin:
I’m really happy about how this turned out, the gremlin looks so much more scary and alive, and I can fully enjoy this replica.
I hope you’ll find this walk-through interesting. And if you’ve been wanting to do the same to your gremlins, but been scared to for any reason, I’d say; just go for it. For me, it has been a really fun project to work on. I had a blast watching the transformation as it went from a huge toy-looking lifeless puppet, to a realistic-looking menacing creature.
Thanks for looking.
Last edited: