32" Falcon My First Scratch Build

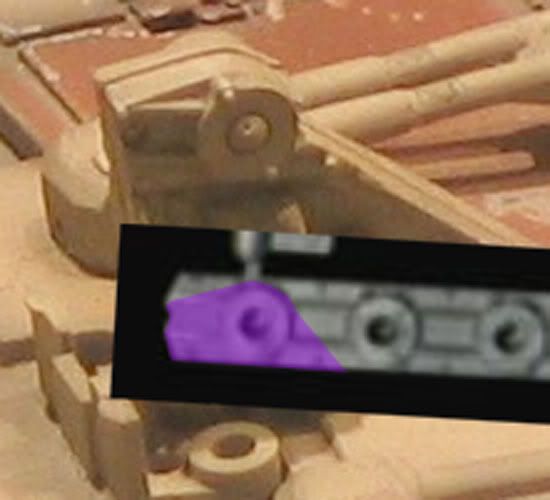
Well really just Moe's & TK1608's recent build & the Halsten photos from studioscale.com. Heres one where you can see the armor plating & sheeting together pretty clearly. I was told that these were both 0.75mm for the sheeting & the armor. The mandibles are supposed to be 0.50mm & maybe also the cockpit tube armor. There are people that know here pretty much for sure but they haven't spoken up. My ability to extrapolate(a word I only recently learned) measurements is non existant & really rely on the advise of others. :confused

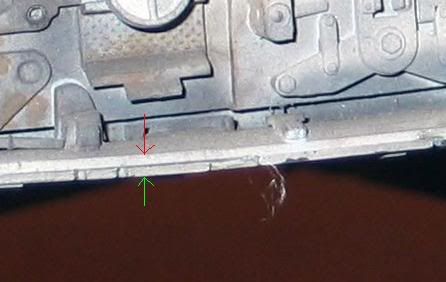
Hey if you look a the bottom of the trench in this picture, where it
touches bottom hull.....you can see the plastics edge, it looks much thicker
than what your using! It looks about the thickness of the ribs your using
or is it my eyes? :confusedLOL That looks like 1.5 to me, I would find it hard to
believe they would use something so thin on almost the very surface!
Even with the plating the thickness your using will have soft spots all
over it between the ribs!! Not something I would think they would
use on a miniature that had to go to work every day.
I am not a SS Guru by any means, it's possible the original was
built in a way that allowed for the thin styrene.But looking at the picture you posted above
only .......I would go with a bit thicker, but thats just me!!!!!
 
Last edited:
Thanks again michael,

after looking more closely at the reference I came to the same conclusion. Im going to get a mate to put the calipers on an MR & see what he comes back with just as another precaution. Things have stopped until I sort this out. Im going to get some mathematics tuition aswell to help me with this extrapolation thats needed for measurements. :wacko
 
Ya well it's not a big deal anyway you haven't glued anything down,
so if you want to go thicker you just need to cut it out again!:lol:thumbsup
 
Thanks mate, definately will be doing :rolleyes A friend gave me measurements also from the MR on the thickness of the dome & plating. There might be a difference in thickness between continents :lol
 
Guys, this is just a cropped bit of the pic above. The arrow in red is the dish plating and the green arrow points to the armour plate. My pc skills aren't great so this is the best I can to to show what I'm on about. These both look the same thickness to me. Frank told me a while back that the armour is .75, so from that info and this pic, I came to the conclusion that they're both the same thickness.

waistcroparrow.jpg


What do you guys think ?...I need to find an MR pic of the same sort of area, but if I remember rightly, when I looked at my pics of the MR the plating looks thicker. I think the real ILM model's plates look thinner.

Also on my model there aren't any large soft spots because I added a lot of ribs, and when the armour's added it stiffens it up some too.

Anyway see what you think.

Cheers

Phil


Phil, the dish thickness is hidden by the armor plates (due to the angle), if you look at the full pic, take a look at the right and you'll notice that the dish is thicker than the armor plates. You'll also notice that the dish has an uneven thickness, probably because it was vacformed. My guess is the dish was vacformed from 1.5 or 2mm thick styrene sheet, coming down to something between 1mm to 1.5mm once vacformed. But that's enough because something vacformed with a curved shape is very strong, even with this thickness.

Just my 2 cents !
 
Can someone varify this 1/30 Bandai Hummel I bought is the one used on the 32"?


Well good news... I found out last night as I was doing some ID on the Falcon (gonna build another 32" MF right after the ISD is finished with all my left over kitparts :)) and I found out that the "hummel parts" were scratched and kitbashed. I found the tip of what they used for the master, it's from a 1/12 DFV ford engine :

mf32scratchedpart.jpg


That's an easy find and I cant believe there's noone here that already knows that...

The kind of ball inside the hole of the ford engine part is probably an airbubble created in the mold when they poured the RTV. Can be recreated by adding a small ball inside the part, or, with some luck, without using a pressure pot ! :D
 
What would be nice is if you could fill in all those ribs,
and vacuum form that shape.The plastic your trying to put
over them looks a bit thin. I do realize it's going to be plated
as long as all those ribs are perfect you should be ok. But if
they are off here and there that thin plastic is really going
to make it stand out. Is it possible to use the same thickness plastic
as the ribs are made of?


Ya kind of lie what I said J-man A formed shell out of 2mm
would be sweet and real strong thats how I would do it!
You could bring it somewhere and have it formed if you can't do it,
it would be well worth it!! But if you decide not to go that route
just thicker in plastic might be better.
 
Phil. Thanks mate for comin in. Your help has been immeasurable on this build. Julien also big thanks to you & not forgetting the 3d-builder. The support Ive had from you guys has been extremely helpful & very much appreciated. Its what these forums are all about. Im going to go with a thicker sheet. I just have to waite until Im paid to buy one so I'll try & get all the boxes cut & mocked up inbetween. Cheers guys & nice find Julien on that strut piece. Any more tips on constructing the rest :rolleyes
 
Phil. Thanks mate for comin in. Your help has been immeasurable on this build. Julien also big thanks to you & not forgetting the 3d-builder. The support Ive had from you guys has been extremely helpful & very much appreciated. Its what these forums are all about. Im going to go with a thicker sheet. I just have to waite until Im paid to buy one so I'll try & get all the boxes cut & mocked up inbetween. Cheers guys & nice find Julien on that strut piece. Any more tips on constructing the rest :rolleyes


Hey I am learning through your build!!!:lol:thumbsup
But if and when I can help I will pitch in ......no problem!
 
Guy's I must be missing somthing here, Julien I'm confused...If I look at the right of the picture, as you said, I can see the edge of the armour plating broken off showing the unpainted black styrene edge and the armour layer split from the layer beneath. I see remains of glue or filler or whatever. Is this layer that has split from the armour not the dish skin then ? I can see that the plate behind the tank suspension parts doesn't look parallel but that would be the upright waistband backing plate before the matilda and other suspension detail was added wouldn't it ?

Also to the left of the shot, above the tank wheel...is it matilda ?...there's an amour plate, rectangular shaped with no notches. Just to the left of that plate in the gap before the next plate there's another layer, is this not the dish skin either ? Again to me, these layers both look about the same thickness...give or take.

Jase, sorry to hijack your thread but, I just wanna be on the same page..I'm thinking my eyes are deceiving me..:confused

Cheers

Phil
 
No seriously to nut these questions out is what its all about. It will only help others with their builds & Im 110% for that. Fire away by all means. :confused The only thing I can say is it really does look thicker than 0.75mm.
 
No seriously to nut these questions out is what its all about. It will only help others with their builds & Im 110% for that. Fire away by all means. :confused The only thing I can say is it really does look thicker than 0.75mm.


You still chugging away on this?
 
Yes Michael just a slight pause due to budgetary resitrictions Am also considering the Vaccuforming of the hull. Haven't done that before though going through your threads is leading me to believe I can do it. Just deciding yay or nay... Either way Im going with the 1.5mm styrene & more supports. Ive done some test with scraps, sorry spare pieces & it bends to the dome curve fine. Would be optimal to vaccuform it though :wacko
 
Yes Michael just a slight pause due to budgetary resitrictions Am also considering the Vaccuforming of the hull. Haven't done that before though going through your threads is leading me to believe I can do it. Just deciding yay or nay... Either way Im going with the 1.5mm styrene & more supports. Ive done some test with scraps, sorry spare pieces & it bends to the dome curve fine. Would be optimal to vaccuform it though :wacko

Yes it's optimal to form it!!!:lol:thumbsup
But being optimal will include other expenses,
such as building or buying a set up, more plastic,
a heating source, if the size of plastic you need
doesn't fit in your home oven. I would say if you want it formed
pump all your time into the pattern and take it somewhere
and get it done if you don't want to do it.....or can't at home.
If you don't go that route 1.5 should work just fine!!!:lol:thumbsup
 
Sorry this has been down for a bit. Purely finances holding up the show :unsure. Well it looks like Im going to get the domes 'Vaccuformed' so I just need to make the plug(shape that gets plastic sucked over it to form the shape required). Ive got the ribs cut out. Whats that foam stuff i use to fill it in? Then I coat in Bondo & sand smooth I believe :confused I know Michaels done this in his thread so guess I better go back & read through. The stupid plumber also lost my pipe I wanted rethreaded & hasn't given me a replacement :confused. Hope to have a good update soon. I want this on its mount pole as soon as possible.
 
Thanks for the feedback. Ok thought it was long over due to get some more progress on this & stop just thinking about it. I traced the hull dome shape onto some styrene then cut the shape. I used the cut piece as atemplate to make 3 more. I will most probably make another 4 atleast as these will be the ribs used to make a 'Plug' for 'Vaccuforming the 2 upper & lower Hull Domes. These will be spaced out & filled with a substance( not 100% sure which yet) I have an engineer from work helping me out as he used to be a boat builder, amongst many other useful things :rolleyes. My plastics supplier will do the Vaccuforming once I have made the plug. Its actually going to be quite easy because of that & the finished product should be very good as long as I get the plug right :lol Big thanks to Michael, Julien & Phil for their help, guidance & support.
 
This thread is more than 13 years old.

Your message may be considered spam for the following reasons:

  1. This thread hasn't been active in some time. A new post in this thread might not contribute constructively to this discussion after so long.
If you wish to reply despite these issues, check the box below before replying.
Be aware that malicious compliance may result in more severe penalties.
Back
Top