Here's Boba Debt's Tutorial:
I use red felt covered inserts made from Styrofoam to display my props at home and when I go on the road.
If constructed properly they will protect your prop and look great to.
*******************DISCLAIMER*******************
Use this tutorial at your own risk. I can not be held responsible for any damage or injury sustained from the improper use of tools or procedures that are outlined below.
*******************DISCLAIMER*******************
• Knife or Table Saw
• Straight Edge
• Utility Knife
• Extra Blades
• Black Markers
MATERIALS:
• 2" Thick Sheet Styrofoam (Available at Wal-mart)
• Red Felt
• Krylon Spray Contact Cement
• Large Brown Paper Bag
1. MAKE A PLAN
The most important step to the whole process is to plan how you are going to use your inserts. Select a few common sizes that will be universal for your collection and take into account future props that you intend to buy.
Once you have assessed your needs and have a good plan you can start to make inserts.
2. CUTTING THE STYROFOAM TO SIZE
The easiest way to cut the Styrofoam is on a table saw.
You can cut several "Blanks" at one time with one setup and they will be consistent.
If you do not have a Table Saw at your disposal you can cut the Styrofoam with a long knife if you follow these instructions:
• Use a very sharp knife and cut the Styrofoam on a solid surface such as a scrap of plywood.
• Make several shallow cuts, keep the knife vertical at all times.
• Use a straight edge to make the first cut.
Work slowly to avoid knife wobble which will result in ugly edges.
3. MARKING THE CUTOUT
• Gently place the prop on the Styrofoam insert.
• Outline the prop with a black marker.
Keep the outline close but don't worry too much about neatness at this point.
4. REMOVING THE CUTOUT
• Use a utility knife to cut the outline to a consistent depth.
• Keep the blade edge vertical when cutting into a corner.
• Once you have cut the outline make a series of straight cuts in the field about 1/2" apart.
• Use the regular knife to carve the scrap out of the field. Do not go to deep.
• Wobble the scrap until it breaks free and discard it.
• Scrape the bottom of the field with a utility knife blade until it is consistently flat.
• Use your thumb to smooth the floor of the cutout.
Turn the cutout upside down to remove any crumbs that will prevent the felt from sticking.
5. CHECKING THE CUTOUT
• Place a thin piece of cloth over the cut out.
• Set the prop in place and check for proper fit.
Remove and additional material and check as needed until the prop sets in the cutout without a great deal of force.
6. CUTTING THE FELT
• Use a Sharp utility knife blade to cut the felt.
Make sure you leave enough extra felt to cover the sides. I add 4" - 6" to each side.
7. APPLYING GLUE TO THE INSERT AND THE FELT
• Cut paper bags open and tape them to a flat surface.
• Place the felt on the paper bag face down.
• Place the Styrofoam insert on the felt face up.
• Spray a light coat of contact adhesive on the top surface of the Styrofoam.
• Set the Styrofoam aside.
• Spray a light coat of contact adhesive on the felt.
Let the contact adhesive dry according to the Manufactures directions.
8. GLUING THE FELT TO THE INSERT
• Once the glue is dry lightly set the insert onto the felt face down.
• Flip the felt and insert over.
• Place the prop in the cut out.
• Pull the felt loose all around the prop.
• With considerable force push the prop until it is seated at the bottom of the cutout.
• Starting in one corner stretch and flatten the felt against the top of the insert.
• Work your way around the entire prop removing all wrinkles.
• Once you have the top looking good pull the felt over any of the sides.
• Use a new utility knife blade to trim the felt 1" or more from the top of the insert.
• You will need to cut 45 degree angles at the corners to prevent the felt from overlapping.
Use compressed air and tape to remove all of the Styrofoam crumbs that are sticking to your insert.
YOUR INSERT SHOULD BE DONE
Hope that you find it useful and that it can be archived for posterity.
I forgot to add my thanks to David (BobaDebt) for allowing me to repost this.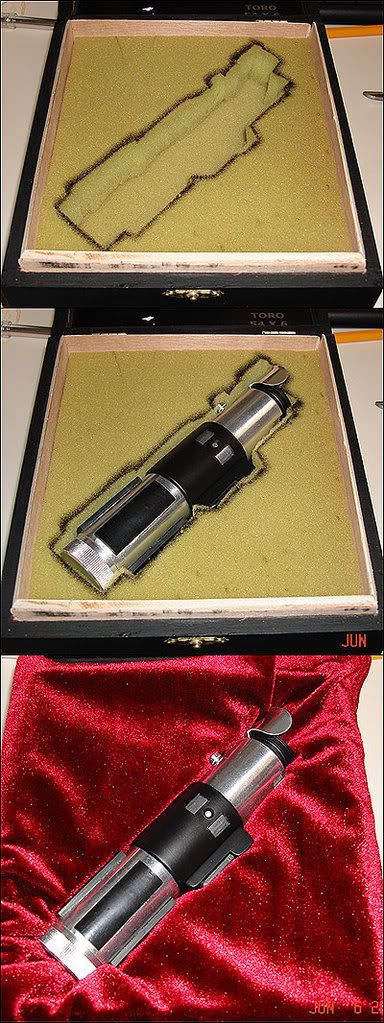
")


