Help with painting panels on Falcon

Jimmer

Well-Known Member
I purchased the Hasbro Hero Falcon about a year ago (actually started the New BMF Coming thread which has taught me volumes) and immediately stuck it in the closet to watch what you pros did with the beast. I'd never painted a model other than basic weathering but knew that I wanted this as a major display.

So after patiently watching everyone's techniques all this time, and practicing on smaller ships in the meantime, I've decided to bite the bullet and start work on mine. My major regret is not buying a second Falcon to use as a "trial version" which is why I'm only now beginning on mine.

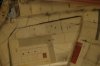
Anyway, one thing I plan on doing (I'll state now that all my ideas are "borrowed" from you guys) is to use the decals as a guide to build all the panels with styrene.
So I got to thinking, why not paint the styrene panels before attaching to the ship to make the whole painting process easier. I'm sure there's probably a very obvious reason not to do this that I'm not seeing, but I thought I'd ask if this would be a bad idea.

I hope this makes sense, as an example I considered painting all the "red" panels before actually attaching and so on with each "off" colored panel.

Thanks for any input.
 
First thing I can think of would be that the Falcon's paint is not limited to the boundaries of the panels. The red will spill over multiple panels. Pic example attached. P1210017.jpg
 
I think it would be a good idea to paint the panels prior to attaching - if you are confident that your gluing method has little risk of marring the finish. As CB notes, it won't save you from having to still mask and paint other areas on the model, but it will save time masking up panels that are a solid color other than the base color. I'd still recommend putting tape on the inside to keep overspray from contaminating your glue surface.

If you are mixing colors, just take care to make notes so you can keep the colors consistent - assuming you want them to be! Color variations are a time-honored method of increasing the 'visual complexity' of a model. (Having seen some of the color schemes applied to other YT-1300 depictions, I wonder if the red areas are the remnants of a more extensive original color scheme. Anyone for a 'new from the showroom' finish on the Falcon?) Alternatively, paint a color all at once (like all the reds, etc.)

R/ Robert
 
I'm not sure that I would bother painting the panels before, but I don't see any issues with it other than glue might leak out from the edges and look gross. If you are doing a lot of mods you might paint some recessed areas first because getting at them before they are attached is easier, you have to mask over them if you paint later.
 
The issue with the panels is the slew of little 'notches' in the edges. Masking that cleanly would be a real pain that is avoided if painted before attaching... I know I'll be doing that way.

Regards, Robert
 
First thing I can think of would be that the Falcon's paint is not limited to the boundaries of the panels. The red will spill over multiple panels. Pic example attached.View attachment 588729

I cannot believe that as much time as I've spent studying the Falcon (even grabbed the Hayes manual) I have never noticed the extended boundaries like the red in your example.

I'm not sure that I would bother painting the panels before, but I don't see any issues with it other than glue might leak out from the edges and look gross. If you are doing a lot of mods you might paint some recessed areas first because getting at them before they are attached is easier, you have to mask over them if you paint later.

The glue is a major issue - too much and it's a mess, too little and the edges of the panels won't be secure. If I go this route I'll do a test area on the underside.

The issue with the panels is the slew of little 'notches' in the edges. Masking that cleanly would be a real pain that is avoided if painted before attaching... I know I'll be doing that way.

Regards, Robert

Those little notches are what got me thinking along these lines. I don't airbrush (need to make the jump) and I can see a lot of time spent around those notches.

Thanks for the input, guys.
 
Jimmer, you're using some kind of CA (super glue) right? If so, perhaps using a gel type to 'tack' the panel in, then a thinner product to seal up the edges.

R/ Robert
 
It's odd you mention that, recently user Musceleni (spellling?) recommended using lock-tite to do a cannon fix on an x-wing and it works amazing with plastic and is a gel. I'm hoping to get a good enough finish on the Falcon to use this and not eat that cheap plastic they used. I've always used a combination of model cement and Tamiya extra-thin cement but recently it's been lock-tite and tamiya ex-thin on most projects.
 
When I did my Falcon a few years ago, I used a liquid masking agent for the notches in the panels. It took some time, but the results were worth it.
 
It depends on what effect you prefer,....the painting of the 32' studio model was done in a much quicker fashion than the 5 footer,....pen lines drawn on instead of decals etc,...if you want to go studio accurate,....paint it in this style....or make it your own & paint it more carefully with more detail

J
 
When I did my Falcon a few years ago, I used a liquid masking agent for the notches in the panels. It took some time, but the results were worth it.

That's a good idea, I've never worked with a liquid mask before. A local art store has one but it is a light brownish-color that I'm afraid may stain. Do you happen to remember the brand of the agent you used?

Thanks
 
I would go so far as to say that just about 0 of those notches were masked around when they painted the red. Examples...
View attachment 589108View attachment 589109View attachment 589110View attachment 589111View attachment 589113

Those are some helpful photos, and most importantly the info I've gotten from this thread has shown me how important it is that I study some high quality detailed photos like these to get best results. I'm not concerned with 100% accuracy (not possible with all variations of Falcon models anyway) but I do want to put in the time to highlight a lot of small details that photos like these provide.

Thanks
 
I rushed my Hasbro Falcon in a day. It came out OK........not perfect by our standards. It was more or less a test on what could be done in a day with a $60 toy. Looking back, I can see the mistakes of my rush job.

The Falcon is a combination of at least 10 different painting, weathering techniques. Over-do/ Under-do one and it doesnt look look correct. This is the perfect project to do a little and let it sit for a while to then re visit in a week or two. Dymerski does great video tutorials on Model Space. One of the best tips he gives is to paint the base coat in a lacquer paint and do the rest of the details in a water based paint. That way if you want to re do a section, you can wipe it off with water.

Base coat, shadow weathering, air brush panel offset weathering, scoring, over panel weathering, pencil marks, Tooth Bush splattering, dremel Tool blast marks, rust marks, dry brushing, weathering with chalks.......etc. The added problem is that the original model was finished by various different artists who had different signatures.

If you take your time it will have an accurate feel to the filming miniature. My Hasbro was my test bed, I am building the Deago MF now.

I agree completely, I knew I wanted to really try to do a nice job with this so mine's sat closeted for a year while I watch tutorials and practice painting. I've also been using some of the Tamiya Weathering Mastering sets and am starting to practice with normal pastel powders.

I'd love to do the Deago (bit out of my budget...:cry) so I'm just thrilled Hasbro produced the cheap-o hero version. My biggest regret is not purchasing 2, could have done a test version, then painted final version & finally re-visit the first to do an alternate paint scheme or even a crashed version (always thought that would be a really cool diorama).

I'm up in the air as far as displaying goes. I have a set of the 7 landing gear that came with the BMF and saw where one RPF member is building styrene landing gear covers then attaching magnets to Falcon, land gear & gear hatch covers so that he can alternate between landing gear and flight mode - like that idea.
Lately I've been considering actually hanging it flat on a wall like one would hang a painting.

Last idea is also a "borrowed" one that I saw on a website shortly after the BMF was released. A guy built a coffee table that was 6 sided, the sides basically followed the geometric shape of the Falcon - hope that makes sense. In other words, the side of table where engine is was the largest, the side where front of ship is was the shortest. Bottom of table was solid, sides and top were glass.
I think it would be cool to build something similar, only fill in the bottom with sand and use the landing gear - perhaps even make a battered tarp as seen in Force Awakens.
 
That's a good idea, I've never worked with a liquid mask before. A local art store has one but it is a light brownish-color that I'm afraid may stain. Do you happen to remember the brand of the agent you used?

Thanks

The one time I used a liquid mask I used it on a matte surface, and it was very difficult to remove (actually impossible in some places), and yes, it stained the finish (and ruined the model).
If you decide to use a liquid mask, I would gloss-coat your model before applying it.
 
The one time I used a liquid mask I used it on a matte surface, and it was very difficult to remove (actually impossible in some places), and yes, it stained the finish (and ruined the model).
If you decide to use a liquid mask, I would gloss-coat your model before applying it.

Shows the importance of using a 'test pig' for any finishing systems you intend to try for the first time. I learned that the hard way (probably like everyone else!) Fortunately, even without a second copy, Jimmer, you can still use the inner surface for testing (first have to take it apart, though... Bwaahhhaha!)

R/ Robert
 
Jimmer- I used "Mr. Masking Sol neo" from Mr.Hobby. It's a blue-green color, and didn't stain or discolor any part of the model, and that was on a flat enamel finish. I did have some areas where it was pretty tough to get off (undercuts and inside sharp corners, IIRC).
Hope this helps!
 
Last edited:
I use latex for masking & for doing chipping effects,....I put a drop of a bright colour....Vallejo Red, Blue or Green,...just to see where I'm masking,...it never stains & never lifts the paint underneath

J
 
I use latex for masking & for doing chipping effects,....I put a drop of a bright colour....Vallejo Red, Blue or Green,...just to see where I'm masking,...it never stains & never lifts the paint underneath

J

+1

I use the pink stuff and it works a treat. It takes a while, but you can build it up in layers on difficult details to get a really good edge. You can also put it on so it overlaps masking tape to clean up any small gaps or difficult bits like radiused corners.
 
Last edited:
This thread is more than 8 years old.

Your message may be considered spam for the following reasons:

  1. This thread hasn't been active in some time. A new post in this thread might not contribute constructively to this discussion after so long.
If you wish to reply despite these issues, check the box below before replying.
Be aware that malicious compliance may result in more severe penalties.
Back
Top