You are using an out of date browser. It may not display this or other websites correctly.
You should upgrade or use an alternative browser.
You should upgrade or use an alternative browser.
Tom's Real Parts Obi Wan Saber
- Thread starter thd9791
- Start date
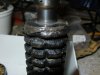
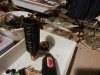
After re-doing the weld I actually welded the neck to the grenade. oops (technically that's not a big deal) but the weld isn't that noticeable. I took newspaper and dabbed some semi-gloss black paint on the grey weld to camouflage it some more. My grenade is very gray and metallic-y (and lumpy) so this seemed to work.
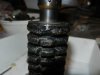
I also took a crappy pink grinding cone and attacked some of the rust. in taking it off, it seemed to spread! I think its just the rotary tool throwing rust - I hit it with a damp paper towel and that seemed to help. I dried the grenade over an open flame on my stove to avoid rust forming....left a tiny bit of rust for 2 reasons: weathering and avoiding bare patches of metal that would still look weird. I then hit it with a liberal amount of clear coat (I got excited)
pics to come!
I got pics of every step but after I stopped removing rust, and then the clear coat drying..
Attachments

You are a beast, man! Great job on the rebuild. Again, the patch/rebuild is very intimidating.
I did pick up a JB Weld liquid steel putty stick for mine. The fluidity of the one you got scared me (I have learned that I don't handle certain material too well heh heh)..I'll let you know how it goes.
I can only hope the repair I do is in the same ballpark as yours.
I did pick up a JB Weld liquid steel putty stick for mine. The fluidity of the one you got scared me (I have learned that I don't handle certain material too well heh heh)..I'll let you know how it goes.
I can only hope the repair I do is in the same ballpark as yours.
Gosh, thanks Andy! yea, I haven't used a stick before and I'm VERY interested in how that pans out. Especially for grenades in good shape, you need a smooth surface if you're going to patch it. I also originally imagined wiping away the excess and just leaving putty in the holes but that's how Apoxie sculpt works. Not JB Weld *sigh*
I'm watching the clear coat dry. Since it's flat (there was only gloss, flat and satin and gloss usually looks cheap) the grenade isn't as shiny but "gun metal-y"Tthe whole thing looks like one solid relic!
I'm watching the clear coat dry. Since it's flat (there was only gloss, flat and satin and gloss usually looks cheap) the grenade isn't as shiny but "gun metal-y"Tthe whole thing looks like one solid relic!
Nice save! Good job! :thumbsup
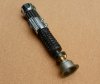
Is that a real balance pipe?
Is that a real balance pipe?
Nice save! Good job! :thumbsup
Is that a real balance pipe?
Thanks!!! As my first real part I was so scared to taint the authenticity. The balance pipe...youre not the first one to ask - this is the first balance pipe replica made after the discovery. Boba Debt weathered them - were you around for that run? I don't know who exactly machined them, maybe serafino? Anyways, other than the real thing, I'm really appreciative kurtyboy sold it to me while I was in college.
- - - Updated - - -
Oh and that's one of your weathered necks welded to the damn thing - it looks identical to the real thing, just with cleaner machining :lol
Thanks man! The validation feels so good, I kept using hand sanitizer because I was sweating trying to concentrate..
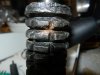
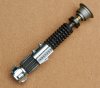
here are some beauty shots with a modern handwheel, @RomansEmpire booster, clamp spacer, transistors and grenade neck, A real Graflex clamp, Exactra 20 bubbles, Motorola M series amplifiers, British Hales frag body and that ol' balance pipe replica!
here are some beauty shots with a modern handwheel, @RomansEmpire booster, clamp spacer, transistors and grenade neck, A real Graflex clamp, Exactra 20 bubbles, Motorola M series amplifiers, British Hales frag body and that ol' balance pipe replica!
Attachments
Last edited by a moderator:
Chaim, that image is having a hard time leaving my head. I will have strange dreams tonight.
Thanks for the kind words everyone! I haven't put a D ring on because I always seem to be able to keep turning the pommel. I have a metal washer and then a rubber one below the booster to brace against the knob...hmm, like you Andy I just have a bare T nut and no endcap on too. Maybe it's the rubber grommet, I might be slowly crushing it
Thanks for the kind words everyone! I haven't put a D ring on because I always seem to be able to keep turning the pommel. I have a metal washer and then a rubber one below the booster to brace against the knob...hmm, like you Andy I just have a bare T nut and no endcap on too. Maybe it's the rubber grommet, I might be slowly crushing it
Saber looks great ! Most impressive.
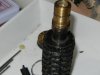
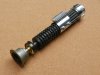
Well, everyone, I now have re-chromed sink knobs and I found a real Browning Flash Hider, booster attached.
I'm not sure if it has a separate bearing or not, still finalizing the transaction, however this means some structural changes.


I used a brass "cabinet" allen screw to affix the pommel to the booster. Its head is very flat, something I was looking for in case I add a cap, and there's a T nut and washer bracing it inside, facing it. (opposite the direction of the photo)


Now, the question is how do I bolt the booster, clamp and grenade together easiest and cheapest....
I'm not sure if it has a separate bearing or not, still finalizing the transaction, however this means some structural changes.
I used a brass "cabinet" allen screw to affix the pommel to the booster. Its head is very flat, something I was looking for in case I add a cap, and there's a T nut and washer bracing it inside, facing it. (opposite the direction of the photo)
Now, the question is how do I bolt the booster, clamp and grenade together easiest and cheapest....
Similar threads
- Replies
- 16
- Views
- 279
- Replies
- 4
- Views
- 615
- Replies
- 2
- Views
- 476