Hi:
I think this is my first post here. It's definitely my first asking for advice.
I could use some expert advice on the best way to mold and cast a PKE meter replica I've been working on for quite a long time. Like 20+ years.
First, some context. (Feel free to skip to the bottom to see my specific questions regarding molding and casting.)
1984: My friend Bryan and I built pretty accurate Proton Packs after one of the hero packs (which I've recently learned was Spengler's) was put on display in a museum in Scottsdale in September of 1984. The story behind that build can be found here:
http://marshall-arts.net/ProtonPacks/index.html
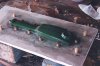
1989: To go along with the release of Ghostbusters 2 I built this PKE meter:
The YouTube page includes a brief description of how I built this one.
1993-ish: I learned the origins of the original prop, and a co-worker of Bryan's (who was working as a set dresser) found an original Iona polisher and let him have it after Bryan showed him my scratch-built version. Bryan's work also found him visiting Modern Props where he was able to snap a bunch of good photos of the prop that was just sitting open on a workbench. Here are a few of the photos he took:


When I first started this my plan was to make a resin copy of the Iona polisher, modify that resin copy to create the PKE, then make resin copies of the finished PKE. At the time I harbored thoughts of producing (and possibly selling) multiple copies. The shell had sort of been loaned to me, and my plan was to return it, but I could never produce a good copy.
This is the setup I was using in Tucson to make copies of the Iona shells:
View attachment 477805View attachment 477806View attachment 477807View attachment 477808View attachment 477809View attachment 477810
I played around with several types of Polytek's Poly 74 series urethane RTV rubbers for the mold and their Poly 15 series of casting resins. I think I eventually got some pretty good molds, by my casts had problems. They had a tendency to set up too fast while working in 100 degree heat.
1995: I moved from Tucson, AZ to Portland, OR. My job, and then our computer animation business (1999) monopolized much of my time.
2002: After seeing some of the nascent Ghostbusters prop sites come online I endeavored to start up again on my PKE meter. I decided to use the Iona shell that Bryan had acquired after getting his permission to keep it. Here are a few progress photos; the first one shows my 1989 PKE next to the unaltered Iona shells-pretty close given the lack of reference materials in 1989:


2003: The shell modifications were fairly straightforward, but I ran into trouble with the electronics. With the help of some engineer friends I was able to create schematics and build a circuit that used analog components to drive the servos and run the LEDs activated by touch switches, but my resulting circuit and wires were way too big to fit in the shell. At that point my enthusiasm to complete the prop kind of petered out.
2011: The mechanical contraption I had driving the wings in my original PKE finally broke beyond the point of repair, so I replaced those innards with a single servo driving the wings. I also reworked the order of the wing LEDs, which were wrong due to film pulldown issues with the videotape I used for reference in 1989.
2014: My neighbor, a programmer and electronics hobbyist, introduced me to the Arduino, and I've been playing around with that to drive the servos and lights. I still have a bunch of things to figure out.
2015: I'm trying to get going again on making resin copies of my finished shells. Though I no longer harbor ambitions of mass-producing these (the Matty reproduction is probably sufficient for most people) I want my final to be resin, rather than the original modified Iona shell. It's a little delicate; I've had a rib pop off several times while building it.
Here are the finished shells:


My plan is to use techniques and materials similar to those I used in 1993. I've purchased a 2 quart kit of SharkThane Flex Pro 30-20 to make the mold. Since I only plan to make one or two copies of this I didn't want to pay twice as much for silicone. I'd blanket my masters with clay to produce plaster mother molds and seal the plaster with mold release wax.
What I don't remember from 1993 is whether I sprayed PVA onto the plaster and my Iona styrene master before spraying on Pol-Ease 2300 mold release.
So should I spray PVA on the plaster before spraying on the Pol-Ease release?
Should I spray PVA onto my styrene PKE master before spraying on Pol-Ease? I know that some casting rubbers can eat into styrene, and I really want to avoid that in case I end up using my master for the final prop.
Once the surfaces are prepped I'd pour the casting rubber to fill the void around the master. I'd move the pour hole from the middle of the piece (as I had it in 1993) to a low corner so the rubber can find its own level, working low to high. I guess I'd need a vent hole at the high spot.
Assuming I can generate good molds for each shell half I'd then cast finals using SharkThane Hard Pro 70-3. This resin seemed closest to styrene (at least of what the Fiberlay near me had in stock).
I could never determine the best way to pour (or inject) the resin that mitigated bubbles when I was trying to cast my Iona replica in 1993.
To produce the minimum amount of bubbles should I have the mold horizontal with the hero side facing down (and a few vent holes), like in this rendering?

Or should I have it oriented vertically like this?

Sorry if this was too long-winded. I try to offer as much detail as possible.
Thanks for reading. Any advice or suggestions would be appreciated.
Cheers.
Shawn Marshall
Portland, Oregon
I think this is my first post here. It's definitely my first asking for advice.
I could use some expert advice on the best way to mold and cast a PKE meter replica I've been working on for quite a long time. Like 20+ years.
First, some context. (Feel free to skip to the bottom to see my specific questions regarding molding and casting.)
1984: My friend Bryan and I built pretty accurate Proton Packs after one of the hero packs (which I've recently learned was Spengler's) was put on display in a museum in Scottsdale in September of 1984. The story behind that build can be found here:
http://marshall-arts.net/ProtonPacks/index.html
1989: To go along with the release of Ghostbusters 2 I built this PKE meter:
The YouTube page includes a brief description of how I built this one.
1993-ish: I learned the origins of the original prop, and a co-worker of Bryan's (who was working as a set dresser) found an original Iona polisher and let him have it after Bryan showed him my scratch-built version. Bryan's work also found him visiting Modern Props where he was able to snap a bunch of good photos of the prop that was just sitting open on a workbench. Here are a few of the photos he took:
When I first started this my plan was to make a resin copy of the Iona polisher, modify that resin copy to create the PKE, then make resin copies of the finished PKE. At the time I harbored thoughts of producing (and possibly selling) multiple copies. The shell had sort of been loaned to me, and my plan was to return it, but I could never produce a good copy.
This is the setup I was using in Tucson to make copies of the Iona shells:
View attachment 477805View attachment 477806View attachment 477807View attachment 477808View attachment 477809View attachment 477810
I played around with several types of Polytek's Poly 74 series urethane RTV rubbers for the mold and their Poly 15 series of casting resins. I think I eventually got some pretty good molds, by my casts had problems. They had a tendency to set up too fast while working in 100 degree heat.
1995: I moved from Tucson, AZ to Portland, OR. My job, and then our computer animation business (1999) monopolized much of my time.
2002: After seeing some of the nascent Ghostbusters prop sites come online I endeavored to start up again on my PKE meter. I decided to use the Iona shell that Bryan had acquired after getting his permission to keep it. Here are a few progress photos; the first one shows my 1989 PKE next to the unaltered Iona shells-pretty close given the lack of reference materials in 1989:
2003: The shell modifications were fairly straightforward, but I ran into trouble with the electronics. With the help of some engineer friends I was able to create schematics and build a circuit that used analog components to drive the servos and run the LEDs activated by touch switches, but my resulting circuit and wires were way too big to fit in the shell. At that point my enthusiasm to complete the prop kind of petered out.
2011: The mechanical contraption I had driving the wings in my original PKE finally broke beyond the point of repair, so I replaced those innards with a single servo driving the wings. I also reworked the order of the wing LEDs, which were wrong due to film pulldown issues with the videotape I used for reference in 1989.
2014: My neighbor, a programmer and electronics hobbyist, introduced me to the Arduino, and I've been playing around with that to drive the servos and lights. I still have a bunch of things to figure out.
2015: I'm trying to get going again on making resin copies of my finished shells. Though I no longer harbor ambitions of mass-producing these (the Matty reproduction is probably sufficient for most people) I want my final to be resin, rather than the original modified Iona shell. It's a little delicate; I've had a rib pop off several times while building it.
Here are the finished shells:
My plan is to use techniques and materials similar to those I used in 1993. I've purchased a 2 quart kit of SharkThane Flex Pro 30-20 to make the mold. Since I only plan to make one or two copies of this I didn't want to pay twice as much for silicone. I'd blanket my masters with clay to produce plaster mother molds and seal the plaster with mold release wax.
What I don't remember from 1993 is whether I sprayed PVA onto the plaster and my Iona styrene master before spraying on Pol-Ease 2300 mold release.
So should I spray PVA on the plaster before spraying on the Pol-Ease release?
Should I spray PVA onto my styrene PKE master before spraying on Pol-Ease? I know that some casting rubbers can eat into styrene, and I really want to avoid that in case I end up using my master for the final prop.
Once the surfaces are prepped I'd pour the casting rubber to fill the void around the master. I'd move the pour hole from the middle of the piece (as I had it in 1993) to a low corner so the rubber can find its own level, working low to high. I guess I'd need a vent hole at the high spot.
Assuming I can generate good molds for each shell half I'd then cast finals using SharkThane Hard Pro 70-3. This resin seemed closest to styrene (at least of what the Fiberlay near me had in stock).
I could never determine the best way to pour (or inject) the resin that mitigated bubbles when I was trying to cast my Iona replica in 1993.
To produce the minimum amount of bubbles should I have the mold horizontal with the hero side facing down (and a few vent holes), like in this rendering?
Or should I have it oriented vertically like this?
Sorry if this was too long-winded. I try to offer as much detail as possible.
Thanks for reading. Any advice or suggestions would be appreciated.
Cheers.
Shawn Marshall
Portland, Oregon
Last edited by a moderator: