kristenhenry70, I see now. Thanks for posting the pictures! It would be easier to cut it as one strip, but I have leather that is already dyed, so I'm not sure if wetting it to shape will work. Do you know if wetting/shaping works with dyed leather?
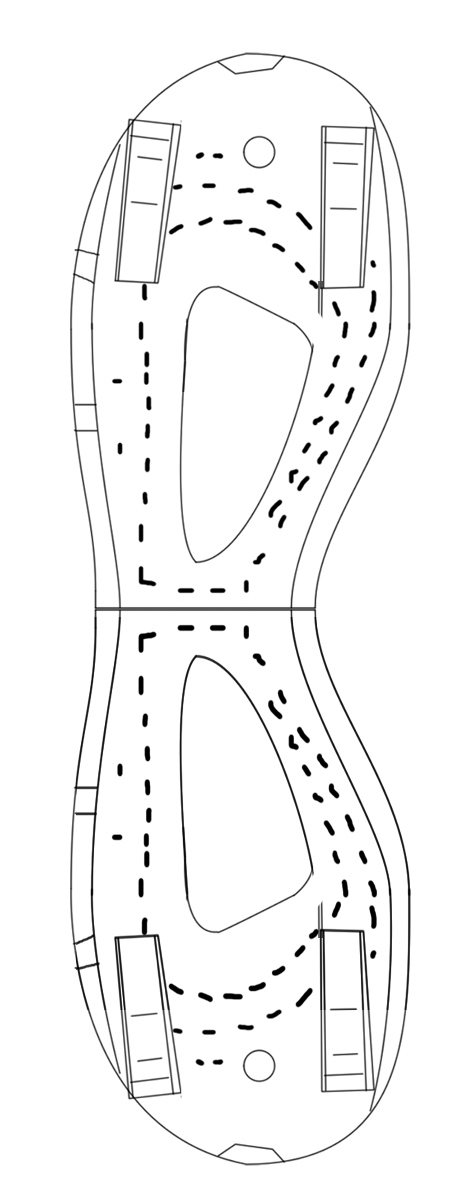
I was going to use the template that division 6 made that has the end pieces already angled and cut it out that way.
View attachment 606109
Wetting dyed leather will work just fine..
")
Of course you can lay it out like the drawing, but having done that the first time and then having done it the other way the second, it is not only much easier to do it as a straight piece and bend, but it is also much more conservative with your valuable leather.
What I would do is cut it out like his drawing from paper instead of your leather--and don't worry about the end details. that way you can check your lengths and see what you will need.
The "lower" portion will be the longest, so once you know what that has to be, cut a 3" strip that length. then you can draw out the "bottom" portion on your leather, and then draw out the "upper" portion right above it, making it the length that you need it to be. then do your cutting and wet/bend the lower part into place.
Really either way that you want to do it is fine in the end. I just found the wet/bend method easier.
If you do decide to wet/bend, it's helpful to use your hole punch and punch a hole into the leather where each of the slits will end in the center. that way you won't just have a slash end in the leather--which can tear over time. instead you'll have those slits ending in a round hole, which will resist tearing.
Once I knew how long my "bottom portion" was to be, I measured in from each end the right amount so that I would have my "middle portion", and I punched a hole there, so I had two holes in the leather, about 5-1/2 to 6" apart from one another, and 1-3/4" from the bottom of the leather. Then I split the leather from each of those holes outward toward the end of my leather strip, forming the "two halves" if that makes sense.
I could have just cut it, but like I was saying, the round little hole resists tearing better.