newmagrathea
Sr Member
Lichtbringer What are the dimensions of the bearing disk? Hopefully I'll hear today.
Last edited by a moderator:
")
Not what I remember
Are we talking about the same? The disc with 3 holes in the outer rim, and the lower center?
I really want to build this blaster now, as I've seen it for real and it is only an MGC (not a real mauser, an impossibility for a Brit/Japan resident).
You know that the only restriction on deactivated guns in the UK is that you're over 18? They're actually less restricted than replica guns.
That's great! I bet they're stupidly rare though. I dunno how to get one while living in Japan though. Hopefully the law remains unchanged into the near future.
Just went to the exhibition again, cloakroom was enforced so had to leave bag and dslr with them. Pocket camera only but got caught between getting it out and taking the shot. Got out a notebook and started writing in it and another lady asked me to stop using my pencil, then handed me a bizarre disposable plastic pencil that is like an ice cream spoon at the cinema. Why? No answer!. Abeno Harukas Art Museum sucks.
Anyway I wrote with it.
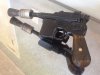
-Flash hider is 100% aluminium. The exposed bits had minor scratches on, its definitely aluminium.
-Behind the flash hider looks darkened black.
-There is a lip illusion, its a 45 degree slope preceding something like a 30 degree slope. I will draw a diagram later, got rough dimensions.
-The mgc barrel was cut approx 1cm shorter than the edge of the flash hider. Its plugged and the plug is black.
-Inside the hood of the flash hider is darkened with the same weathering as on the outside.
-It is a black rattle can overspray weathering job.
-The lines are not pencil, it's like a 2mm marker pen. A little translucent or perhaps ink fading has occured.
-The spacer is made from 2 things. An approx 8mm brass thing, straight edges. Ontop of this is some silvery metal thats about 2mm thick. They are identical diameters and are about 2.5mm wider in diameter than the thorens above.
-Actually, the thinner spacer component looked the same thickness as the thorens but was 2.5mm (ish) wider.
-Thorens staining is a grey gloopy looking filler or glue that is unknown to me. Its about 1cm in diameter but irregular as you'd expect. It's slightly glossy in an irregular way. The closest colour match I can think of is the old lego light grey colour.
-Thorens is screwed on with phillips screws. Maybe 3.5 or 4mm screw heads, domed head. Don't know the official engineer name - panhead?
-The screws don't overhang the thorens at all. Theyre flush with the edge completely.