kingart4
New Member
Greetings! I haven't posted here before, but I posted a collage with a question on the Facebook site and was told I should post what I have been doing here. So I'll start from the beginning. First, I have been a puppet maker for about 3 years (www.PuppetSmithArts.com). I have A.D.D. (which I love!) and after working with and casting liquid latex for a while, wanted to experiment. Ever since I was little and had a cheesy, latex Frankenstein mask, I wanted to make a mask. So I built a Marvel's Rhino mask. Then a suit to go with it. Then a walk-around character inspired by Sweetums, then a Ben Gimm Thing.

Next I decided on trying an updated Mugato - that white ape with spikes from TOS Star Trek? I sdulpted, molded and cast the face in foam latex; sculpted, molded and cast horns in liquid latex; and made some arm extensions with cable operated fingers.


Though this was coming out quite well, the A.D.D. struck and I got super excited to scrap Mugato and do a Return of the Jedi Rancor instead. Trying not to waste what I had already done, I looked online and found that "Bull Rancors" have horns. So Mugato is gone, now starts the Bull Rancor Build which started with a concept sketch:

10/28/14 - I started bottom up. So I first built a PVC structure to support a pair of scrubs. Then added foam. I took a soldering iron and burned in creases and folds.


Next I needed a frame for the body. I started with an old Boy Scout backpack frame and added flexible conduit for the shape. I added foam to it and yes, i looks like a hot dog, but I will add details!!


I temporarily glued some horns on it to give an idea of the look. eventually I will contact cement them on then add the latex, which should make them permanent. But so you and I both have an idea where I'm going...

Moving on up, I made a big block of foam to start the head. I am use to building up foam for the puppets. This is my first 3d carving. For the carving, I maily used a simple, electric kitchen knife and an exacto. Oh, a tip if try this, wear a mask/regulator. I think there was as much in my nose and lungs as you see on my face!


Here is the sculpt, with and without the jaw.


I purchased a pair of 5" platform boots, covered them in foam and sculpted feet. I also added a layered tail to the body


I took the arm extensions and added styrofoam to them so I can just lay foam over them for the shape. I started that last night, but haven't finished. I am trying to work out how to get the elbow to bend and not fold up when bent. Though I don't think that will be a huge issue once the latex is done.

Very plain arms. On the left you can see where I'll put my arms in. The right is at an angle so you can see that I added an elbow pad. Hopefully the pad will be enough so when I bend my arms, it will fold in the right place (path of least resistance)
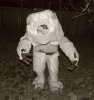
Side-view minus arms. Note the feet are just next to it so it will be taller.
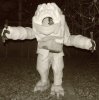
front-view minus arms. The head is leaning a bit. But so is the body. I'm hoping that when on, it all straightens up. Well, at least to my body's version of straight! lol


Now, this was the question I posed that prompted them asking me to post here:
"I am nearing completion of the fabrication stage and will soon beginning covering this monstrosity in liquid latex. Any suggestions on a spray method of applying it? Equipment to use other than a brush? I have a compressor for air brush that does at least 60psi if that helps (I think 80psi, but not positive)?"
Many said I could use a spray gun. I have found them with tip sizes 0.5, 1.5 and 2.5mm. Which size is best? I assume not 0.5mm but of the other two? I want it to spray, but not ridiculously thick. Thanks!


Next I decided on trying an updated Mugato - that white ape with spikes from TOS Star Trek? I sdulpted, molded and cast the face in foam latex; sculpted, molded and cast horns in liquid latex; and made some arm extensions with cable operated fingers.
Though this was coming out quite well, the A.D.D. struck and I got super excited to scrap Mugato and do a Return of the Jedi Rancor instead. Trying not to waste what I had already done, I looked online and found that "Bull Rancors" have horns. So Mugato is gone, now starts the Bull Rancor Build which started with a concept sketch:
10/28/14 - I started bottom up. So I first built a PVC structure to support a pair of scrubs. Then added foam. I took a soldering iron and burned in creases and folds.
Next I needed a frame for the body. I started with an old Boy Scout backpack frame and added flexible conduit for the shape. I added foam to it and yes, i looks like a hot dog, but I will add details!!
I temporarily glued some horns on it to give an idea of the look. eventually I will contact cement them on then add the latex, which should make them permanent. But so you and I both have an idea where I'm going...
Moving on up, I made a big block of foam to start the head. I am use to building up foam for the puppets. This is my first 3d carving. For the carving, I maily used a simple, electric kitchen knife and an exacto. Oh, a tip if try this, wear a mask/regulator. I think there was as much in my nose and lungs as you see on my face!
Here is the sculpt, with and without the jaw.
I purchased a pair of 5" platform boots, covered them in foam and sculpted feet. I also added a layered tail to the body
I took the arm extensions and added styrofoam to them so I can just lay foam over them for the shape. I started that last night, but haven't finished. I am trying to work out how to get the elbow to bend and not fold up when bent. Though I don't think that will be a huge issue once the latex is done.
Very plain arms. On the left you can see where I'll put my arms in. The right is at an angle so you can see that I added an elbow pad. Hopefully the pad will be enough so when I bend my arms, it will fold in the right place (path of least resistance)
Side-view minus arms. Note the feet are just next to it so it will be taller.
front-view minus arms. The head is leaning a bit. But so is the body. I'm hoping that when on, it all straightens up. Well, at least to my body's version of straight! lol
Now, this was the question I posed that prompted them asking me to post here:
"I am nearing completion of the fabrication stage and will soon beginning covering this monstrosity in liquid latex. Any suggestions on a spray method of applying it? Equipment to use other than a brush? I have a compressor for air brush that does at least 60psi if that helps (I think 80psi, but not positive)?"
Many said I could use a spray gun. I have found them with tip sizes 0.5, 1.5 and 2.5mm. Which size is best? I assume not 0.5mm but of the other two? I want it to spray, but not ridiculously thick. Thanks!
Last edited by a moderator:
")