My "2nd" Mark 42 Helmet Build. WIP and Pic Heavy

POEPOE93

New Member
​Hey guys, so I've finally decided to share some of my work. I'm probably about halfway into this build so there will be quite a few photos for these first few posts. This is technically my second pep build of a Mark 42 helmet(and pep in general). The first one I did started having too many problems, and I didn't have enough experience yet to try and fix them. This ones going quite a bit better, the main problem I'm running into is probably keeping the symmetry of the helmet. There's also the problem of trying to make it as movie accurate as possible. Anyways enough talking and more progress pictures. Hope you guys enjoy.

IMAG0020.jpgIMAG0021.jpgIMAG0022.jpgIMAG0023.jpgIMAG0024.jpg

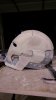
This is the first one I worked on. Its the Mark 8 by Gimpee I think. I had lined the edges of the three parts with aluminum foil before fiberglassing, and I kept them together for a bit of bondo work before separating them. Once i separated them, the parts just didn't seem to line up properly. The gaps were too big, and I didn't want to try and fill they back in and risk to great a variance in symmetry. I may come back to this one some day, but not quite yet. I had the scale a bit big too, so I fixed that for my new one.

IMAG0012.jpgIMAG0007.jpgIMAG0006.jpgIMAG0004.jpgIMAG0019.jpg

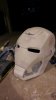
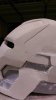
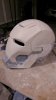
Started with Blackouts Mark 42 unfolded by StreetSoul. I chose this one this time because the back part wasn't separated in the pep stage, so I figured I wouldn't have as many problems with gaps later on in the project. I also scaled this on down some so it wouldn't be so big on my head, but still allow room for hardware later on down the road.
 
Last edited:
Re: My "2nd" Mark 42 Helmet Build

IMAG0025.jpgIMAG0027.jpgIMAG0031.jpgIMAG0039.jpgIMAG0044.jpg

Glued popsicle sticks in to the straight bits, and lined all the edges that are touching with aluminum foil. First layer of fiberglass resin laid on to strengthen the model a bit. You can see I mixed waaaaayyyy to much resin. I always seem to either over or underestimate how much I need.

IMAG0059.jpgIMAG0062.jpgIMAG0078.jpgIMAG0084.jpgIMAG0083.jpg

Fiberglass glued down, and resin brushed on. I had used binder clips to hold the two parts together, but it took me about an hour of prying with pliers to get them separated from the fiberglass. Took apart the faceplate and main helmet, and removed the foil. Sprayed a quick coat of primer just to take down some of the tackiness of the resin on the outside(didn't want to fully cure for some reason...) I was feeling better at this point, seeing that the gap between the two parts this time around was minimal. I don't really know what I did different this time around but something seemed to work out better, so I wasn't complaining.
 
Re: My "2nd" Mark 42 Helmet Build

IMAG0090.jpgIMAG0091.jpgIMAG0092.jpgIMAG0098.jpgIMAG0100.jpg

Started the body filler work on the new one. You can see the difference in size between the two. Its not a huge difference, but I think its till pretty significant. From the angles of the photos, you can see where the new pep is slightly warped, but it's fixable in the body filler stage, so I wasn't worried.

IMAG0104.jpg

Checking the face plate size.
IMAG0114.jpgIMAG0113.jpgIMAG0112.jpgIMAG0130.jpg

I found this trick from some thread on here, I can't recall which one. The blue tape helps sooo much when trying to keep crisp corners, and a difference in level between two parts. Just make sure to peel the tape while the filler is still kind of pliable. After some more filling and sanding I had the face plate at this stage. It looked alright to me, but not quite right, so I ended up adding even more filler and more sanding later on.
 
Re: My "2nd" Mark 42 Helmet Build

IMAG0131.jpgIMAG0135.jpgIMAG0136.jpg
Now for the parts of the helmet that are separate, but need to be as close as possible. I tape one side of the two pieces, and then layer on body filler maybe 1mm thick on the non taped side.Then I put both parts back together, and push them together tightly. As the filler squeezes out the sides, I smooth out the excess so that both pieces are level with each other as well. Once one side is done, repeat on the other, and the seems should be fairly tight. I didn't make sure they were perfect yet, just because I know they may get messed up later on as I do other sections of the helmet.
 

Attachments

  • IMAG0154.jpg
    IMAG0154.jpg
    1.7 MB · Views: 97
  • IMAG0153.jpg
    IMAG0153.jpg
    1.8 MB · Views: 100
  • IMAG0143.jpg
    IMAG0143.jpg
    1.7 MB · Views: 103
  • IMAG0125.jpg
    IMAG0125.jpg
    2 MB · Views: 102
Re: My "2nd" Mark 42 Helmet Build

IMAG0161.jpgIMAG0162.jpgIMAG0163.jpgIMAG0164.jpgIMAG0165.jpgIMAG0166.jpgIMAG0168.jpg

This is basically where I'm at now. Started to work on the ears (hardest part I've attempted yet...). Still plenty to do before I'm done and ready for paint, but I've also come pretty far from the paper model which has me feeling really motivated. Updates are gonna slow down now since school is starting soon, and I'm back to work.

Also, any feedback (positive or constructive), comments, questions, or concerns are gladly welcomed and appreciated.
 
Haven't been getting too much work done. I just started school recently and have been putting in more hours at work, so between the two I hardly have any time to work on the helmet.

IMAG0174.jpg
This is my wall of reference photos at the moment. A few I found online, and the others I grabbed from the movie. If anybody was looking for some movie reference photos I have some more, so just let me know. I'm also waiting on the "Marvel's Iron Man 3: The Art of the Movie" book for more references.


IMAG0182.jpgIMAG0183.jpgIMAG0184.jpgIMAG0185.jpg
I haven't made too much progress on the helmet itself though. Just been trying to even up and fix some of the problem areas and symmetry. The top of the helmet is probably the hardest part for me to get a nice even curve. Every time I try to fix one side, the other either seems too low or too high... But I hope I'll get there eventually.

I also decided to smooth up and test paint the faceplate of my failed helmet to see if the paints I bought would end up working out.
IMAG0192.jpgIMAG0190.jpgIMAG0189.jpgIMAG0187.jpgIMAG0194.jpg

I put on a 3-4 coats of primer, then 3-4 coats of the red and gold, then maybe 3-4 coats of clearcoat. I'm liking the red, I think it was Duplicolor Toreador Red. But the gold (Duplicolor Champagne Pearl) isn't quite right. I don't know if its showing in the pictures, but it's too silver. The only time the gold seems to match up is when I hold it up near the reference photos. But then again, that's under crappy garage lighting. I'm probably gonna try a different gold when I get the chance. If anybody has any suggestions on good paints for the Mk 42 they would be greatly appreciated.
 
This thread is more than 9 years old.

Your message may be considered spam for the following reasons:

  1. This thread hasn't been active in some time. A new post in this thread might not contribute constructively to this discussion after so long.
If you wish to reply despite these issues, check the box below before replying.
Be aware that malicious compliance may result in more severe penalties.
Back
Top