DDS2 - Netflix Marvel’s Daredevil Season 2 Full Suit Replica Build ***Very Pic (and Text) Heavy***

AegidiusDesigns

Well-Known Member
RPF PREMIUM MEMBER
Hello everyone!
It’s been a long, long time since I’ve posted here but I’ve wanted to document this build and share it with all of the members on this board for a bit, so today I’m taking the plunge.

To say I’ve been passionate about this suit would be a major, major understatement. From the day we got a teaser poster in April 2015 of Charlie Cox in the season finale red suit to the moment he upgraded to the altered Season 2 suit he would keep throughout Defenders. The character of Daredevil has meant a lot to me since childhood and seeing such a serious, impressive modernised take on the classic design left me in awe. I realise the ‘tactical modern’ approach to the suit may not be everybody’s cup of tea, and I understand, but to me it works on every fundamental level of costume design.

EDC64F25-6AC6-4612-AA03-B728C45C7370.jpeg


All this to say, it’s been a dream project of mine, as a -previously amateur- now professional costuming artist to one day have as good a replica of this suit as I could possibly get. I’ve been working on this, keeping it in the back of my mind since 2017.

846D6D2C-53B8-4359-9892-C62C197E9C61.jpeg


In those 6 years, I tried going down a wide array of different routes to achieve this goal. Working with various bespoke cosplay making companies (many of which you’ve most certainly seen out there), designing patterns that at the time I didn’t have the means or skill to sew together myself, only to be disappointed. Not to take away from those makers, but I quickly realised no 3-400 dollar, or even 1-2000 dollar suit would fit the high standards I’d set for myself. Same thing with the accessories. After trying so, so many different various helmets from several makers, none of them fit right or ‘hit the mark’ exactly as I wanted them to.

048D7210-33AC-48ED-8C7E-AD667D6F1BCD.jpeg

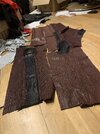
(photo was the first version of this suit I got custom made in late 2017, with a helmet from a maker I sadly don’t recall the name of. If it comes back to me I’ll update the thread for anyone interested)

Since then, I’ve honed my skills in 3D modelling, sewing, patterning, moulding and casting to such a point that last year I decided I would go the distance and make the entire suit myself.

In my sharing this project with this community I only ask that people are respectful of my work and research, and also ask to not be inquired to about selling anything. Nothing I share here will be for sale. Please don’t ask for 3D files or patterns. I spent countless hours on them and for me to be asked to put a price tag on passion is not the goal here. I only share this with the hopes that people with a shared interest in this costume can see the work and learn some things about this suit along the way, if they ever might want to tackle this project some day.

I also wish to extend thanks in advance to any and all individuals who’ve helped me along the way, as well as credit the incredible teams working for the production at the time for designing such a beautiful suit, as well as all the people responsible for chronicling so many wonderful references of the costumes over the years.

So, with this very wordy introduction out of the way it’s with great pride and pleasure that I welcome you to this build thread. A 6+ year long journey of research, passion and love, documented for your eyes to see. I invite any curious reader to join me as I catch us up to all the major steps of this journey, leading us to my current situation with the project. After which I’ll be posting updates until the day I hopefully, finally… push this thing across the finish line.
 
The first challenge with this project was deciding, definitively, which direction I would go. The reason why I specify and stress so much that I am doing a ‘Season 2’ style replica is because, for anyone unaware, the suit gets a massive change in episode 4 of Season 2 of the series. After Punisher shoots Daredevil, it notoriously cracks his helmet, which gets replaced with a new model. One would think that’s the only change, but the costuming department used that opportunity to sneak by a bunch of changes under the radar. The base vest and upper body remains primarily the same, but the lower body is entirely different. We get new boots, some Bates 8 boots without the black ‘armor’ pieces on the shins and forearms. The gloves are also completely new, and keen eyed observers will have noticed some of the rubber armour parts on the shoulders have switched from black to red.
From there on, the suit remains primarily the same, save for a few subtle changes I’ll be covering below.

Posted below are two very insightful reference images that showcase the differences. Both images were pulled from the incredibly helpful PropStore Marvel Netflix Auction from several years back. A few months ago, a second auction was held that had different, new items as well. If you’re interested in looking into it I recommend checking out both, though the second didn’t have as much to offer regarding DD suits.
FDDE4365-6458-4747-A64D-8572CA7818AB.jpeg

20CCFFE8-B83F-4A4B-81CC-E19C1916F166.jpeg


As mentioned, the suits kept getting minor little changes as their appearances went on. In Defenders, the helmet appears more matte for example. There are different textured versions of the suits. On the Propstore auction Archive you’ll find prototype suits with completely different screen printing textures on the fabrics. They vary from the production used suits, to the promotional suits worn for Season 1 posters and things like that… So be aware of this if you’re keen on a particular appearance of the suit.

One of the other main differences I’ve noted was that on the upper body ‘vest’ component (the piece that covers the chest and back, separated from the undershirt covering the arms and neck), there are little top stitches on the red panels between the black pads. These end up going away as the suit kept appearing, so it’s an important detail. There’s also a subtle little extra bit of black on the side of the lower ab section which goes again with the Season 2 iteration.

EED1322B-B5EA-4236-B2CA-A5E8D9162968.png


Also important is the side clip. On this particular photo, the little ‘clasp’ on the side of the vest is different, indicating it’s the ‘Imposter’ suit worn by Dex in Season 3. Matt’s suits always had the same ‘clasp’ throughout S1, 2, and Defenders.

So there we have it. A brief breakdown of the variations of the suit, which I’ve affectionately come to call ‘DDS1’ and ‘DDS2’. And DDS3/DDI (Daredevil Imposter).

Regarding my choice, I decided to start with DDS2. I’d done parts of a yellow concept suit for myself using my first crack at the pattern of the DDS1, so I felt it would be more fitting to focus on the DDS2 and knock it out of the park. That being said, I would love to make a DDS1 some day, down the road…. Maybe…. Probably.

I also started by modelling the DDS1 helmet a few years ago, and decided to tackle the DDS2 on a blank slate as I find it to be considerably more challenging. But I must stress, I love both. I get why some might have preferences, but I love both for different reasons. Speaking of which, let’s start working on the helmet in my next post.
 
The helmet is probably the most important piece of this entire project. It’s the centrepiece, and it’s the thing I wanted to focus on more than anything and make sure I got right before even thinking about the rest.

6DB69B6E-558C-429A-9467-11195A43096E.jpeg


As I mentioned I tried several of the helmets on the market personally. Some worked better than others and did the job but I always felt something was missing. So for this part I decided to go at it from the ground up. I purposely avoided looking too closely at what other makers and artists had done as to not bias myself away from true reference.

My one true reference was working off the work posted by Ismael Salcedo, the Senior 3D Modelling Artist and Concept Designer who worked on the original DDS2 helmet design for the show. He very generously posted some very clear shots of his work over on his Instagram and ArtStation (@FilmGHawz). This was insanely helpful in figuring out all the right proportions and details of the helmet. Paired with all the references I could gather from the Auction photos I managed to get quite far.

It’s important to note that later on, I realised the model created by Ismael was in fact used as reference by Legacy Effects to create a clay sculpt, which I believe was used for the final show. My main point being, there were still super subtle differences between the model references and the helmet seen on screen.

AE2B45A1-96F5-4513-8044-53548ED01B54.jpeg


In the helmet’s construction, it’s designed to split down the middle. I also realised it’s designed with the ‘eye’ pieces separated, glued in place later on. I kept those facts in mind while making my model. I then printed a mock-up sort of prototype of the helmet to test out the fit. I modelled the helmet around a 3D scan of my head, but nothing beats a physical fitting test. Excuse the absolutely wild facial hair. I was goin thru a King Daredevil Phase… (Checchetto fans unite <3)

B0D8DDB6-7972-456A-8F61-3CCB48A02C22.jpeg


The fit seemed good, but as we’ll come to learn this’ll be the start of a long and trying adventure of trial and error. Once I was happy with the fit however I proceeded to start adding the textured areas.

988136AA-BF20-4284-ACF5-7D9A1789C8DD.jpeg


After that was well and done, I took the helmet into Zbrush and added all the little panel lines and details to finish it up. At this point, a few proper textured renders felt appropriate to celebrate !

442EDA2D-8423-45AE-8F72-619D7DF5385B.jpeg

F8FE3664-8DF9-4010-8002-17AE5170F524.png


Hooray :D 
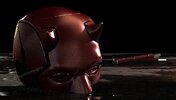
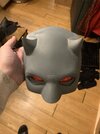
I may have modelled more complicated things before this but let me tell you, reaching this point was so gratifying. This has been such a passion of mine, something I never thought I’d be able to get 100% right how I wanted. And granted, I knew I wasn’t at 100% yet. I needed to let it sit with me a bit more, to refine it. But I’d already gotten a lot further than I ever had. At which point, a friend and frequent collaborator/partner of mine offered to print me the helmet using his large volume SLA printer. So I had to accept ! I revised the model a bit. Changed the eyes, made sure everything was up to snuff and got one last render done before I sent it. At this point I was on my third version of this helmet. The first prototype, the revised one, and now the SLA printed one. DDS2 Mk 3.

2DB13E49-B134-4037-8044-886AF1302926.jpeg

6AA62272-07BA-4B95-8209-B8217E0C5ECB.jpeg

Texture looking sharp!
4AA2698E-3E37-4A4C-9E56-C3D376CD9CDF.jpeg

3D14EF59-6ACA-44F3-B0FE-201ACACE1189.jpeg
DDE16118-E67F-4309-A2B6-ADFE3764F2DA.jpeg


It was around this time that I caught wind that Charlie Cox was coming to a con near me. I’m in Belgium. He’s never come to Belgium or to a place within driving distance to me. And now he’s coming. December 3rd, 2022. Dortmund Comic Con. Oh **** I can meet Charlie Cox !!
Oh ****. I’m going to meet… Charlie Cox.
 

Attachments

  • CA91B208-5BFC-4AF0-9EA0-D3DC00C064CA.jpeg
    CA91B208-5BFC-4AF0-9EA0-D3DC00C064CA.jpeg
    368.3 KB · Views: 62
So now we have a deadline… December 3rd. That’s okay. But this was a project that meant a lot to me, and I did not want to see it rushed. That was my single rule going into this, and I was going to break it for the only valid reason to break it.

But also, who knows..? This might be the kick in the butt I need to dive head first into the pool instead of hesitantly dipping my toes.

So the project was now in full swing. First step was gathering the fabrics I needed. I’d actually gotten some custom screen printed fabric done for this project several years back and still had quite a bit in stock, but most likely not enough to finish the suit. Since that source was no longer available to me to get more, I needed to find a solution. I called upon some friends at Parallel Life Studios to hook me up with their DD fabric, matched to my previously acquired batch!

For the black sections, I ordered some of their DP2 style fabric. It’s the closest match in my eyes and gives a very similar aspect and shine to the real deal. I also got some BW fabric for the balaclava.

I figured the Balaclava would be a good place to start, since it's the one piece I was really completely unfamiliar with. I previously just used a normal sporting goods ski balaclava, so this was uncharted territory.

IMG_3139.JPG


IMG_3138.JPG


It's a decent fit, and certainly looks better than my old balaclava looked before. I'd later come to learn a ton of things to improve on this design. It was really tricky figuring out the pattern AND learning how to make a balaclava both at the same time. As of when I'm writing this, I haven't started on the V2 yet, but it's in the plans.

This was also my chance to work on the eyes. I didn't really know how to tackle the lenses, and my friend that had printed the helmet for me also attempted to print some lenses in dyed, red transparent resin. They were a bit hazy, but I decided to try to work with what I had. I also wanted to test a technique I saw being used on some Halo Spartan visors of chroming the inside of the piece to give it a reflective mirror finish while remaining somewhat seethrough. Only issue being, that only really works if your piece is CRYSTAL clear to start with. So now, my lenses were really hazy.. I still got some moderate visibility out of them but it was limited. It did look really, really cool, though.

IMG_1235.jpg
(I also finally trimmed my beard, I didn't need to keep it for another project anymore)
IMG_3901.PNG


As mentioned, I’d made patterns for this suit before, so I wasn’t going from nothing. That said, I realised there were a ton of new intricacies I’d noticed since I first made the pattern. In those 6 years since I’d first designed the pattern, so much more reference imagery became available. I got the Hot Toys figure. Which -granted- is not exact in terms of accuracy, but it certainly helped me figure things out. Since then we also got those ever so precious PropStore pic. I now had a lot more ressources at my disposal to revise my patterns. I quickly got to work making mockups for the main 3 pieces of the suit.

I also knew I'd be using some sort of muscle padding for the arms, mainly for the shoulder since the real DD suit has this really smooth, rounded shoulder bell that I felt could benefit from some padding to give it a nice rounded shape. I opted out of using chest padding however considering the suit's chest is already quite padded. It's at this point that I drew all the various panels for the chest and back to get a good idea of the proportions for this suit.

IMG_4457.JPG

IMG_4487.JPG


Oh, and yeah, at this point I should mention I'd also actually managed to find a pair of Bates 8 boots. They're slightly too big for my foot but I put some orthopedic soles in them to make em fit me and they're quite comfortable now. I know they're still relatively easy to come by in the US but in Europe it's a different story, so I was pretty excited to finally land on a pair that didn't cost a fortune.

81a-VGrEnQL._SLDPMOBCAROUSELAUTOCROP288221_MCnd_AC_SR462,693_.jpg
 

Attachments

  • IMG_3902.JPG
    IMG_3902.JPG
    299.6 KB · Views: 52
  • IMG_4061.JPG
    IMG_4061.JPG
    1.5 MB · Views: 89
With the helmet well on track, and the mockup done, and with the deadline quickly closing in, I started working on the actual pieces for the suit.
Started with the pants.

I wanted to start figuring out how I'd do the knees first since the rest of the builld would revolve around those pieces a lot. I'm well aware the real pieces were probably urethane, I'm not sure. I was okay making them out of foam wrapped in leather. My first attempt just involved me gluing the faux leather on using contact glue, but it wasn't getting the faux leather the definition of the piece I wanted. I opted to just sew right through the low density 5mm foam and the leather directly, giving a much cleaner result. To clarify I was using sort of 2-way stretch faux leather. A relatively thin material that conformed to the shape nicely.

IMG_1239.PNG

IMG_4557.JPG

IMG_4567.JPG

IMG_4602.JPG


IMG_4663.JPG

DB9BB517-0950-4D4F-8174-F208509BC427.JPG

F5412C24-77AC-4586-ACDC-27E59477D87C.JPG


The pants overall had 68 panels, not counting the fly shield and the 4 straps that sort of connect on the side. It's very complicated, filled with tons of little panels and I wound up using a lot more red fabric than originally estimated when I started. Not helped by the fact the suit has a pretty high waist so I extended the pants well above what I needed just to be sure they'd go high enough. They're also quite heavy, all those seams and top-stitch lines add a pretty hefty weight once it's all put together. My favourite little detail is this sort of mini strap with a metallic ring going through it. I made the ring using a coat hanger, a vice, a metal rod to bend the thing over and a pair of pliers to twist the metal into the tight shape required.
 

Attachments

  • IMG_4602.JPG
    IMG_4602.JPG
    2.4 MB · Views: 44
Next challenge was doing the gloves.
As of right now, I’m still not finished with those, so they’re still very much a work in progress, but I’d made some headway last year already.
Getting decent reference for the fabric ‘underglove’ was tricky, so I’ll admit to allowing myself some creative agency on this piece. I mainly noticed there was some hexagon pattern on the palm, and that the fingers had this ribbed leather texture. I somewhat recognised a red stripe going across the whole hand, too, but it’s kind of hard to say at this point. In some shots it’s there, in others it isn’t. The figures sometimes have it… Sometimes don’t. The most important bit is the armor, anyways. More on that, later.

ACBFDE35-C433-481F-8CD5-E4728EE63C1E.jpeg

B4FFB5F4-0078-4BD5-9ADC-E768FB81C0EC.jpeg


So with a vague idea of what to do I got to work patterning. I opted for some thick, stretchy fabric for the inside of the fingers, for added comfort and mobility (a WISE choice). For the ribbed texture it took me a few tries, but my favourite look came by using a piece of piping cord to create the ribbed effect.
B5431045-6B03-4D48-B58E-E3F3E34FECE2.jpeg

F5E8F196-B9C8-4F53-AA94-8DB4833C7321.jpeg


Now came the time to tackle the armour.
I started off by 3D modelling some pieces just to test scaling and things like that.


4C6BF5E7-554D-4737-AC5A-B009BCE711A9.jpeg

B3835888-F381-4DE6-AA35-DECE450B5786.jpeg


Now sadly this is where this step ends.
I got the pieces resin printed, tried a mould to rotocast some TASK rubber in there and it didn’t work as well as I’d hoped. So I’m still in a research stage for the armour pieces. The glove armour is divided in 3 visible sections. One over the fingers and knuckles, one over the hand and a sort of cuff that wraps around. I’m still debating if I should merge the finger-knuckle and hand pieces or what. Tricky choices.

But still, a fair step towards the goal, even if I’d end up using some other gloves to go see Charlie in the end.
 
This has been a lovely read, and I will follow this thread with great interest!

Bit of trivia for you, though, if you didn't already know: yes, technically the Bates boots are new for the upgraded suit, but they're actually the same boots used with the season one and three black suits!
 
technically the Bates boots are new for the upgraded suit, but they're actually the same boots used with the season one and three black suits!

Thanks for the kind words! And yes I was aware of it, as the story goes Charlie Cox and his stuntmen went to the costuming department and got the 'old' shoes back for the newer suit. I genuinely never looked into the S3 suit however so I was unaware they'd kept em even for S3. I mean, if the shoe fits, don't fix it! lol

With the gloves somewhat out of the way I only had a few days left before the event. I strapped in and worked my ass off to finish the suit in time. I was crunching.. I'd finished 3D modelling all the hard bits and pieces for the suit, and had them resin printed.
'Belt' buckles, shoulder 'strap', and shoulder pads. I also modelled the little hexagonal "nut" piece. Also realising now when I'm posting the screen shots, I took the screen shot before making the final version of the strap I'd end up using. A good friend who'd been helping me along for this build showed me they have a sort of "hourglass" shape to them.
IMG_4527.JPG

IMG_4524.jpg

IMG_4636.JPG

IMG_4592.JPG


The prints came in. Both straps, the glove cuff, belt buckle, and the hand plates for the gloves. I moulded and cast all the pieces, at this point still firmly believing I'd have time to do the gloves. This ended up being my downfall since I spent a lot of valuable time at the end rushing to get gloves done, that I wouldn't end up using.

I also continued sewing, tackling the arms and chest next. Hands down the trickiest, most finnicky part of the arms isn't even so much the assembly, but more so making sure the pattern fits the shoulder pad and vice versa. Making sure the back and front fit on my body properly also turned out to be a more frustrating endeavor than I'd hoped.
IMG_4664.JPG

IMG_4840.JPG


In the home stretch also came time to paint the helmet. I'd ordered a version of the helmet in "one piece" for myself to mould and cast so I'd be able to make flexible rubber casts of the helmet if needed, just like the stunt versions of the helmet. The model got several revisions as well since the one I'd gotten resin printed, making this at this point my 5th proper iteration of the helmet. For this version, I also fused the eyes in it, so that the helmet could be cast with the eyes. Something I'd also kind of end up regretting and working to undo later by trimming the eyes of the casts.

IMG_3815.JPG


IMG_5090.JPG


Home stretch now, only a day or so left until I drive out to Dortmund to meet Charlie Cox..
 
**Disclaimer for this 'Chapter' of the build** This part briefly talks about painting the helmet and then it's mainly about my meeting with Charlie Cox. Feel free to skip this one if you don't care to read bout that, it isn't really relevant to the build at large!

All my pieces were cast and I had my pattern figured out. I actually ran out of red but parallel life studios came in incredibly clutch for me and got me the necessary bunch I needed a day before the deadline.. But so that meant I only had one day/evening to finish the main vest piece, and I still had to paint the helmet. Painting the helmet went okay, but masking took a bit of time, so it was a non stop hustle back and forth to get everything done.

CFDB9588-FDE9-481A-BAE8-4E8B359CC143.JPG

The helmet ended up a bit more red than originally anticipated but I managed to knock it back to the more burgundy tone of the fabric using thin coats of grey and beige by airbrush. Here was the result:
IMG_4948.JPG

IMG_8893.JPG

IMG_8897.JPG

IMG_8898.JPG


After a sleepless night of crafting pretty much non stop it was off to Dortmund. A four hour drive. Thankfully, my loving girlfriend (and Elektra for the day <3 ) took over for the first half of the drive, leaving me to get some much needed shut eye for 2 meek hours. At least I wasn't going to look like a complete zombie. We arrived on schedule, then got stuck in a queue from hell in the car for 2 hours to get parking. 2 hours. I could've slept in more..! What a way to start things off. But regardless, we make it in the Con. Charlie had two slots for photoshoots for the day I think, and thanks to the parking kerfuffle we'd missed the first one. If you've never done a con meet-up like this, usually actors stay at their tables all day for autographs unless they're needed for photo op time slots or going on stages (QnAs n whatnot).. Next photo ops were in 30 minutes so we decided to get a head start and go wait in line already, a wise choice as we were among the first to go!
And then...
E0BCBF59-C65A-49CF-83B7-28F0664FDF15.JPG

Scan10003 copy.jpg


With a photo of my girlfriend's Elektra as a bonus ! She made the suit herself as well, going off of far less reference imagery than me with DD. There weren't any Netflix Elektra costumes on sale at the first Propstore Auction, so the only references were atmospheric promo shots and the show itself. A few days later, of course, the second Propstore Auction dropped with -you guessed it- super clear photos of the Netflix Elektra suit.
But that only confirmed a lot of things she got very spot on, funnily enough.

Regardless, that photo made it all worth it. At that point, condensation had made my lenses super hazy so I couldn't really see. When my turn came, my girlfriend guided me in and just let me go and then shouted "No he really can't see!!", which made everyone laugh. Charlie put his hand on my shoulder, guided me to the photo spot and I requested the back-to-back pose! Magical. Afterwards I still popped the helmet off to say hi, and was greeted by a cheerful Charlie Cox who shook my hand, asked my name and complimented my suit :D:D

I let him know I'd go see him at the autographs later and went on my way. When we went to the autographs later we made some friends with the fellow hornheads in line, and then had a nice little chat with the man himself as he signed a helmet I'd brought for him to sign. I let him know how much the show meant to me as a fan of the character, and showed him my suit in more detail, asking some questions here n there. In a perfect world, I'd have made one for him to keep too, but was strapped for time and materials, I was dry on urethanes and realised too late. (But don't worry, this story's got a happy ending too somewhere further down the road ;) )
 
Alright, so… the Photo happened. But like I said, I wasn’t happy having to rush things. And boy had I rushed things. My suit still looked good, I think. Especially when I know the time crunch I was under. But truth be told I felt like the work wasn’t done. Not by a long shot.
This isn’t the best I can do. It’s the best I could do in a few months. So now it’s time for me to do the best I can do, period.

But not right now. I had poured a lot of energy all at once on this project and needed a clear step back. Needed to reevaluate, recharge. So I did. I didn’t touch it for a few months, just gathered new ressources for the moment I inevitably would go back in, once the itch returned.

And one day… the itch returned. I got a tingling to rework the helmet a bit. While I was quite happy with the colours and finish of it, it still left a bit to be improved upon.
So I went back in. Compared side by side imagery and started really studying the helmet under different lights when we see the various iterations in the show(s). I also didn’t like how the mask sat on my face when closed… Modelling it on a 3D scan of my face certainly helped but trying to conform geometry to a head shape it wasn’t specifically designed for, especially for such a tight, face-hugging helmet was a bit trickier than expected. Also now I had a more serious balaclava, so I know the thickness of what I’m going to be wearing underneath, which plays a part in the whole thing too. (Screen printed fabric is obviously a bit heavier and thicker)

So I went back to quick PLA prototypes this time looking out more precisely for the way the mask sat, most specifically with my nose. In the show, the mask sits firmly on Charlie’s face leaving the lower part of his nose tip and nostrils uncovered.

Therefore, the DDS2 v6 happened. Never to go past prototype stage lol, I’d course corrected too far in the other direction. It rode up to high.

BA86B8FC-62FA-4D2B-B647-D9C74949F018.jpeg


Skipping some steps, with a bit of trial and error on the helmets and a couple weeks later I’d finally cooked up a very promising prototype. Just as well, I’d now partnered with a company that specialises in large volume SLA printing and I commissioned 3 iterations of the helmet from them. While quite similar in overall shape and look, the DDS2v8 was now a completely different model. I’d completely retopologised the original and fixed all my problems from the ground up, no longer just tweaking the base v3 I’d worn before.
Different approach, cleaner end result. Reworked eye lenses, too. This was a new piece. One I was already much happier with. Not that I was unhappy with the previous, of course. But, this felt different. Better!
I also reworked the enclosure of the helmet with some notes from Charlie on how his helmet closes, as well as using a set of new reference photos I’d found from Legacy Effects when they made the helmets for the show.

85A68F99-5789-4358-9E7C-C620F083BC6D.jpeg


The reason why I commissioned 3 helmets is because a new opportunity had presented itself. A friend of mine was going to see Charlie at a con in a few months so I asked him if he’d give Charlie the helmet I couldn’t get to him back in December. I offered to let him keep the second helmet. And to ask Charlie to please sign the third and have it sent back my way. He accepted and so I’m really happy to say I actually managed to get Charlie a helmet after all. What’s more, a better one than the one I’d worn when I met him..!

I made two of those helmets red in the classic colours (one satin, one more matte) and then I made a the third black and red. I told my friend that he could tell Charlie to take the one he liked best, classic red or inverted black.

I also looked a lot further into how to develop better lenses. Obviously what I'd done on the V3 I wore to Dortmund wouldn't cut it for a final design. It was more of a novelty design statement than anything, something that ultimately will look neat on display but isn't meant to be worn.
I wound up getting translucent red tinted SLA prints of the new lenses, adjusted with a calculated width. That prototype lens can be seen in the shot where I have. just the one eye in. I also tried another method of vacu-forming the lenses in clear plastic, and tinting that after the fact with automotive red candy paint. This proved to be my favorite way to go, offering a deep red that retained a bit of that miraculous little metallic edge.


IMG_7972.JPG
IMG_8132.JPG

IMG_8206.JPG

A688FED2-A702-49C2-9B92-34F8452310E3.JPG
47E3A97B-62B6-4A46-8617-63D5FBE4FEA9.JPG
5CEE05BB-0F12-47DF-9E3F-08400BF8C607.JPG
FAD8B3D1-DA48-4C2E-88CF-D0DD3C6F97DC.JPG

iozw69pgaqoa1.jpg


All good fun. I was beginning to be really, really happy with the direction of the helmet. Couple tweaks I wanted to touch up on the final version, but we were getting really close to my desired level. As you might be able to tell even in this photo at the end, the nose would still ride too low. The main reason for that was because there was maybe 5-7mm of space at the top of the head as wiggle room. With that gone, the problem was pretty much fixed. That, along with a few extra tweaks-only-I-would-notice, would lead me to the now 9th iteration of the helmet model, almost a full year after starting this new "from-scratch" approach to it. Since I was happy with my collaboration with the SLA printing workshop from before, I went ahead and ordered 4 new DDS2 V9s for myself. 1 to paint inverted again, 1 to paint in the She-Hulk colour scheme, and 2 to put in the classic colours once again. (Still probably going for a matte one and a satin one)

Unfortunately, when they arrived... 2 had been warped. The back pieces wouldn't fit properly on the front, they wouldn't line up at all. Sure, I could try to heatshape them but for the price I was paying I asked that two be done again. This turned out to be a blessing in disguise, as well. See, as I kept messing with the endless new revisions and iterations, I found myself straying further from the reference. So, back to the lab again for a final pass of corrections. DDS2 V10. For what would now be the best (in my eyes), most perfectly fitting, most faithful helmet I think I could ever make. 6 years of careful study and obsession, condensed into a year long journey with lots of highs and some tiring lows.
At the moment of writing this, I haven't painted them yet. I'm waiting on the rest of the suit to be finished to better match the colors. But it feels right. Every curve, every line, all the details.. I'm really proud of it and I can't wait to share some high quality shots of it when it's finished.

Until then, it's a pretty perfect transition to my next post, which will focus on the suit's upgrades/overhaul.
To make up for the lack of shots of the DDS2 v10, however, enjoy this special little novelty model I did of a custom Bullseye helmet made from the DD base. I really mourn the fact we haven't gotten to see a red-suited DD facing off against a fully suited up Bullseye (yet?). So I had fun remixing the DD helmet into some classic looks for what Dex would wear. I've seen concepts of black DD helmets with the horns shaved off.. It's cool but if Dex really does return I hope he gets a designated helmet. Clearly *based* on DD's design but custom made as his own, like a taunt to ol' Hornhead...! I also played with incorporating much wider eyes, as we saw on the Dex DD I helmet in Season 3. Enjoy!
IMG_1837.JPG

IMG_1839.JPG
 
While reworking the helmet slowly but surely over the course of the last few months it finally motivated me to get back to work on the suit itself.

I’d designed a pattern in 2017 but having gotten so much more and better reference since, I decided it was time to start fresh.
As mentioned though, I was cut a bit short by the December 3rd deadline. So I rushed and painfully admitted to myself this would just be a version 1, and that I’d probably need to start over. And start over I did.

Since I didn’t have time to take any photos of the suit as I was assembling it a day before the event, I threw it on a mannequin tonight as I started writing this to better show where I was coming from.

D1D15573-9F03-4CA5-93BF-B2233063A3D8.jpeg


I need to stress that this suit has seen much better days. I removed the collar, took out the lining, and the pads came loose from the fabric.
By no means a bad attempt, but I would soon come to learn a great many new things that would turn out to explain why I wasn’t satisfied with it, but also why I couldn’t have gotten it right the way I did it.
First of which being the fabric. I assembled this suit properly, in the correct order and with the right seams… but something was off. And that was simply due to fabric choice. After getting a production fabric sample, I realized the fabric I got was way too thin. I’d come to learn that professionally made screen printed fabrics such as the ones used on superhero costumes are much thicker. They use the same screen printing technique but on a much more expensive, thick type of fabric that isn’t commercially available. I could try to source some through some connections but it would turn into an insanely hefty endeavour. So, my alternative is to use a contact bonding agent on some thin, scrap black fabric on the back of the one I’d been using. It makes the fabric about twice as thick, and gives it a much sturdier constitution that behaves much closer to how those thick production fabrics do.

For the central pieces of the suit I wanted to make sure they’d be as crisp and sharp and tightly aligned as they are in the show, and so I sought out the help of a friend who’d done his suit a few years/months ago and who had the cleanest replica I’d ever seen. He explained to me that he and the seamstress he worked with wrapped all the pieces individually in little pads and then handstitched each and every single one of them together.

8A4B7139-B5A4-4E42-8E56-8D37FDBB19AB.jpeg


It took a long time. At first I struggled with some trial and error making sure all the pieces fit together like a neat little puzzle. In fact, you can tell on the first photo they didn’t, since the two red pieces on the side went up too high. Ended up having to redo those a couple times to get it right and account for the thickness added by the fabric layer. I wound up having to redo some pieces a few times. Worst it got was when I had to redo a piece FOUR times to have it fit properly. But time and patience got me thru. And at least that way I had a few scrap bits to test things on.

I also had to figure out the chest. My first attempt was actually a custom 3D modeled chest pad that I made, that I then moulded and cast out of expanding PU Foam (coated with a layer of rubber for sturdiness, longevity and structural integrity). The problem with that technique is that it would lock me into a chest pattern and that I needed to take some time to truly figure out the exact geometry I wanted.
So I tried other things. I tried taking a big piece of expanded foam and carving into it to get the angles and such. It looked okay, but not clean and every imperfection showed through the fabric. So in the end I just went with…. Good old fashioned EVA foamsmithing. I converted the 3D file I’d done into a Pepakura template, reconstructed it in foam, then modified that overall shape as I saw fit. The result was clean, properly proportioned and just delightful. So that’s what I ended up going with after all this time and research. Sometimes all the fancy stuff of moulding and casting distracts from the simpler things that work just as well, or in this case so much better.

48D01C5D-4E54-49E8-8B3F-58CE05D30327.jpeg


It was an incredibly soothing process though, I must say. The hand stitching, I mean. It was fun. I’d just sit there, with something on in the background ladder-stitching my way around the entire front of the vest pattern. It took exactly one background viewing of 2020’s ‘Bloodshot’ along with one FULL first season rewatch of Netflix’s Daredevil..! (Well, minus the last episode because I love that part so much that I can’t help but be enthralled by it every time I see it) So you do the math! Hahah

7D3D7DE8-DE4B-49ED-9802-472C47CAF171.jpeg


At long last... We're heading in the right direction.

747E82F8-CC9C-4A95-8E91-05D1442E7A6F.jpeg
 
Continuing on from our previous step, I kept working at the chest. With the main part done, it was time to move on to the sides and the back.

4780B92D-8811-4604-BCB0-5AC11BC07653.jpeg


Now, here’s where I ran into another issue. I’d revised my front and back patterns so now the strap pieces didn’t exactly work anymore. Kind of… they worked on the mock-ups… but with all the new padding forcing the suit into a different form, it wasn’t working anymore. I was discouraged to realise I’d basically have to go ‘back to formula’ on this and try to come up with better pieces that remained accurate.

But yeah, that one stung. So much so I basically didn’t touch the suit for a whole month. Other projects kept me busy and any little amount of free time I had, I spent elsewhere. Main reason why I’m sharing all this is to underline that projects like these are a process. It’s a full test of wills and motivation and it’s okay to let things sit for a bit and cool off. I’ve essentially been running this marathon for 8 months now and it started with a wayward sprint. So I took a breath. Sat on the bench for a bit, gave myself a break. It’s important !

Which brings us back up to roughly two weeks ago when I slowly started back up on the project, developing the new strap system. I quickly printed a mould out of PLA just to run some spare urethane rubber into and was very pleased with the result.

So now that we had the straps figured out I could finally fully assemble the suit.

C6B462A8-DDB8-4BA4-BDA6-4482DAA8A9D9.jpeg


A full night of headaches later and I’d installed the inner lining to the vest, finishing the overall look.

(no lining)
2E92DFD8-911B-46E2-83DB-587058D93216.jpeg

(With lining)
6F38C131-2001-49E4-9161-00B76E4BF36B.jpeg


Perceptive readers may catch the added little grey clasps on the sides of the midsection. I modelled those before my little break, and opted to print some placeholder clasps before I’d get the chance to get some proper ones done.
I also added the little hexagonal bits in the ab pieces. These are custom made machined little hexagon bits I had made just for this build. I also wanted to get the clasps machined but the cost was severely higher so I ordered some Nylon prints of my model.
That said, having never worked with Nylon I must confess I’m not sure if they’re really all that practical enough for use… so I may have to go a different route like SLA.

Next step is putting finishing touches on the vest:
Making the belt, adding the side straps and getting finalised clasps done
Getting higher quality prints of the straps to mould n cast them
Adding the last few little hexagonal bits here n there.

Honestly I’m over the moon with the progress. There’s still a bunch left to do, the belt won’t be a small undertaking but I’m really happy with how it’s come along so far. I’m also much happier not rushing, taking my time and figuring things out. If it doesn’t work, taking time to fix it and moving forward in a way that I’m always pleased with.

And that’s it! We’re basically all caught up to today. As of writing this I’m working on the belt. It’s almost done, I hope. Had to give myself a couple tries but this one should do it. I’ll of course be posting updates as I go forward, but they’ll probably be less wordy and more punctual. Thanks for reading this far and I hope you’ll follow along and join me as I see this project to its end !
 
FF6BC44B-ECB2-4259-BA30-44712667CACA.jpeg


It’s been a little over a month since my last update so I figured I’d show some progress.
I finished the main vest assembly. Ended up using some more resistant type of SLA resin for the claps and belt D-shaped buckles. Getting the belt to line up flawlessly with the black side-panels was a trickier endeavour than I’d imagined. Still though, I’m super happy with the result.

Next step was to redo the neck, and assemble the whole undersuit with lining once and for all. It’s not done yet, I still need to close the lining on the ends and add some strategically placed snaps here and there to really lock everything down into place.
Still, though, I couldn’t help myself to try it all on at once.

A13D9019-3AC8-4EFF-ABBF-166B5E0664BC.jpeg

5232EAEE-5056-4B88-B9E8-6F4D49B70767.jpeg


The photos are obviously poorly lit phone shots, but I figure I’ll reserve better photos for when the suit is finished and I do the full reveal! All that being said I’m super happy with the way it’s coming along.

I’ve also reworked the balaclava, but I’ll go further into detail on that in another post.

Next step will be moulding and casting the new shoulder strap bits (slight delay on those since one of my resin prints for that got messed up so I had to get another one done) and the new improved shoulder pad urethane pieces.
I also need to do a proper dedicated muscle suit for the arms to give the suit a smoother, filled-in look at the arms. Nothing too bulky, but something to really redefine the silhouette the fabric diminishes a bit.
I’ll also have to finish closing the undersuit’s lining but that shouldn’t be too difficult once I’ve got a better idea of the silhouette.
Last but not least I’ll have to revisit and finish up my glove armor.

With all that being said I’m very happy to report we’re closing in on the finish line.
Thanks for following this build up until now if you’re still with me! :)
 
Outstanding! Thank you for sharing your journey and all of your hard work! I've really enjoyed reading about your process and progress!
Thank you so much ! I realise I’ve been rather radio silent for the past few months here with this build but I’m happy to report the suit is basically done now!

The final, proper, high quality images will come later but for now, I can share the progress I did leading up to the final suit’s completion.

I’m really pleased with the look of the urethane pieces I made for the suit. Getting the colours right was a challenge, I basically had to ‘guess’ the colours and make huge batches of colour pigment in one long casting session to ensure all my pieces would match… only to realise that-while my pigment matched the ink’s tint, from afar it was much too bright compared to the rest of the overall suit. Loooots of experimenting back and forth !


I also played with some casting powders for fun. I figured they’d be too shiny, even with my efforts to keep the aspect matte, but it was a neat test regardless.
You can also see my efforts in trying to match the paint of the helmet to the urethane.

9704C038-A02F-4EAB-8109-F27CE1068748.jpeg

394F3DE8-EA2A-4278-8498-154BAB6B5652.jpeg

7C5E9990-5BD2-4E7A-A596-0E45C8B76A54.jpeg


Speaking of the helmet, painting one of my V10s was quite nerve racking. I have several in case of issues, but only one I’d actually sanded and finished properly for wear, so I didn’t really have room to mess it up. I also needed to decide on a look for the helmet once and for all. Would I match the Defenders matte finish, or go for the more satin-almost gloss of the Season 2? In the end I opted for something in between, though that clearly leans more heavily toward the Season 2 look overall..! In the end I’m super happy with the colors. Slightly brighter, and not as brown as the first one I’d finished to go see Charlie, this one imo is the perfect balance of hue and brightness to make a tint that really goes well with my suit. (As well it should- I spent the better part of half a day adjusting the mix of paint to get it like this! Hahaha)

I included my color recipe. Obviously if you’re attempting something like this build or you’re hoping to paint your own helmet to match your suit it might not be a perfect match to its colours, but hey, if it helps, here it is!

E47D201A-8E60-450C-832A-FE9AB15CEC62.jpeg


Lastly, if you’ll recall a few posts earlier, I really struggled making the gloves! I knew in the end they’d probably end up being the hardest step left. And they were. Boy, were they. But, many failed mould prototypes and half a dozen test casts later,… I’m happy to present my current Daredevil gloves!
Some of THE MOST deceptively difficult things I’ve done for this suit. Making sure the thickness was a perfect balance for mobility and overall aesthetic. In the end I’m really happy with them!
E6B97275-8F36-47BD-AFD2-8A1A3EEC85EB.jpeg

189B067F-805E-4875-81E9-586186CCBE89.jpeg
 
Last edited:

Your message may be considered spam for the following reasons:

If you wish to reply despite these issues, check the box below before replying.
Be aware that malicious compliance may result in more severe penalties.
Back
Top