Show off your RE weathered Obi sabers!

Imitation is the sincerest form of flattery!!! :lol :lol :lol

Here's a pic of my personal sabers:

afbbcomp3.jpg
 
They are usually in stock if you ever decide to pull the trigger : http://www.romanprops.com/kits

Oh, I have already decided... like back in LAST SUMMER! :p :lol
I have just lacked the proper funding for it ;) other replicas/stuff have gotten in the way. RIght now I am about to pay for my most expensive replica related thing, ever. But I will most certainly get back to you when I have some money for you ;) It's a real beauty.
 
I don't want to hijack this thread but here are pics of my Obi saber. It does have Romans parts but I built it with parts from various people here n the rpf. The windvan, grenade, and clamp are from Roman. The emitter came from a saber I bought on Ebay. The booster was a Romans but bought from Peacefrog on here. The pommel it the modern handwheel and came from thd9791. Enjoy!
 

Attachments

  • image.jpg
    image.jpg
    1.4 MB · Views: 122
  • image.jpg
    image.jpg
    1.3 MB · Views: 124

Now, I like this box idea very much. It looks awesome. I hope you don't mind if I borrow this idea too!
 
I agree, I was thinking about this today too! When I first saw it I thought...boy that just keeps the theme of unlatching a lid for a lightsaber (the trunk)
 
Thanks guys, no I have no clue what the box was originally used for. It seems to be maybe Persian or Indian. I was thinking it was for something like a ceremonial candle extinguisher or some other brass doodad. Really have no clue though.
 
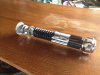
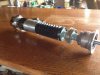
Here is mine. It is the basic, unfinished RE kit with a real graflex clamp (Thanks 3cell!) done up like the Chronicles/Mechanismo book shows. This is my second attempt at a Chron/Mech duplicate and I am much happier with the way this 'un came out :) I did not put the wires that go through the booster and clamp, I always hated that look :lol. I also have a thread where I documented the build:
http://www.therpf.com/f79/chronicling-chronicle-mechanismo-obi-saber-build-225154/
And here are the DIFFERENT and color photos:

What did you do to beat up that balance pipe? It looks great.

Also, is there a "correct" or accurate position for the booster to be rotated to? In particular, where should the large hole be oriented?
 
Last edited:
Also, is there a "correct" or accurate position for the booster to be rotated to? In particular, where should the large hole be oriented?

Yes, if you are looking at the butt of the pommel, the large booster hole will line up with the cube left of the d-ring cube. :)

This will also put the smaller vent holes in the correct position. :)

project2.jpg
 
Thanks! I took mine apart and of course forgot what orientation everything went back together in.
 
Last edited:
Okay, so I got my Obi this week and I absolutely LOVE it. Roman's work is impeccable. However, after reading through all of this and the other long Obi ANH thread over and over again for months, I decided I should try my hand at some additional weathering. This is really my first attempt at aging anything other than paper, but it looks okay so far. I did the ammonia thing to the stem and wind vane, I'll probably put it back in a little longer to get it a little darker. I added the tape to the clamp and used black and copper acrylic paint to add grime to it. I used aluminum black on the grenade and booster. The grenade looks pretty good but the booster is too light. I read in one of the threads that if you leave it on too long it will leave a white residue and won't be very dark, I think that's what happened, so I'll have to do it again. For right now though I think it looks pretty good. I'll probably let it sit for a few days and then see if I want to beat it up some more. I did a LITTLE hammering but I was kind of afraid to do too much.

Before:

IMG_4116.JPG

And after:

IMG_4123.JPG

-----Edit----

Okay, I redid the aluminum black two more times on the grenade and booster, also took some pictures in better light. I'm pretty happy with it now. Not sure what else I would really do to it at the moment.

IMG_4127.JPG

IMG_4134.JPG

IMG_4135.JPG

IMG_4126.jpg
 
Last edited:
That looks fantastic!!! :cool

You used aluminum black on the steel? I've never tried that, but it looks like it worked pretty well. :thumbsup :thumbsup
 

Your message may be considered spam for the following reasons:

If you wish to reply despite these issues, check the box below before replying.
Be aware that malicious compliance may result in more severe penalties.
Back
Top