New BMF coming

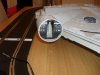
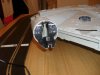
I don't know if anyone else noticed these little differences between the two, but thought I would point out a couple of added and missing things I noticed from the Hasbro Falcon to the Studio model while you all were talking about the cockpit... sorry, my OCD just gets the better of me sometimes. Anyway, I highlighted wuite a few differences in blue. I'm still trying to figure out where the extra hose came from on the HBMF and why one hose wasn't bent like it should be. Some of the differences are extremely minor and I didn't highlight them (like the size of the pair of rectangles). But here's what I got so far.

comp.jpg
 
LrdSatyr8 - as you're probably well aware the details of the Hasbro falcon are a mix of both the 32" Falcon model made for The Empire Strikes Back (used in TESB and ROTJ, and the basis for the digital model used in the special editions etc.), and the original 5' model made for ANH (used in all 3 films).

What you're seeing above is essentially the difference between the "shorter" 5 foot model cockpit and the longer 32" model cockpit. You can either live with it or upgrade to the TESB style cockpit the is available on shapeways here: http://www.shapeways.com/model/2907...e-long.html?li=search-results-3&materialId=61

Jedi Dade
 
Hello all.. I have been a member here for a few years but this is my first time posting. I have spent the last two years finishing my ROTJ fett, and was searching for something new to begin. I ran into this thread and was hooked. I was able to snag the rebel falcon for $50 on eBay and am waiting for its arrival. Anyway I look forward to getting started, and a big thanks to everyone that has posted as it has been a big help in my decision to start this beast!
-Lance
 
LrdSatyr8 - as you're probably well aware the details of the Hasbro falcon are a mix of both the 32" Falcon model made for The Empire Strikes Back (used in TESB and ROTJ, and the basis for the digital model used in the special editions etc.), and the original 5' model made for ANH (used in all 3 films).

What you're seeing above is essentially the difference between the "shorter" 5 foot model cockpit and the longer 32" model cockpit. You can either live with it or upgrade to the TESB style cockpit the is available on shapeways here: http://www.shapeways.com/model/2907...e-long.html?li=search-results-3&materialId=61

Jedi Dade

I wasn't talking about the cockpit... I highlighted a couple of parts on the ship itself in blueish purple (might have to zoom in to see them) where the differences are most prevelant.
 
Sorry I misunderstood your question then... I don't have my reference with me - but it still "could" be the differences between the 5 footer and 32" falcons... or they could have just made stuff up :)

Jedi Dade
 
Hi all,

Havent posted much lately. I was going to buy Jaitea's resin inserts etc when he does them but i decided to use the ones i removed and build them up a bit. Also started doing a test fit of the Deagostini Falcon cockpit parts. Now this isnt set in stone yet, but i trimmed them up to fit and they look ok for the most part. I trimmed the floor/seat area back to compensate for the difference in size of the cockpit. Just wanted to know how much longer the cockpit is that is available on shapeways and is the Hasbro one way too short?
 

Attachments

  • SAM_3739 (640x480).jpg
    SAM_3739 (640x480).jpg
    172.9 KB · Views: 220
  • SAM_3740 (640x480).jpg
    SAM_3740 (640x480).jpg
    169.9 KB · Views: 269
Hi all,

Havent posted much lately. I was going to buy Jaitea's resin inserts etc when he does them but i decided to use the ones i removed and build them up a bit. Also started doing a test fit of the Deagostini Falcon cockpit parts. Now this isnt set in stone yet, but i trimmed them up to fit and they look ok for the most part. I trimmed the floor/seat area back to compensate for the difference in size of the cockpit. Just wanted to know how much longer the cockpit is that is available on shapeways and is the Hasbro one way too short?

Lee.

My Hasbro long cabin cone is 58 mm long. It's a replica of the 32" Falcon. Jaitea has posted a render some posts before.
The original Hasbro cone is too short because is from the 5" studio model.

- - - Updated - - -

Hello all.. I have been a member here for a few years but this is my first time posting. I have spent the last two years finishing my ROTJ fett, and was searching for something new to begin. I ran into this thread and was hooked. I was able to snag the rebel falcon for $50 on eBay and am waiting for its arrival. Anyway I look forward to getting started, and a big thanks to everyone that has posted as it has been a big help in my decision to start this beast!
-Lance

Welcome Lance!!

Yes, this is the hottest thread actually -IMHO-.

Welcome to the Hasbro BMF fever! :D
 
GLUE!

So as this is my second build i was still thinking about how to glue my bits this team. First time around i used hot glue/glue gun and it is still sticking strong as an ox. It aint budging one little bit. Not bad considering im using a Bostik gun with Silverline high strength glue sticks-its got me a bit miffed actually. Im expecting them to fall off but they aint moving.
 
Hi all,

Havent posted much lately. I was going to buy Jaitea's resin inserts etc when he does them but i decided to use the ones i removed and build them up a bit. Also started doing a test fit of the Deagostini Falcon cockpit parts. Now this isnt set in stone yet, but i trimmed them up to fit and they look ok for the most part. I trimmed the floor/seat area back to compensate for the difference in size of the cockpit. Just wanted to know how much longer the cockpit is that is available on shapeways and is the Hasbro one way too short?

Looks brilliant Lee

J
 
Hi all,

Havent posted much lately. I was going to buy Jaitea's resin inserts etc when he does them but i decided to use the ones i removed and build them up a bit. Also started doing a test fit of the Deagostini Falcon cockpit parts. Now this isnt set in stone yet, but i trimmed them up to fit and they look ok for the most part. I trimmed the floor/seat area back to compensate for the difference in size of the cockpit. Just wanted to know how much longer the cockpit is that is available on shapeways and is the Hasbro one way too short?
Nice, we all have to do lists and this is one of mine , looks good
 
Hello. I have glue reports.

I drove into the big city and visited the fratton model centre. This is where I found the same range of glues as can be found on Mr Stickys eBay page.
I bought a few bits and tried it out. Here are my findings.

Now the weakest of all is just superglue on its on it just pops off unless its scored or wraps around some moulded detail.

Next the spray adhesion promoter for painting helps, making it a lot better but the superglue tests still pop away with about 4 x the force.

Now if I clean the surfaces with acrylic thinners (like @RougeTrooper suggested on his X wing thread), then use the “Mr Stickys Cyano Xtra Surface Primer” (Which is the same as the “Loctite 770” that @samster27 suggested on his Falcon thread). Then superglue.
We have a result.

It sticks. I mean properly sticks. I have tried to separate the pieces but they remain together still. I’m sticking Polypropylene :)

*The only problem is the primer acts like a kicker so don’t apply superglue until the things are in place if both surfaces are primed*

Finally success, I mean she needs to hold together right?

Excellent news on the loctite as I have not had chance to use it...nice one spacebob
 
I got a question... I realize this is probably a bit late for some of you that have already started working on this, but for those that haven't, what's the reason behind going thru the hassle of cutting out the 100+ panels to replace the stickers on the hull when you could have just used the stickers the whole time and saved yourself a whole lot of pain in notching all those little notches. Are the stickers not notched at all or not accurate enough? I would think that the stickiness of the stickers themselves would be awesome for total coverage and no gluing involved. You can always just paint over the stickers afterward right? I know they used alot of paper "panels" on the original model. And the thickness of the paper they are printed on is about the same thickness of the panels themselves... So what does everyone else think? I haven't started working on mine yet, but this has been weighing on the back of my mind for awhile now.
 
Last edited:
I did the same thing. I would recommend a few coats of dull coat first, helps seal the paper and gives some tooth for your paint. The warm gray panels are the only ones that I think are a little off in color.

Here are some shots with the decal panels prior to weathering, and beginning stages, I'm almost finished currently I'm adding the decals from the 5 ft version that I have created.

I'll post some when i'm done. "drive safely" here is a LOW res example:LMF_Decal_1.jpg

RHMLF_m.jpgRHMLF_o.jpgRHMLF_q.jpgRHMLF_t.jpgRHMLF_u.jpgRHMLF_v.jpgRHMLF_w.jpgRHMLF_x.JPG

Note; The weathering is NOT airbrush,.. it is all done with Tamiya weathering master pastels (Snow soot rust and orange rust gun metal silver) using the supplied foam sticks and old small square tip brushes followed by 2-3 coats of Testers dull coat. The dull coat knocks it back and diffuses it into the crevasses really well I think.
 
Last edited:
I did the same thing. I would recommend a few coats of dull coat first, helps seal the paper and gives some tooth for your paint. The warm gray panels are the only ones that I think are a little off in color.

Here are some shots with the decal panels prior to weathering, and beginning stages, I'm almost finished currently I'm adding the decals from the 5 ft version that I have created.

Is that the New Hasbro Falcon or the old one with all the lights and sound? Did you use the stickers or did you paint all the panels?
 
That's stunning. You've proved Hasbro didn't make a toy. They've made a low cost replica. Most improvements are within the affordability and capability of almost everyone who ever dreamed of owning the MR Falcon that is definitely display worthy.
 
This is the new REBEL (BMF) Hasbro Falcon. I also have a semi modified Legacy that I just cut down the upper and lower cannons plus firing studs, disabled the front missiles, cut down the lower cargo bays and landing gear. I did NOT modify the cockpit access tub or cockpit as I would have had to reduce the side walls ect on the whole model. At his point I have vision issues and rebuilding the interior isn't an option.(sucks:) get out the violins)

I used a legacy hull for parts; side walls, landing gear, upper and lower jaw box cover, ect as the donor parts for the new (HRMF) version. Got them off e bay for about 150.00 total. I have a post on this on this board.
Hasbro Rebel Millenium Falcon build (BMF) using 95% Hasbro parts

retiredadguy


To answer your Q?

I used the supplied panels (all of the hull panels), plus painted the missing panels using the Legacy and 5ft version as reference. The warm gray panel were attached then washed with a light neutral gray to modify the color. One nice thing about the sticker sheet is there is enuagh extra aria you can use an xacto to cut any smalll missing panels (the red panel by the left front access aria etc.) Once you have finished your weathering if you take an xcto you can nick out the paint chips on them instead of using paint. You need to be carful though as it is easy to get carried away.

hope this helps
 
Last edited by a moderator:
I used a legacy hull, landing gear, upper and lower jaw box cover, ect as the donor parts for the new (HRMF) version. Got them off e bay for about 150.00 total. I have a post on this on this board.

I was thinking about doing that for this puppy myself, nice to know they all fit the HBMF as well... now I'll just have to keep my eyes open for someone selling those parts on $bay!

I used the supplied panels (all of the hull panels), plus painted the missing panels using the Legacy and 5ft version as reference. The warm gray panel were attached them washed with a light neutral gray to modify the color. One nice thing about the sticker sheet is there is enuagh extra aria you can use an xacto to cut any smalll missing panels (the red panel by the left front access aria etc.) Once you have finished your weathering if you take an xcto you can nick out the paint chips on them instead of using paint. You need to be carful though as it is easy to get carried away.

That's what I was thinking. I probably would have coated everything in Future after priming and before painting to seal all the stickers in place before doing any of the detail work. Would probably help with the "damaged" look better that way as well during the weathering stages. Thanks for the info.. and BTW - Your falcon looks AWESOME! Love how it came out!
 
Rebel(Hasbro) Falcon on HOTH ICE planet:)

This is a down and dirty 10min photo shoot as I could not see the LED(sun to bright) on the camera so I had no idea other then I THINK it in frame.

Minor clone tool PS use on the snow to get rid of the grass,10 min, again down and dirty.

Rebel_Hasbro_Falcon_a.jpgRebel_Hasbro_Falcon_b.jpgRebel_Hasbro_Falcon_c.jpgRebel_Hasbro_Falcon_d.jpgRebel_Hasbro_Falcon_e.jpgRebel_Hasbro_Falcon.jpg

Q? can you spot some of my new decals?
 
This thread is more than 5 years old.

Your message may be considered spam for the following reasons:

  1. This thread hasn't been active in some time. A new post in this thread might not contribute constructively to this discussion after so long.
If you wish to reply despite these issues, check the box below before replying.
Be aware that malicious compliance may result in more severe penalties.
Back
Top