A 12yrs olds odyssey in Prop Making: Junior Division Portal Gun for 2014 Wonderfest

furqueron

Well-Known Member
Similar to a thread for my 16 yr old's entry into Wondefest. Here's a photo journal (cut WAY down) of my 12 yr old son's scratch build of a portal gun. He based it off of drawings from the web and in large part to the Volpin version and a guide we found on Instructables. It was intended to be LED lit, but unfortunately due to some shorts in the wiring, the lighting didn't work out in time for the contest.

Please note, due to safety concerns with some equipment (10" table saw and 12" chop saw) and some chemicals and materials adult supervision and guidance was present at all stages of construction. I make no apologies for doing some steps such as rattle can clear coat spraying or the use of the table saw as needed by myself instead of him. Safety ALWAYS comes first. He did however do his first use of the large belt sander (8") and first extended use of the bandsaw. The arm parts were cut out with a sabre saw and then true'd up on the belt sander.

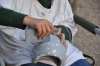
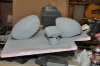
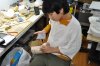
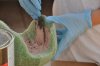
He did all aspects from master carving and shaping, bondoing the master..sanding..sanding, and yes more sanding, mold making, resin casting, sanding...sanding,,,filling, sanding, filling, and yes more filling and sanding (outside and with a high quality mask on!!), acrylic cutting, hole saw drilling on a drill press, soldering, drilling, tapping threads into resin, fitting, and more sanding, filling, then more sanding...yeah...there's a LOT of sanding in this project!!! To lastly cutting and installing the tubes and attaching the arms on the night before the contest (he was up only till 12:30am unlike his brother!).

All in all, he's probably got a good 100 hours into this....at least...we didn't keep track. He started it back in January and...of course...finished 10 minutes AFTER the contest room opened :) People were milling around while he finished the last touch up painting on the nylon nuts.

Ok, with that out of the way, we're off. This will likely take a few postings to get the pics up. So we'll start with the final product that was entered into 2014 Wonderfest Junior Division:

DSC_0385.JPG
DSC_0384.JPG

The D4 just to the right is a resin kit he entered...and yes, that's one of the feet of his brother's StormWalker.

P.S. The Portal Gun is scaled 1:1.
 
Last edited:
Re: A 12yrs olds odyssey in Prop Making: Junior Division Portal Gun for 2014 Wonderfe

We poossibly just debugged via speakerphone with a buddy of mine why the LEDS quit working...looks like one of the solder joints for the blue LEDs broke and likely came into contact with the power...burned out the transistor for the blue channel...off to the 'A' website to order some more transistors....maybe they'll be up and running this Sunday. A buddy of mine who has a lot more electronics experience than we do is going to stop by then to help further debug them.
 
Re: A 12yrs olds odyssey in Prop Making: Junior Division Portal Gun for 2014 Wonderfe

Starting with the paper patterns ...projected onto paper on the wall to scale using one of the kiddo image-still light bulb projectors.

Then cutting the foam masters started. They were done on a bandsaw...at this point in the project he was was still leary of doing the bandsaw...but later he dove right in as you'll see in upcoming pics...my "little woodworker"...guess it runs in the blood :)

DSC_0356.JPG
DSC_0348.JPG
DSC_0349.JPG
DSC_0350.JPG
DSC_0353.JPG
DSC_0355.JPG
 
Re: A 12yrs olds odyssey in Prop Making: Junior Division Portal Gun for 2014 Wonderfe

Starting on the PVC core...3" & 4" PVC pipe fitted together...more on the core later

DSC_0361.JPG

DSC_0362.JPG
DSC_0369.JPG
DSC_0372.JPG
 
Re: A 12yrs olds odyssey in Prop Making: Junior Division Portal Gun for 2014 Wonderfe

Starting to rough fit the foam masters for the "shells" and comparing against the core parts along with the 2 4" couplers that will form the rear core of the gun.

Followed by what became a very lengthy process...making the foam masters themselves. At this point there was no plan to cast them in resin...that all changed when one fell and cracked very easily...the result...an extra 9 weeks to the project. 9 weeks you say...just to make masters? Well...one majorly expensive $$$ epic fail in between...more on that later...this is an odyssey...remember?

Let's just say after this project...he can always get a job in a body shop...Bondo time!!

DSC_0381 (2).JPG
DSC_0007 (2).JPG
DSC_0009 (2).JPG
DSC_0013 (2).JPG
DSC_0016.JPG
DSC_0018.JPG
 

Attachments

  • DSC_0020.JPG
    DSC_0020.JPG
    4.2 MB · Views: 65
Last edited:
Re: A 12yrs olds odyssey in Prop Making: Junior Division Portal Gun for 2014 Wonderfe

And the sanding begins..and goes on and on and on...and it goes on and on and on...I think there's a song like that?

Quite honestly I've never been a Dremel fan..have 6 of 'em...yep and only the newest one works. Well this little right angle attachment with the quick-connect sanding disks changed my mind...a little...without it he never would have gotten this project done...also saved us the day we were leaving as the internal holes to get the light leads into the arm supports had clogged with epoxy...this attachment with a short drill bit...done and cleaned out..only electric device that would fit and the space was too tight to get a pin vise handle onto the drill bit...now the lights not working in the end...turned out we did just confirm tonight that it was a shorted out transistor...bummer!!!! That's going to get fixed this weekend for EagleQuest (a local Dallas show/competition the boys go display their handywork).

Note you can't tell from these photos, but this was done outside and in Dallas in the spring, there's no shortage of very strong wind...we set him up so the wind was blowing the away from his face. He's alergic to the rubber materials used in face masks...even the supposedly hypoallergenic ones I found. So when possible and a good stiff wind was blowing he didn't wear a mask by design. You do what you can.....
DSC_0044 (2).JPG
DSC_0044.JPG
DSC_0047 (2).JPG
DSC_0055 (2).JPG
DSC_0057.JPG
DSC_0074.JPG
DSC_0082 (2).JPG
DSC_0097 (2).JPG
DSC_0101 (2).JPG
DSC_0103 (2).JPG
DSC_0107 (2).JPG
DSC_0123.JPG
DSC_0127.JPG
DSC_0130.JPG
 
Last edited:
Re: A 12yrs olds odyssey in Prop Making: Junior Division Portal Gun for 2014 Wonderfe

First primer coat down on the green florist foam/bondo. Tamiya white putty time. Why the white putty? He tried green putty...but when sanding by the time he got the green putty sanded smooth he was through the bondo coat and had florist foam showing...white putty filled in the small depressions well and it was slightly softer to sand than the bondo was. Best thing we stumbled across for sanding an organic surface and worked for small hands...wrap a white-rubber eraser with sandpaper of chosen grit. My oldest son stole this idea for his Stormwalker resin sanding. The large flat of the eraser gives a less agressive sand...want to go after a tough spot? Turn it on edge and it bites right in due to reduced surface area with same pressure applied...great for little ones without a lot of hand strength to master. Its not shown in these series..but think of it as a smaller version of the purchased foam sander shown here, but much more capable of targeting very specific tiny areas.

As you might notice from the photo #s...there's literally hundered of photos of him sanding...I'm mercifully keeping them to just a few...but want to share the "fun" of the epic sanding effort that went into this project.

DSC_0132 (2).JPG
DSC_0133.JPG
DSC_0137 (2).JPG
.DSC_0138.JPG
DSC_0144.JPG
DSC_0150.JPG
 
Last edited:
Re: A 12yrs olds odyssey in Prop Making: Junior Division Portal Gun for 2014 Wonderfe

First primer coat down on the green florist foam/bondo. Tamiya white putty time. Why the white putty? He tried green putty...but when sanding by the time he got the green putty sanded smooth he was through the bondo coat and had florist foam showing...white putty filled in the small depressions well and it was slightly softer to sand than the bondo was. Best thing we stumbled across for sanding an organic surface and worked for small hands...wrap a white-rubber eraser with sandpaper of chosen grit. My oldest son stole this idea for his Stormwalker resin sanding. The large flat of the eraser gives a less agressive sand...want to go after a tough spot? Turn it on edge and it bites right in due to reduced surface area with same pressure applied...great for little ones without a lot of hand strength to master. Its not shown in these series..but think of it as a smaller version of the purchased foam sander shown here, but much more capable of targeting very specific tiny areas.

As you might notice from the photo #s...there's literally hunderes of photos of him sanding...I'm mercifully keeping them to just a few...but want to share the "fun" of the epic sanding effort that went into this project.

DSC_0170.JPG
DSC_0171.JPG
DSC_0172.JPG
DSC_0177.JPG


DSC_0180.JPG
DSC_0188.JPG

- - - Updated - - -

DSC_0252.JPG
DSC_0257.JPG

- - - Updated - - -

So at this point after I shot another coat of Duplicolor primer for him..he THOUGHT he was done with sanding.....

<key twilight zone music>

Little did he realize....
 

Attachments

  • DSC_0247.JPG
    DSC_0247.JPG
    4.6 MB · Views: 79
  • DSC_0376 (2).JPG
    DSC_0376 (2).JPG
    4.7 MB · Views: 85
Last edited:
Re: A 12yrs olds odyssey in Prop Making: Junior Division Portal Gun for 2014 Wonderfe

A break to work on the core...remember he THOUGHT the sanding was all done.

At this point he's trying to find some scrap wood pieces to wedge in between the 3" and 4" pvc pieces to center the 3" one inside for gluing...time to pull out the calipers! We have 5 pair and you can never find one when you need it...turns out the space created by the pieces of scrapwood came in handy later for creating a channel to run wiring from the front of the gun to the rear where the batteries are at...

DSC_0568.JPG
DSC_0570.JPG

DSC_0584.JPG

DSC_0593.JPG
DSC_0601.JPG
DSC_0605.JPG
DSC_0609.JPG
DSC_0674.JPG

DSC_0687.JPG
DSC_0692.JPG
DSC_0695.JPG
DSC_0697.JPG
 
Re: A 12yrs olds odyssey in Prop Making: Junior Division Portal Gun for 2014 Wonderfe

Drilling the bolt holes in the acrylic arms before cutting them out...this was to avoid breakage of the arms if it was attempted to drll the holes after cutting out the arms. The patterns were done in Rhino 3D, printed on paper and the spray glued to the acrylic. This allowed for very accurate locating of the holes (which were center punched to help him locate the drill bit and keep it from dancing on the slick acrylic) and also served as the cutting pattern for the arms themselves on the scrollsaw. Yes, he knows how to use Rhino 3D. Both of my boys do. Getting them prepped for a Form1 3D printer after I'm comfortable they've mastered their hand and machining skills sufficiently.

He's been scrollsawing intarsia and puzzles for a couple of years, so he's very comfortable with the scrollsaw. The acrylic presented some unique problems (plastic melting and "reattaching" the cut parts). But I think he did a great job for a first timer on acrylic.

DSC_0715.JPG
DSC_0723.JPG
DSC_0726.JPG
DSC_0729.JPG
DSC_0734.JPG
DSC_0739.JPG
DSC_0741.JPG.
DSC_0743.JPG
 
Re: A 12yrs olds odyssey in Prop Making: Junior Division Portal Gun for 2014 Wonderfe

And now to mold making.

I mentioned earlier there was a very expen$ive mistake we made. It was my fault actually. We're lucky enough to have a retail Reynolds AM not far away so Smooth-on products are readily accessible. We just switched over to them from a different brand this year and we're learning how to work with the products. Some and their techniques of usage are quite new to us. As some of you whom know us from Wonderfest are aware, my oldest has been doing resin casting for about 3-4 years now. With a hundred plus molds under our belts the lego-block dam approach and two part molds are pretty much old hat along with pressure casting utilizing a converted paint pot from the place who's name we shall not speak (HF). I will point out the Smooth-On products are much lower viscosity than the product we had been using...this led to a few surprises with our first brush-on mold...leaks everywhere.

One thing just came to mind, in previous years my oldest Jon-Luc, was using vaseline as a separator for two part molds when making them. This year I switched him (and this PGun project for my youngest) to Mold Release 200 from Reynolds...one of the best things we've done!!! flash and seam lines are greatly reduced. If you use vaseline and have flash and seam lines...try this stuff. when making your molds..awesome...20 a can, but one can should last our usage for about 2-3 years judging from how it lasted with all the casting projects this year.

OK, back to the $ mistake. As mentioned we're familiar with pressure casting. Early attempts at room casting in the past were unsatisfactory doing the 1/350 parts Jon-Luc had made in the past so we got in the rut of doing everything via pressure...for those not familiar with pressure casting, our workflow was 1) make master 2) clay up master and build dam 3) pour up half of master mold 4) pressure the mold master to 60psi 4) repeat for second half of mold and then 5) cast resin part at 45-50 psi depending on detail.

In talking with the guys at Reynolds they pointed me at a brush on mold for this project as our pressure pot was too small for these parts. So away we went (no pics uploaded, but I have them)...made the brush on mold, built up the seams to be cut, made plaster casts to hold the molds in shape..separated them with alum foil...took them off, then cut the silicone to release the master making zig-zag cuts in the built up seams...severa weekends later ....everythings great...right...well we went to put the mold together and realized for the first time the zig-zag seems were going to leak...ok...use pins to seal them and then use a bit of silicon on top of that to make it tight...yeah...got 98% there..had a few leaks...went to put the plaster mother mold on...wouldn't fit quite right...ok...wiggle jiggle...maybe the uneven surface of the brush on silicon went into all the correct crevices...cross fingers.add a couple of weekends figuring this out (remember 12 yr olds don't have super long attention spans!!)..did the first pour...still fingers crossed...lots of new stuff...my youngest building this project started to undo after cure time...disaster...the resin cast was all distorted...horrible looking..its now used as a doorstop or hammer...which is needed at the moment....moral of the story after talking with Reynolds...we didn't put any silicone keys to hold the mold into the plaster mother mold..didn't see this in any of the youtubes we watched and they hadn't mentioned it...este la vie.

OK, so time is starting to become an issue, we could afford another setback like this so we went with a two part box mold more familiar to us. We used a tin-cure (10-1) silicone that self-de-gasses from Reynolds for the mold since we couldn't pressure it. Then we also added a lightening agent to reduce the weight..that first shell was HEAVY and it was the smaller front shell. If you use these glass beads (or whatever they are) be sure to do them outside without a ceiling fan on high...don't ask how I know that...this resulted in about a 30% weight reduction. HOWEVER...in the type of mold we were pouring they tend to float to the top of the resin when you have a slow set resin (see below). If using 300 resin this probably wouldn't have been an issue. The result of this was that the bottom of the shell was very dense which is good as it needed to be drilled and tapped...the sidewings are where the beads floated up (vent/fill points were at the top of the wings). The result was the vent/fill points were extremely fragile in that area...so lots of filling sanding and more and more on the final resin parts...still never came out quite satisfactory...the resin/beads were just way soft. A cool side effect of using the beads in the slow set resin...the resin "expanded" out of the mold while it was curing...created some interesting shapes...hey you look for entertainment where you can get it...simple things for simple minds :)

BTW, for this project I purchased 310 for him to use in the casting. The reason is to give him a longer pot working life. 12 yr olds, at least mine, move at one speed..their own..there is no hurrying them when you have a "7" minute pot life product like 305. I quoted the 7. As mentioned we live in Dallas...heat...humidity...all unpredictable and all enemies of consistency for resin casting. The room we cast in has a dehumidifier, we keep it at about 35% when we're casting..the down side is the temp goes up to about 80+ since we don't let the AC come into the room and thus introing more humidity. These are variables that we've learned to control that work for us...your mileage WILL vary on this. Back to the cure times, for us 310 has a "real" pot life of about 10 minutes and 305 has a "real" pot life of about 3-4 minutes as opposed to what advertised for them. The guys at Reynolds confirmed that these are in line with what they see and feedback they've gotten from other customers in our area...YMMV.

Ok, back to the molding...note we started buying materials in gallon sizes...still costs a small ransom...but that's another story.


DSC_0912.JPG
DSC_0955.JPG
DSC_0959.JPG

More casting pics later
 

Attachments

  • DSC_0973.JPG
    DSC_0973.JPG
    5.3 MB · Views: 88
  • DSC_0978.JPG
    DSC_0978.JPG
    4.6 MB · Views: 85
Last edited:
Re: A 12yrs olds odyssey in Prop Making: Junior Division Portal Gun for 2014 Wonderfe

System isn't cooperating to post more...keeps saying something about only 24 pics per post...so I'll wait a bit and see if i can add more.
 
This thread is more than 9 years old.

Your message may be considered spam for the following reasons:

  1. This thread hasn't been active in some time. A new post in this thread might not contribute constructively to this discussion after so long.
If you wish to reply despite these issues, check the box below before replying.
Be aware that malicious compliance may result in more severe penalties.
Back
Top