Teacherinspace
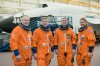
Member
My spring goal is to make STS-135 astronaut advanced crew escape suit. So far I have managed to get all fabrics I need and most of the hardware. Neck rings and visors are a problem that I need to solve quickly. Visors will be most likely vacuum formed but I haven’t found a company that could make realistic (or even any kind of rings) looking rings for suit-helmet connection. It is likely that I wont make gloves now. Maybe in the future.
Here is what I have now:
Fabric is outdoor interior polyester that have similar weave and feel as the real fabric. Patches have orange Velcro background like originals. As you see, I will be ESA astronaut. I have airforce astronaut wings thag with my name on it. I tried to find civilian version, but I could not find it.

Next image has most of hardware I will need. Only clasp and round connector are made for the suit. Everything else just looks litlebit similar than real stuff. Plastic tube has red glow in the dark powder glued to walls. Astronauts have this kind of tubes in their suit upper arm pockets.

Round control panel in the right side of suit, has caused lots of difficulties. First I tried to press right shape from thin aluminium, but it did not work well. Second attempt was Sculpey test. It worked better and final version is in the left. I will use Sculpey part or cast it to aluminium.

Real astronaut suit has at least 10 zippers. Longest zipper is covered with black silicone, for more realistic look. Suit will open from back.

Fifth image has more fabrics, Velcro and other materials. Blue things are cooling garment sleeves. I did sew narrow silicone tube inside sleeve. Children’s raincoat has right coloured material for collar inside neck ring. Black fabric is material for radio cap inside helmet.

I will also need lots of straps and reflectors for the suit and helmet.

Helmet base (surpluss from Robert Clarke Modelmaking) looks like this. It is shaped like mercury era helmets so it is slightly different than helmets during shuttle era. I have to reshape opening, fill the round hole and cut it lower from neck opening. Helmet will have cooling fan.

Some of the sewing patterns. I will make couple of short cuts in desingn.

All help, tips and ideas are very welcome!")
I will post step by step images.
Here is what I have now:
Fabric is outdoor interior polyester that have similar weave and feel as the real fabric. Patches have orange Velcro background like originals. As you see, I will be ESA astronaut. I have airforce astronaut wings thag with my name on it. I tried to find civilian version, but I could not find it.
Next image has most of hardware I will need. Only clasp and round connector are made for the suit. Everything else just looks litlebit similar than real stuff. Plastic tube has red glow in the dark powder glued to walls. Astronauts have this kind of tubes in their suit upper arm pockets.
Round control panel in the right side of suit, has caused lots of difficulties. First I tried to press right shape from thin aluminium, but it did not work well. Second attempt was Sculpey test. It worked better and final version is in the left. I will use Sculpey part or cast it to aluminium.
Real astronaut suit has at least 10 zippers. Longest zipper is covered with black silicone, for more realistic look. Suit will open from back.
Fifth image has more fabrics, Velcro and other materials. Blue things are cooling garment sleeves. I did sew narrow silicone tube inside sleeve. Children’s raincoat has right coloured material for collar inside neck ring. Black fabric is material for radio cap inside helmet.
I will also need lots of straps and reflectors for the suit and helmet.
Helmet base (surpluss from Robert Clarke Modelmaking) looks like this. It is shaped like mercury era helmets so it is slightly different than helmets during shuttle era. I have to reshape opening, fill the round hole and cut it lower from neck opening. Helmet will have cooling fan.
Some of the sewing patterns. I will make couple of short cuts in desingn.
All help, tips and ideas are very welcome!
I will post step by step images.


