Millenium Falcon Lighting Instructions

tek2graphics

Sr Member
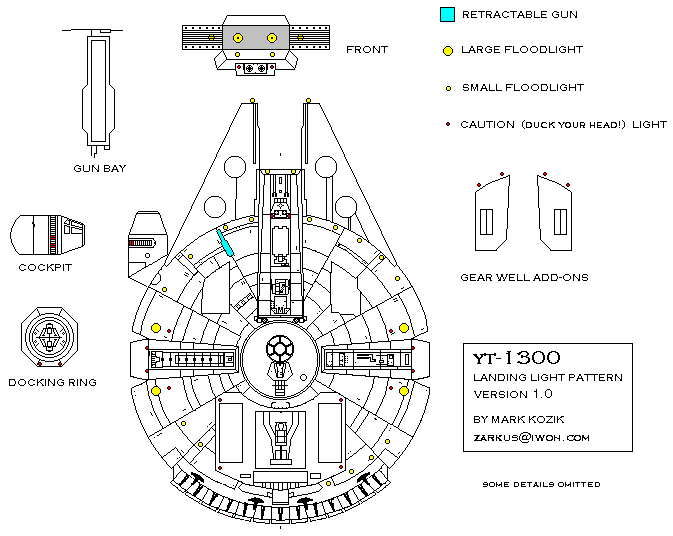
Hello all! I'm in the process of finishing most of the plastic parts for my FM 1:72 Falcon, and i'd like to see if I can light it up. I have NO experience with this and just wanted to know if anybody had suggestions/diagrams that would be helpful. :confused

I know there are lighting kits out there, but I can't afford to get them
. Besides, I would LOVE to learn for future models.

I already purchased LEDs in different colors/sizes and I have small wire, fiber optics, soldering wire/iron and mag glass. All I really want to do is have the BASICS lit up: Lights in mandibles, back engine fully lit, then maybe have separate switch for landing gear lights & minimal lights in the cockpit. Not sure if I should go with batteries behind cockpit or electric? (… kinda scared about electric). I've already seen soldering instruction videos and other people lighting their kits.. but again if I can see a picture of how the wiring should be laid out, that would be great!
Thanks in advanced!:thumbsup
 
I have lit my 1/72 FineMolds Falcon.

The First step is to decide on what power source you are going to use, This will determine the size of resistors to use, you should use resistors they will protect your leds Click here to work out size of resistor. I used a 12VDC power supply I couldn't be bothered with seperating the hulls to change batteries.

Resistors get soldered onto positive cathode which are the longer one of the two and is best to wire the leds in parallel this way you dont have to solder a resistor to every led in the group. Once you have all your groups of leds (wired up in parrallel) you can then wire the groups together.

Regarding the Falcons engines, you should make a lightbox and then work out how many leds it will require, you can make the lightbox out of styrene and line the inside with tin foil.
I use white glue to fix the Fibre Optic to the model.

Hope this helps
 
This was a light box I made for the MPC falcon DSC00608.JPG
 
This will vary greatly from model to model, so I don't recommend following a bunch of pictures.
Different modellers use different power supplies and types of lights--which dictate the wiring diagrams.

Give us an EXACT list of what you want: type of lights, qty of each and locations plus power supply.
We'll come up with your schematic ;)

Thanks for your help mojo.
Anybody have a picture of how their lights are wired in the falcon? :unsure
 
Thanks Hermes… what I would like to have is 2 white led in front mandibles, 2 red fiber spots on cockpit side exterior & few in dashboard… not sure behind the seats, and engine lighted, however not sure how to do this a since i don't have clear parts for this area.. All working with batteries hidden behind cockpit with an on/off switch somewhere on the exterior. (I've seen someone here put batteries there.)

I would love to use electric to power it, but i'm afraid of it burning everything up.. I really have little experience with this.
(Today I burned several LED's powering it with a 9v) :wacko

In the end, I'm just excited about building the nice (expensive) kit and can't justify finishing it without having at lease some lights in it.
Im on a VERY tight budget and would love to learn how to light kits...

Any help would be GREATLY appreciated.
 
Did you use resistors?
Learn Ohms Law....lol.
***please hold off on all future wiring until diagrams are prepared. This is to save you from wasting LEDs, and your own safety***
My diagrams will NOT be technical readout of a familiar battlestation, blueprints or crazy wiring diagrams!
I know you're new to this.
I'll give you simple, and easy to follow diagrams that have color-coded layouts of each section.

I'm about to embark on a similar project, but with the old MPC kit.
Mine will have more lights--may I suggest more for yours?
Example: ramp light, bottom hull lights.

Battery pack back by engine section--easier.

We'll sort of do this together. While yours won't mirror mine, you can follow along.
I'll draw up a few examples.

Now, seems you have your parts on hand.
I need the specs of your LEDs: forward voltage and forward current (mA).

Also need to know the power source you "plan" to use.
I'll make suggestions later based on diagrams... ;)

We'll give you a Falcon that ain't no hunk if junk, boy!


Edit---plan to pay a visit to Kinkos!
Your Falcon will have cockpit panels, gun well panels, engine panel and ramp details--along with instructions on printing them inexpensively at Kinkos.

This is the basic layout I'm using--found on web:


landing_lights.gif
 
Last edited:
Sounds AWESOME!! Thanks!
As far as what I have: 2mm LED lights (white, green, blue & red.) I have a few resistors left. :(
Might need more. What resistor do you suggest?
 
It really depends on your power source. You can get a step down, plug in transformer which can provide a source from the mains ( you would need a plug in socket in the model somewhere where you could plug in a jack similar to those used for headphones) or use a battery ( this can be tucked away in the corridor to the cockpit in the fine molds falcon). But the amount of power (6v, 12v) will govern what resistors you need in order to run the LEDs without burning them out.
DSC00613.JPG

This is a small socket glued into a tube which was attached to the bottom gun well and a hole made for a display stand could be slid through. I attached a jack to a piece of brass tube to make the stand so that the connection was made when the model was placed on the stand.
DSC00614.JPG
 
Last edited:
I may borrow elements of that fine work for mine ;)
Thanks for sharing!
I wanted EL tape for my engine strip anyway--perfect.
Since mine will have more electronics, and I'm making PCBs for various functions...this will fit right in.
Mine has a servo for the landing ramp, as well as the drop-down mini-gun.


absolutely... I posted it all for you guys to use as you see fit. I have the board files and schematic for use on expressPCB (free download) if you want them...
 
This thread is more than 7 years old.

Your message may be considered spam for the following reasons:

  1. This thread hasn't been active in some time. A new post in this thread might not contribute constructively to this discussion after so long.
If you wish to reply despite these issues, check the box below before replying.
Be aware that malicious compliance may result in more severe penalties.
Back
Top