You are using an out of date browser. It may not display this or other websites correctly.
You should upgrade or use an alternative browser.
You should upgrade or use an alternative browser.
This is looking awesome! Good luck on the build.
Thank you! I'm having fun and the positivity from the RPF community is incredible!
aliensarchive
Sr Member
I have KARM-06 parts if you need them. You need 34 for entire suit, I have two sets of 34.
antwanharris
Member
In-freaking-credible!!!!
UPDATE!
Progress has been slowed due to illness/time/money, but I'm covering new ground this week - hoping I can have this finished by Halloween!. I've devised a way to make piston "rod ends" out of PVC, saving me money. Thank you so much to those who have provided identification and links to purchaseable "rod ends" - you guys are great.
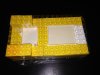
I start with a 4" diameter PVC joint, cut and flatten it(using a heat gun), and pencil a "rod end" on it to be cut on my bandsaw:
 Yeah!...only about 33 more to go -

Then, to approximate the spherical bearing(I think you call it that), I drill a hole in the head, reheat the piece, and push in a clear "pony bead"(used to make kid's necklaces). The hole in the bead is the perfect size for the bolts I'm using on each section. The heated PVC slightly molds itself to the bead without bonding to it, allowing for tilt and rotation without letting it pop out - once cooled. Last will be paint and reassembly of the piston, this time using thin elastic strips instead of rubber bands for durability:

Progress has been slowed due to illness/time/money, but I'm covering new ground this week - hoping I can have this finished by Halloween!. I've devised a way to make piston "rod ends" out of PVC, saving me money. Thank you so much to those who have provided identification and links to purchaseable "rod ends" - you guys are great.
I start with a 4" diameter PVC joint, cut and flatten it(using a heat gun), and pencil a "rod end" on it to be cut on my bandsaw:
Yeah!...only about 33 more to go - Then, to approximate the spherical bearing(I think you call it that), I drill a hole in the head, reheat the piece, and push in a clear "pony bead"(used to make kid's necklaces). The hole in the bead is the perfect size for the bolts I'm using on each section. The heated PVC slightly molds itself to the bead without bonding to it, allowing for tilt and rotation without letting it pop out - once cooled. Last will be paint and reassembly of the piston, this time using thin elastic strips instead of rubber bands for durability:
Thank you for the offer - aliensarchive. I love that about this community! I already have momentum making my own "rod ends" like the KARM-06 parts, but I'll let you know if the bottom falls out and I need the real thing after all.
- - - Updated - - -
- - - Updated - - -
Dude, that's cool. Thanks for the compliment. I hope to post more progress this week.In-freaking-credible!!!!
InsertNameHere
New Member
SUBSCRIBED!!! And also, how to you post pictures on here from an Iphone? Is there an app or something to get?
aliensarchive
Sr Member
SUBSCRIBED!!! And also, how to you post pictures on here from an Iphone? Is there an app or something to get?
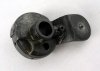
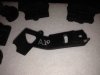
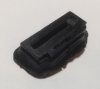
I am making the two parts below. They are very important pieces of the suit that allow the head and shoulders to bend and the arms to rotate. The arm connector is actually 3 parts. A resin cover, a insert washer and a metal bracket.
This is my first time molding something. Should be ready tomorrow.
Attachments
SUBSCRIBED!!! And also, how to you post pictures on here from an Iphone? Is there an app or something to get?
Thanks! I don't know about that, I am new here. Try the help section.
aliensarchive
Sr Member
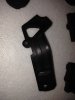
Here's the 'H' connector, I made 4 before the mold broke.
I only got two of the shoulder connectors before that mold bit the dust. Will have to get some stronger rubber. These were easy because they are flat. I have no idea how to mold curved pieces.
I only got two of the shoulder connectors before that mold bit the dust. Will have to get some stronger rubber. These were easy because they are flat. I have no idea how to mold curved pieces.
Attachments
I am making the two parts below. They are very important pieces of the suit that allow the head and shoulders to bend and the arms to rotate. The arm connector is actually 3 parts. A resin cover, a insert washer and a metal bracket.
This is my first time molding something. Should be ready tomorrow.
I've never molded either, but I've seen the "LEGO box" method before.
After I'm done with this build, I plan to try my hand at casting. That part you're working on is just like the movie, great attention to detail! You're suit should look awesome. I don't have that level of detail on this build, but the next should be better.- - - Updated - - -
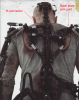
I am In the process of finishing up the Kruger suite from the movie also I made a lot of the parts from abs plastic but the weight sure adds up
Sent from my iPhone using Tapatalk - now Free
Your Kruger suit looks incredible!
aliensarchive
Sr Member
aliensarchive
Sr Member
This is amazing. I just had to say this build is the reason i signed up to the forum. Keep up the good work
Hello RPF community! This is my first post and my first movie costume build using foam. I saw the trailers for Elysium a few months ago and decided(despite travel and work) to make the HULC(Human Universal Load Carrier) or powered exoskeleton that Matt Damon wears. I started work on it, but couldn't finish in time for the movie's premiere, but I loved the film and it reinspired me to finish it despite my hectic Summer.
View attachment 219492
I'm using the 0.5" EVA foam puzzle-piece "Gold's Gym" equipment mats from Walmart for $20. I'm using a wood-burning wand with an Exacto-blade attachment(as well as others for shaping). Hot glue binds the pieces. I'm using two sizes of PVC to approximate the pistons.
View attachment 219496View attachment 219517
That picture shows the chest piece and the upper arm/shoulder segments linked with the PVC pistons(which will get a paint treatment later). The white nylon straps make a harness I can wear under a gray shirt to keep the whole thing in place.
View attachment 219500
That one shows the beginning of the forearm bracers
Here's the completed forearms:
View attachment 219515View attachment 219516
That's all the progress I've made thus far. I'm attaching the bracers to the upper arm pistons today. Tomorrow I begin the spine and head piece. I'll be adding socket-head cap screws to each foam piece for detail along with wires and lights for the head. More pictures to come.
Is anyone else making one of these?
PROGRESS UPDATE: (8-14-13)
It was more problematic linking the forearm bracers to the upper arm sections than I first expected, but once I reinforced the foam with black coat hanger wire it supported itself nicely.
View attachment 220332
View attachment 220333
View attachment 220335
Here's a shot of the underside with the completed arms
View attachment 220334
That shows the attached nylon harness and the elbow straps.
I put the pieces on to demonstrate the working connections and I'm wearing the harness over my shirt to show its fitting as well. I will conceal the elbow straps under gauze wrapping when the whole thing is finished.
View attachment 220336
Try to ignore the stray pistons. I will connect them to the shoulder blades later.
Thanks again for the support everyone! You guys are awesome.
UPDATE (8-27-13)
Before I could begin the spinal section or shoulder blades, I had to construct a duct tape dummy to hold my work:
View attachment 224796
I know it looks crude, but it's my first.
This plus my day job set back my progress a little. I did start painting and reconstructing new pistons (because I just wasn't happy with the old ones):
View attachment 224797 View attachment 224798
UPDATE (9-4-13)
I've nearly finished the head piece:
View attachment 227392View attachment 227393
The upcoming wires and mount covers for them will conceal the globulous hot-glue on the edges and I'll install a blue LED on the com-port for the right side of my head.
Progress was slowed again because I'm remaking all the previous pistons, changing their mounting bolts, and reinforcing the foam where they connect. It's tedious.
UPDATE (9-11-13)
I finally finished the head piece and cervical section:
View attachment 230415View attachment 230416
I couldn't resist sticking it to my head again:
View attachment 230418Here's a pic of the original for comparisonView attachment 230420
I still need to rig the blue LED+wire to the data port and ribbon cable on the right. I've been sick for the past two days so - delays delays delays, but I WILL start the spine and shoulders tomorrow.
UPDATE (9-12-13)
I finished the shoulder blades:
View attachment 231342
I had to stop work on the spine section to fix some problems with a few pistons, bolster the harness a little, and begin replacing the bolts and stop nuts being used to attach the pieces to the harness with magnets. Thanks to Demolition for the magnet idea - "... then attach the armour through the shirt with earth magnets ..." Soooo much better than unscrewing bolts each time I need to make an adjustment. I'm feeling foolish for using bolts now.
UPDATE
The new pistons made with the pvc rod ends are the best yet!

I still have 2 more pistons to make for the Thoracic section(as you can see), the Lumbar pieces, and the Coccyx pad with hip hinges before I can begin the hip and thigh sections. Once I'm past that, the thigh pads and lower legs should be easier to make.
The magnets for the chest and spine worked beautifully, but they did not for the arms/shoulders and shoulder blades. I might need to either add more magnets for stronger adhesion or attach a hidden Velcro strap for those pieces. The stresses places upon those areas from average movements constantly popped off the costume segments.
The new pistons made with the pvc rod ends are the best yet!
I still have 2 more pistons to make for the Thoracic section(as you can see), the Lumbar pieces, and the Coccyx pad with hip hinges before I can begin the hip and thigh sections. Once I'm past that, the thigh pads and lower legs should be easier to make.
The magnets for the chest and spine worked beautifully, but they did not for the arms/shoulders and shoulder blades. I might need to either add more magnets for stronger adhesion or attach a hidden Velcro strap for those pieces. The stresses places upon those areas from average movements constantly popped off the costume segments.
I forgot to show the rig on me:


You can see the arms have fallen down and are only held up by the elbow straps, plus the right shoulder blade detached and rotated a little. That showed me I need larger/more magnets for those pieces or just strap them to the harness. I'm also gluing a thin foam layer under the harness to keep it from agitating my skin. I might try using a tight athletic top under the grey shirt next time as a base to hold the costume in place...like the "stunt version" costume sold on EBay. That shirt in the picture was too big...didn't look like Damon's from the film.
You can see the arms have fallen down and are only held up by the elbow straps, plus the right shoulder blade detached and rotated a little. That showed me I need larger/more magnets for those pieces or just strap them to the harness. I'm also gluing a thin foam layer under the harness to keep it from agitating my skin. I might try using a tight athletic top under the grey shirt next time as a base to hold the costume in place...like the "stunt version" costume sold on EBay. That shirt in the picture was too big...didn't look like Damon's from the film.
Last edited:
Similar threads
- Replies
- 0
- Views
- 256
- Replies
- 2
- Views
- 319