Kormier
Well-Known Member
So a while back I lost my leg hose connector and have been wanting to replace it for a while. Since the overall shape is fairly simple I thought I would use my woodturning skills to make one on my wood lathe. This thread will document the process that I followed.
My old connector was way too big so my first step was to try to gather information on measurements to be as screen accurate as possible.
A quick search in Google images revealed two photos that I chose to use (credit for the images goes to their respective authors):
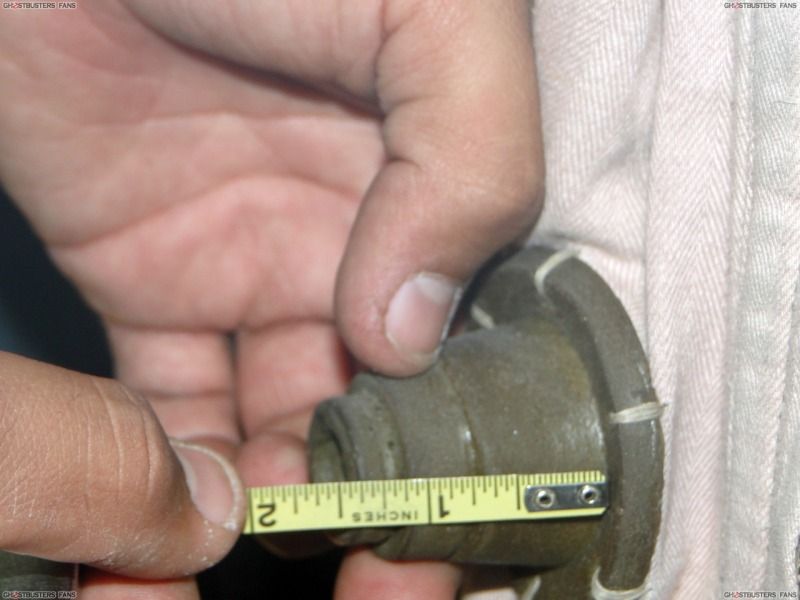
I used this one to determine the approximate height and width of the piece:
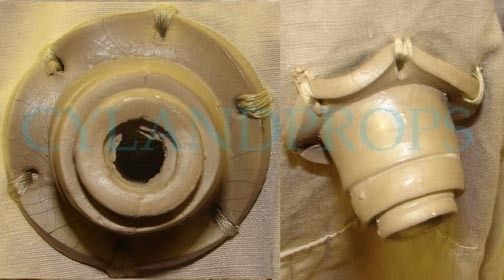
This one was used to figure out the proportion of each "segment" and overall diameter of the base.
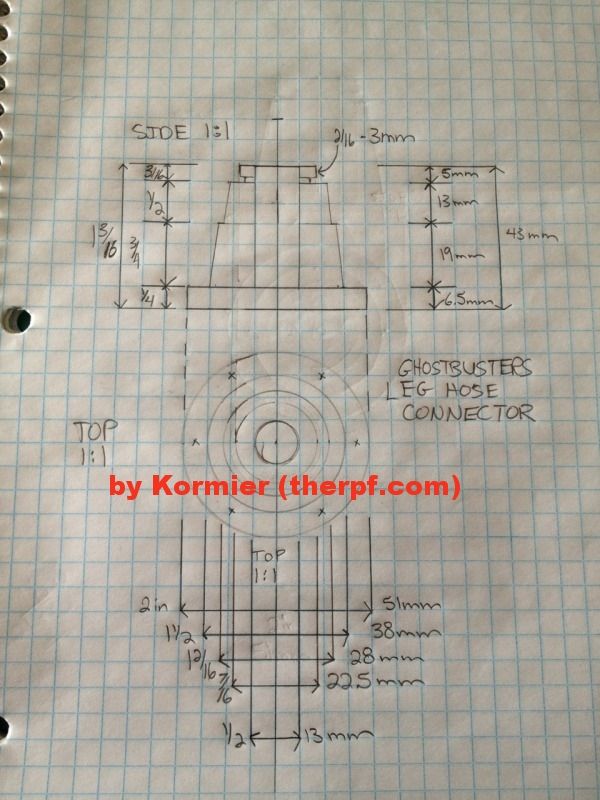
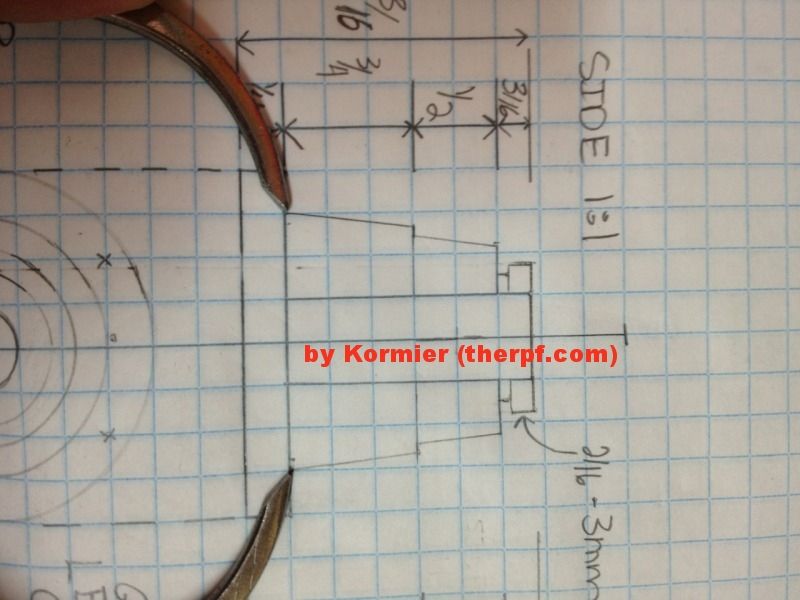
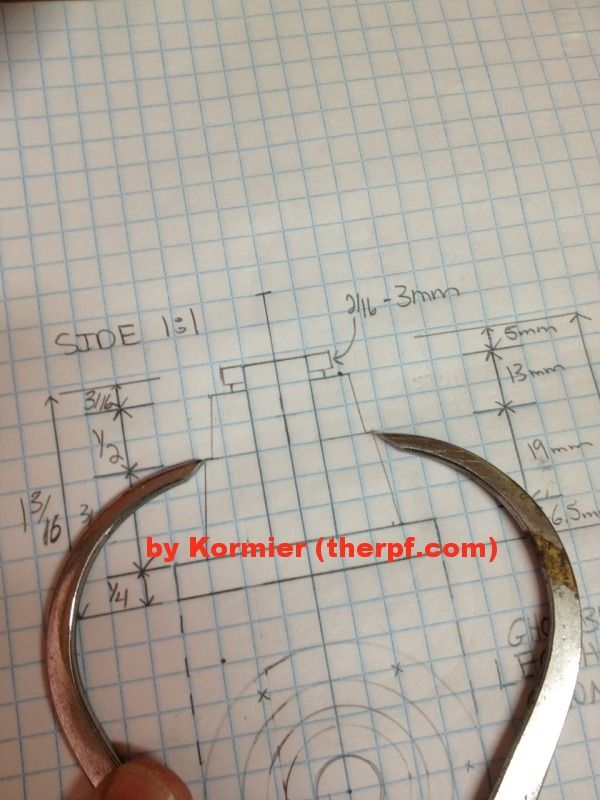
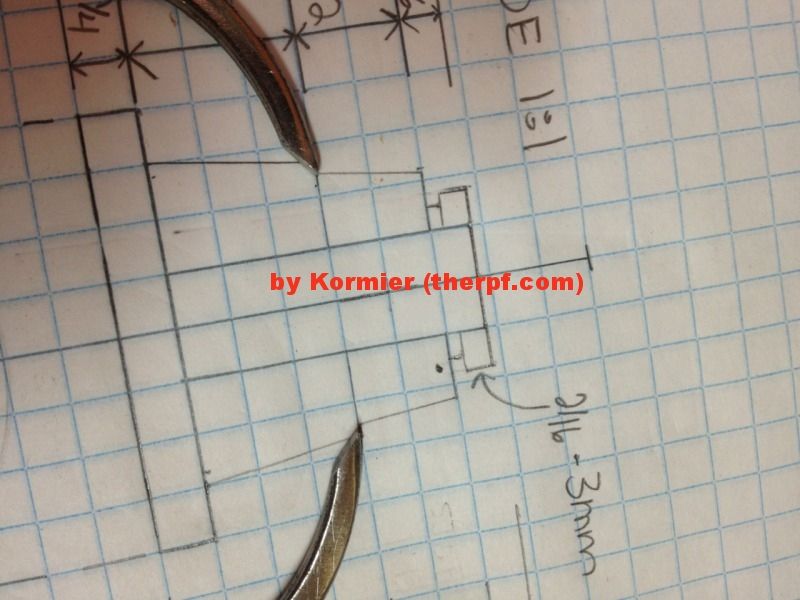
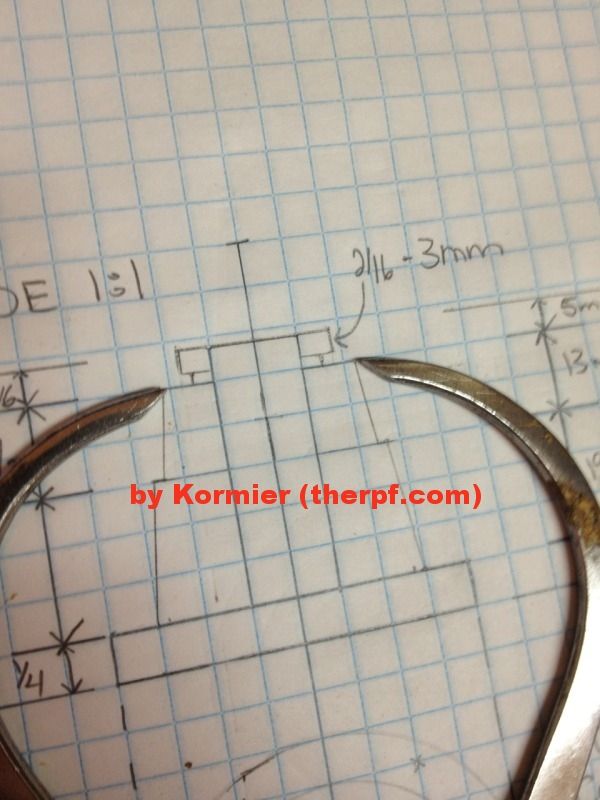
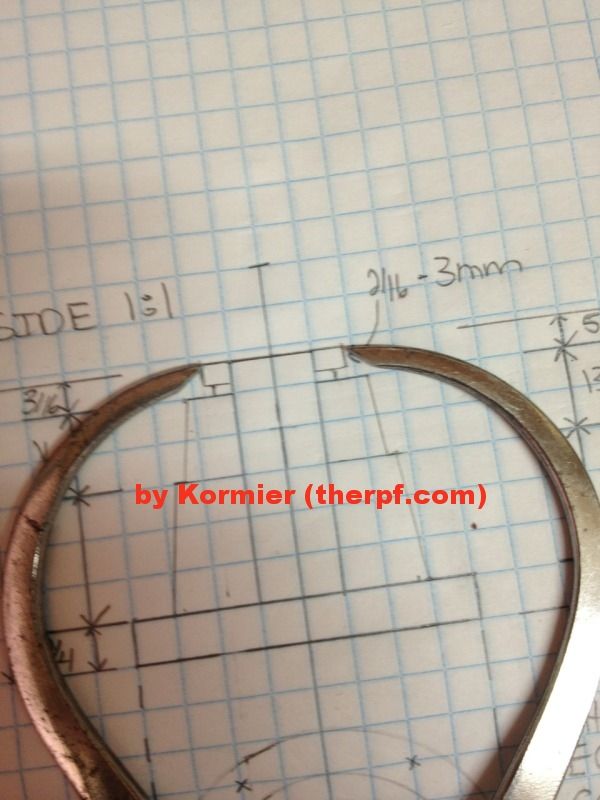
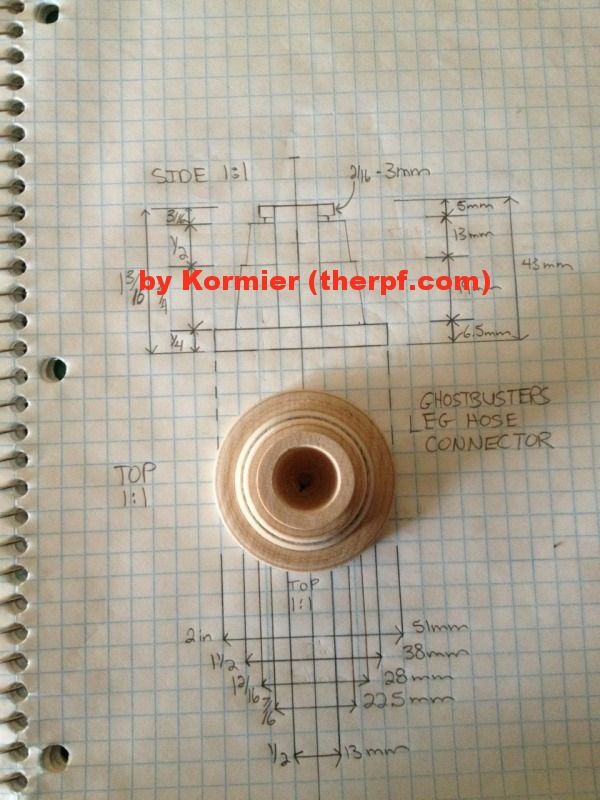
Knowing that the "fuel hose" that connects to the center is 1/2 inch in diameter, I calculate the approximate size of each segment and came up with the following schematic:
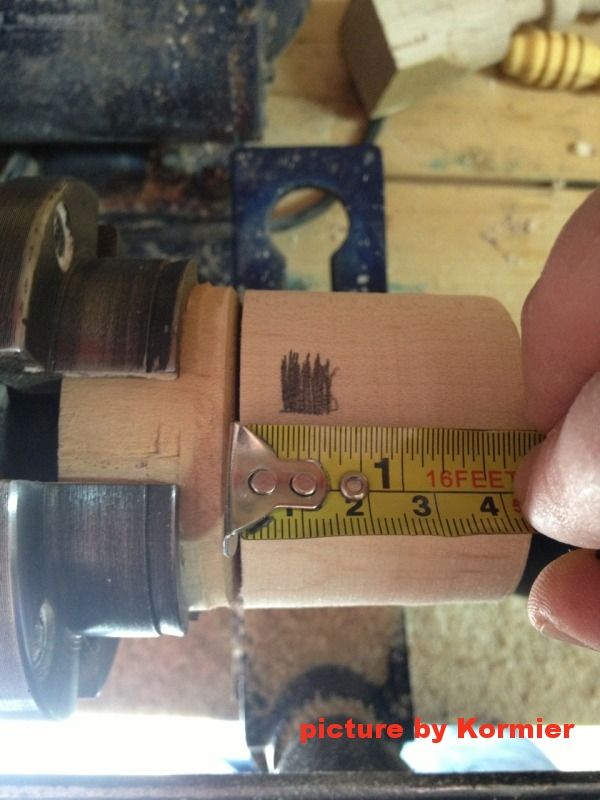
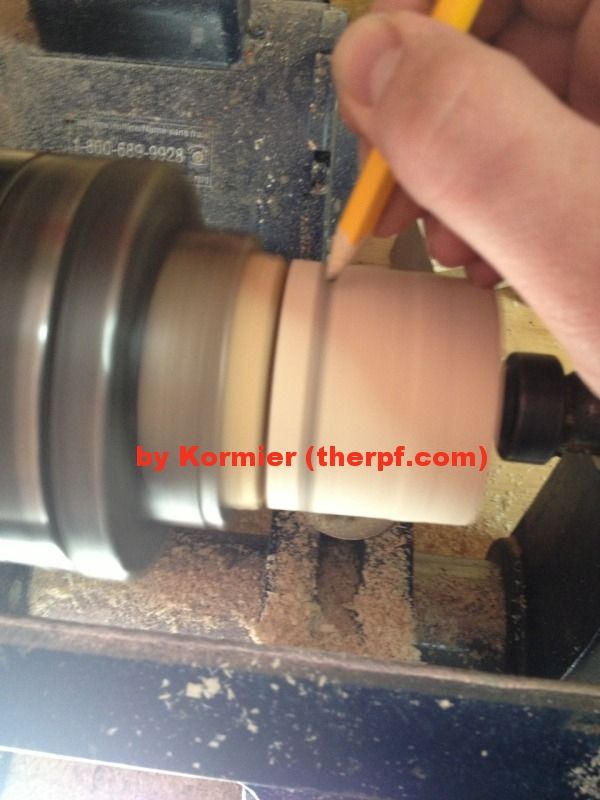
With my measurements in hand I headed to my garage workshop and selected a nice piece of Canadian maple which I "trued up" (i.e. put it on my lathe and brought it from square to round). I used a screw chuck for this piece since it's pretty small. So what you see in the picture below is a piece of scrap wood being held by the jaw chuck. That piece of wood has a screw in its center that holds my piece of maple. The tail piece is a standard live center. Since the base of the connector is 1/4 inch thick, I put pencil marks as reference.
More pencil marks as the lathe turns. This is a trick that I often use to guide me in making my cuts.
Calipers are an essential tool when turning wood to get down to the desired diameter.
Next step is the base of the first segment. I obtain the correct diameter by adjusting my calipers according to my 1:1 schematic.
I then use a parting tool to bring down the wood to the desired diameter next to the base.
That segment is 3/4 inch long so I removed more wood accordingly. Technically I could have turned down all of the remaining of the piece to the same diameter as above.
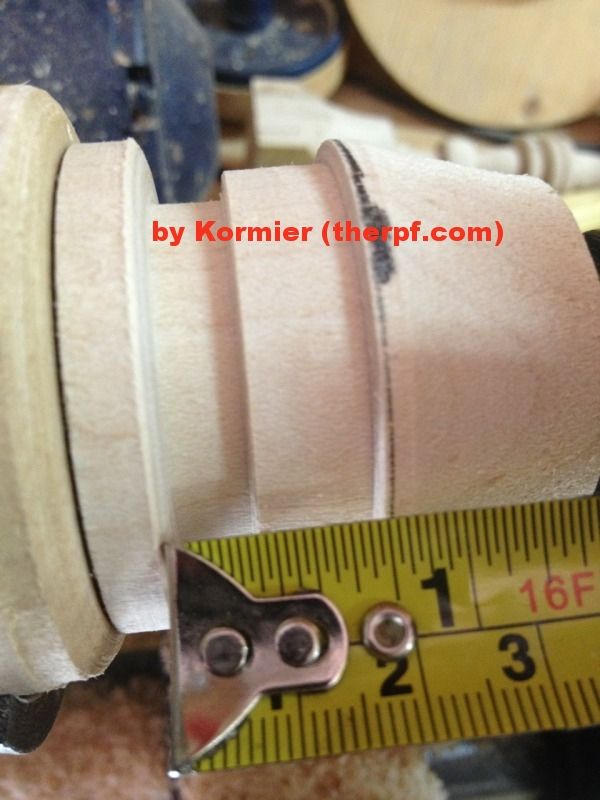
Next step is to get the diameter of the top portion of that segment.
One trick that I learned over the years is to always have your caliper measurement slightly longer than what you need since you'll be losing some wood during the sanding step.
Next you "connect" the larger diameter cut to the smaller diameter cut. This gives you the proper angle.
Next step is the base of the middle segment. Again I get the diameter with the calipers.
And as I did before, I turn the wood down to the proper diameter using a parting tool. I also turned the remaining of the bloc to that diameter.
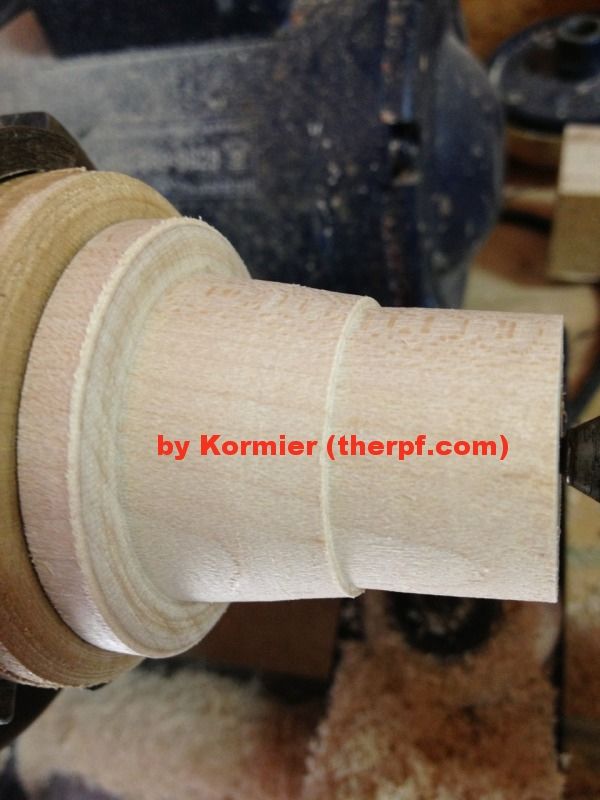
Next is getting the diameter of the top portion of the middle segment.
I then turned it down and sloped it as I did before.
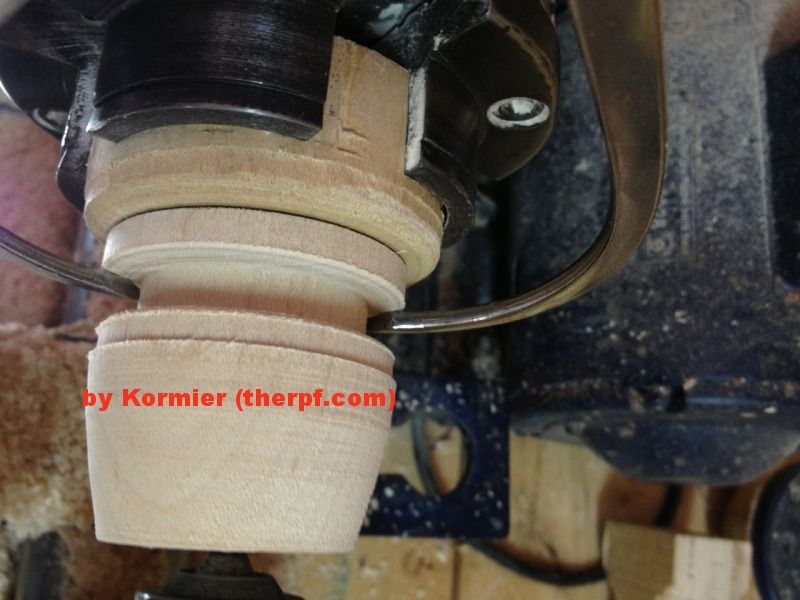
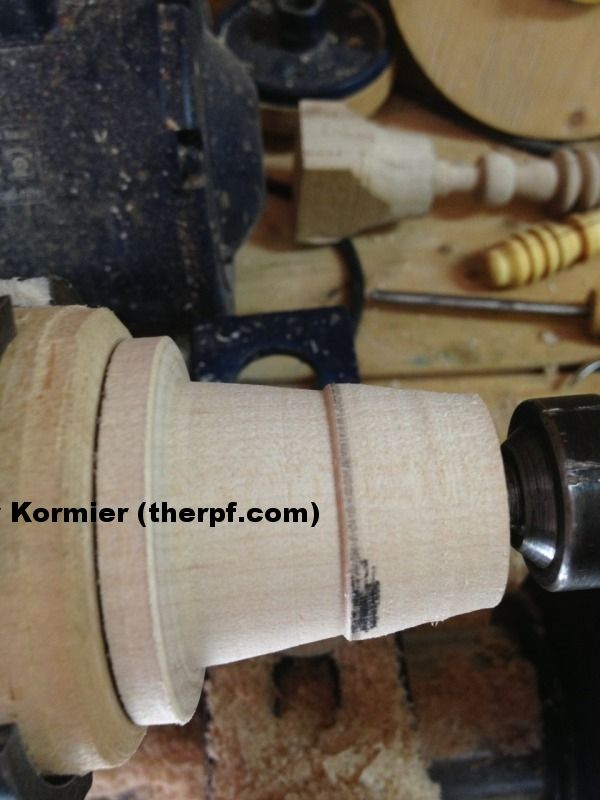
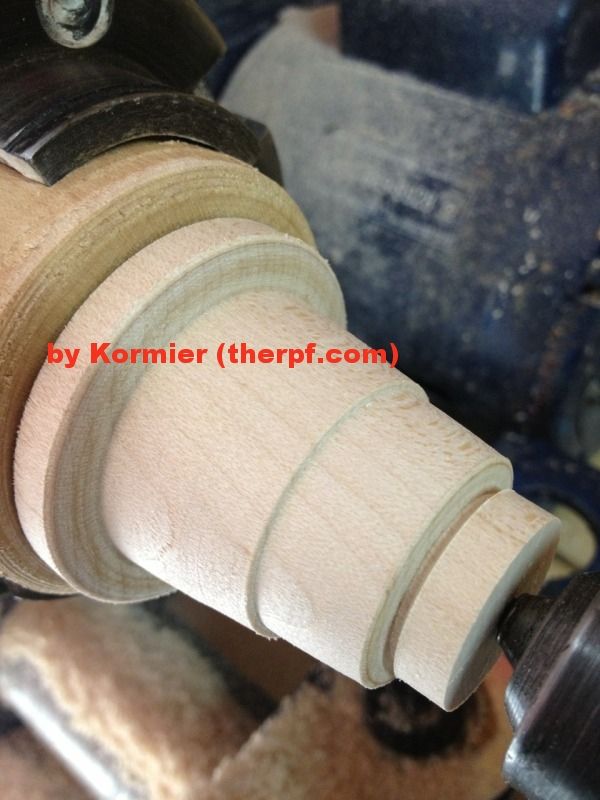
The next step was to get the diameter of the top "hat" portion"
Here it is turned down to the proper diameter.
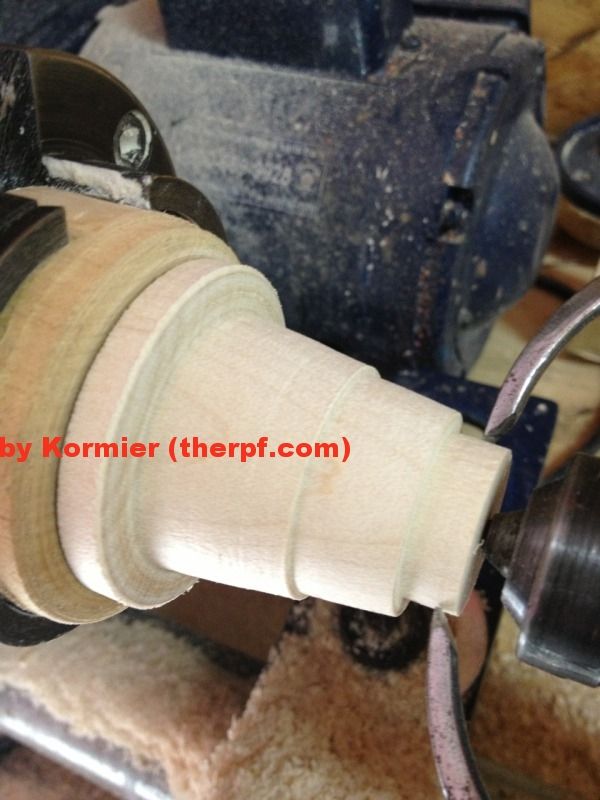
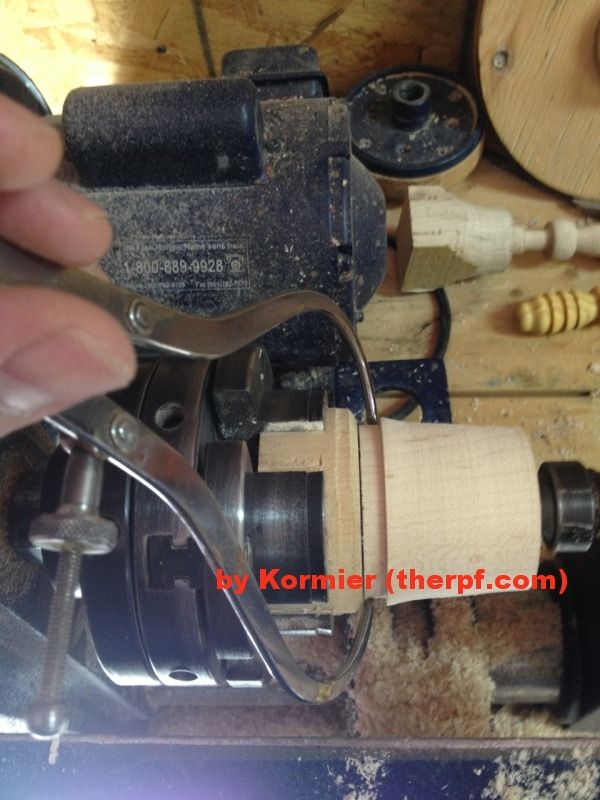
Next I used a narrow skew chisel to make the small groove that separates the "hat" from the middle segment.
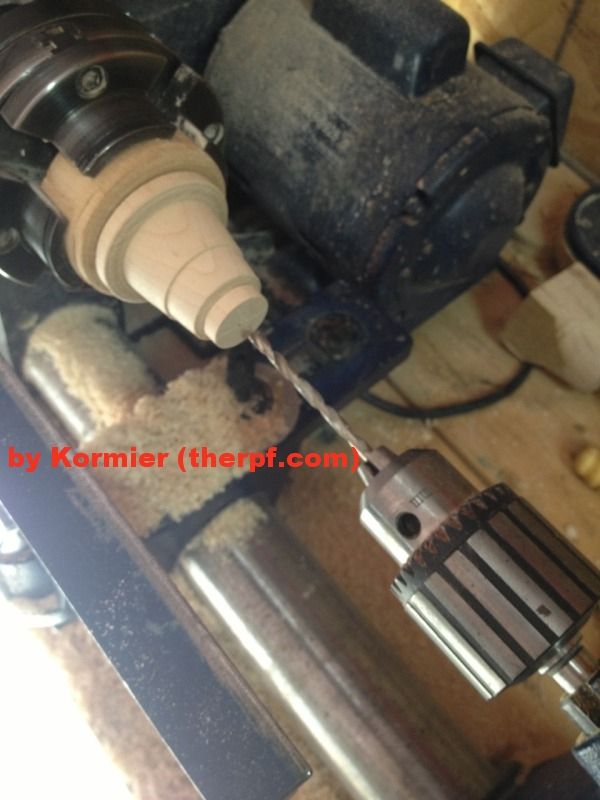
The next step is to drill the 1/2 inch hole in the center of the piece. To do so I replace my tail piece with a drill chuck. It's essentially the same as the end of an electric drill that fits in the tail piece of the lathe. The hole is drilled by manually moving the tail piece (holding a drill bit) towards the piece. I find it easier to have the lathe run at its slowest speed when drilling holes. Start with a small drill bit and slowly increase to the desired diameter. The picture below is the 2nd drill bit that I used (1/4 inch).
Since I could not find my 1/2 inch round wood bit I used a spade bit instead. Spade bits are more prone to have your wood chip so it's not what I would recommend using. If you end up using a spade bit go extremely slow and do small increments; removing the bits often to clear wood debris.
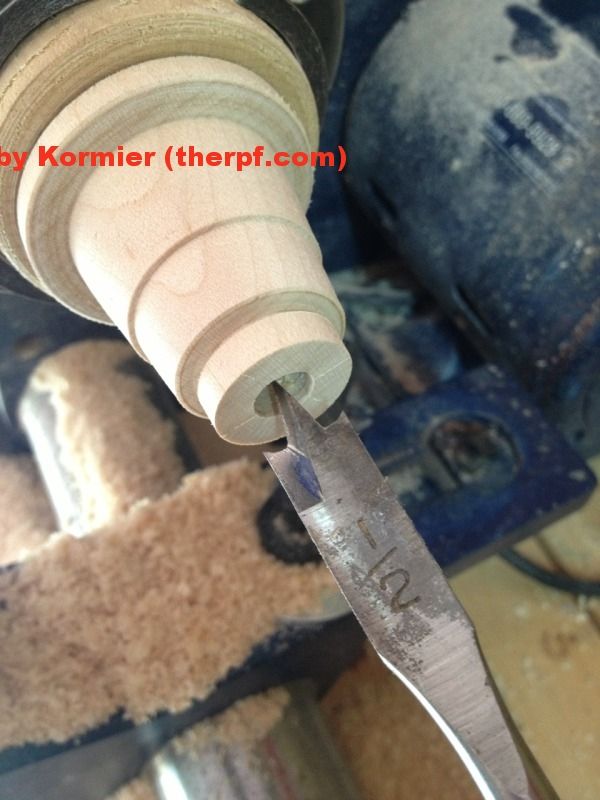
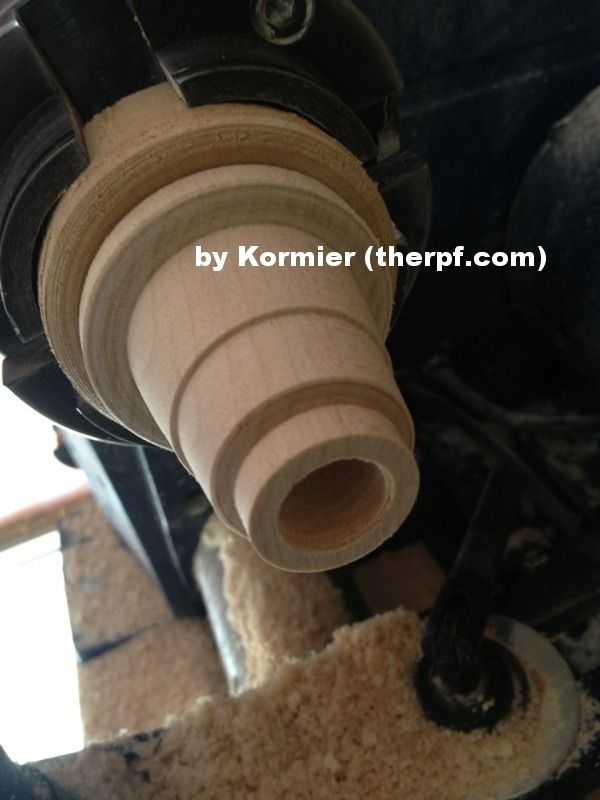
I drilled the hole about half way down the piece. The reason I did not go deeper is because there is a metal screw in there holding the maple to the scrap wood. I can always drill it all the way through on the drill press later if desired.
The next step is a light sanding. Since I was very cautious when making my cuts and ensured that my tools were extremely sharp there is not much sanding to do. That is the advantage of using hard wood; almost no sanding required if you are careful.
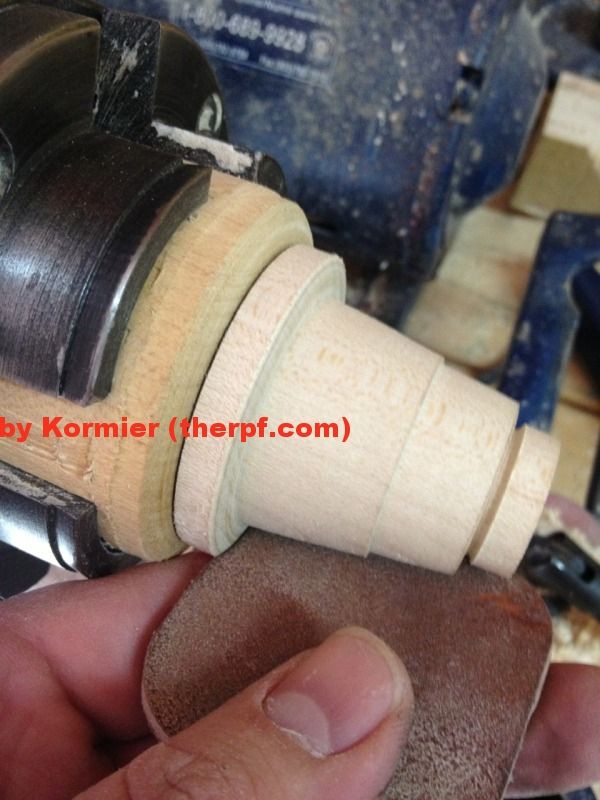
For sanding I am a big fan of the Micromesh products. Each pad has a different grit ranging from 1500 grit to 12000. As you go through each pad one by one you can notice that the wood begins to shine as it gets sanded to the finer grits. The 12000 feels like a piece of leather.
I have had these pads for at least 2 years and they are still doing the job.
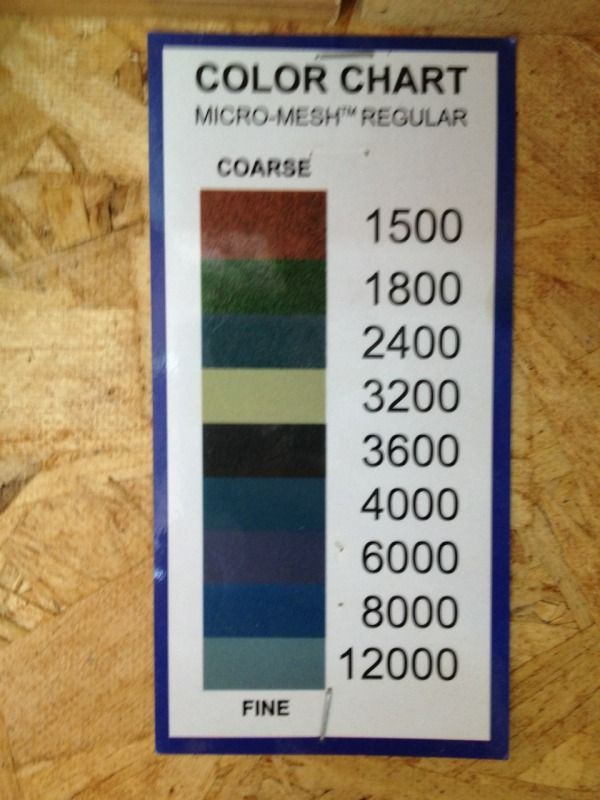
I stapled the color chart in front of my wood lathe to remind me of the sequence of colors that I need to go through.
And here's the piece on top of my original schematic.
That's what I got done today. Next I will be sealing the wood (not sure with what yet) and making a mold so that I can cast them in rubber.
I may consider doing a run if enough people are interested and will post an interest thread in the junkyard when I reach that point.
I hope you found this useful and let me know if you have any questions on the process I used.
cheers! :cheers
My old connector was way too big so my first step was to try to gather information on measurements to be as screen accurate as possible.
A quick search in Google images revealed two photos that I chose to use (credit for the images goes to their respective authors):
I used this one to determine the approximate height and width of the piece:
This one was used to figure out the proportion of each "segment" and overall diameter of the base.
Knowing that the "fuel hose" that connects to the center is 1/2 inch in diameter, I calculate the approximate size of each segment and came up with the following schematic:
With my measurements in hand I headed to my garage workshop and selected a nice piece of Canadian maple which I "trued up" (i.e. put it on my lathe and brought it from square to round). I used a screw chuck for this piece since it's pretty small. So what you see in the picture below is a piece of scrap wood being held by the jaw chuck. That piece of wood has a screw in its center that holds my piece of maple. The tail piece is a standard live center. Since the base of the connector is 1/4 inch thick, I put pencil marks as reference.
More pencil marks as the lathe turns. This is a trick that I often use to guide me in making my cuts.
Calipers are an essential tool when turning wood to get down to the desired diameter.
Next step is the base of the first segment. I obtain the correct diameter by adjusting my calipers according to my 1:1 schematic.
I then use a parting tool to bring down the wood to the desired diameter next to the base.
That segment is 3/4 inch long so I removed more wood accordingly. Technically I could have turned down all of the remaining of the piece to the same diameter as above.
Next step is to get the diameter of the top portion of that segment.
One trick that I learned over the years is to always have your caliper measurement slightly longer than what you need since you'll be losing some wood during the sanding step.
Next you "connect" the larger diameter cut to the smaller diameter cut. This gives you the proper angle.
Next step is the base of the middle segment. Again I get the diameter with the calipers.
And as I did before, I turn the wood down to the proper diameter using a parting tool. I also turned the remaining of the bloc to that diameter.
Next is getting the diameter of the top portion of the middle segment.
I then turned it down and sloped it as I did before.
The next step was to get the diameter of the top "hat" portion"
Here it is turned down to the proper diameter.
Next I used a narrow skew chisel to make the small groove that separates the "hat" from the middle segment.
The next step is to drill the 1/2 inch hole in the center of the piece. To do so I replace my tail piece with a drill chuck. It's essentially the same as the end of an electric drill that fits in the tail piece of the lathe. The hole is drilled by manually moving the tail piece (holding a drill bit) towards the piece. I find it easier to have the lathe run at its slowest speed when drilling holes. Start with a small drill bit and slowly increase to the desired diameter. The picture below is the 2nd drill bit that I used (1/4 inch).
Since I could not find my 1/2 inch round wood bit I used a spade bit instead. Spade bits are more prone to have your wood chip so it's not what I would recommend using. If you end up using a spade bit go extremely slow and do small increments; removing the bits often to clear wood debris.
I drilled the hole about half way down the piece. The reason I did not go deeper is because there is a metal screw in there holding the maple to the scrap wood. I can always drill it all the way through on the drill press later if desired.
The next step is a light sanding. Since I was very cautious when making my cuts and ensured that my tools were extremely sharp there is not much sanding to do. That is the advantage of using hard wood; almost no sanding required if you are careful.
For sanding I am a big fan of the Micromesh products. Each pad has a different grit ranging from 1500 grit to 12000. As you go through each pad one by one you can notice that the wood begins to shine as it gets sanded to the finer grits. The 12000 feels like a piece of leather.
I have had these pads for at least 2 years and they are still doing the job.
I stapled the color chart in front of my wood lathe to remind me of the sequence of colors that I need to go through.
And here's the piece on top of my original schematic.
That's what I got done today. Next I will be sealing the wood (not sure with what yet) and making a mold so that I can cast them in rubber.
I may consider doing a run if enough people are interested and will post an interest thread in the junkyard when I reach that point.
I hope you found this useful and let me know if you have any questions on the process I used.
cheers! :cheers
Last edited:
")

