A Foam-Finishing question thread?

IronManiac

Sr Member
Hi all. Can we could start a Foam-Finishing FAQ thread?

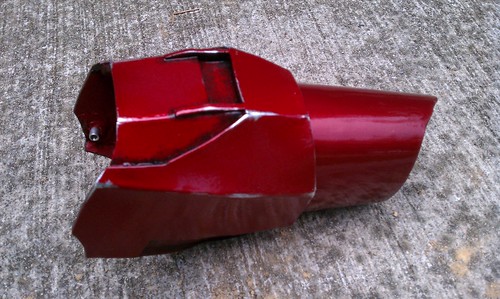
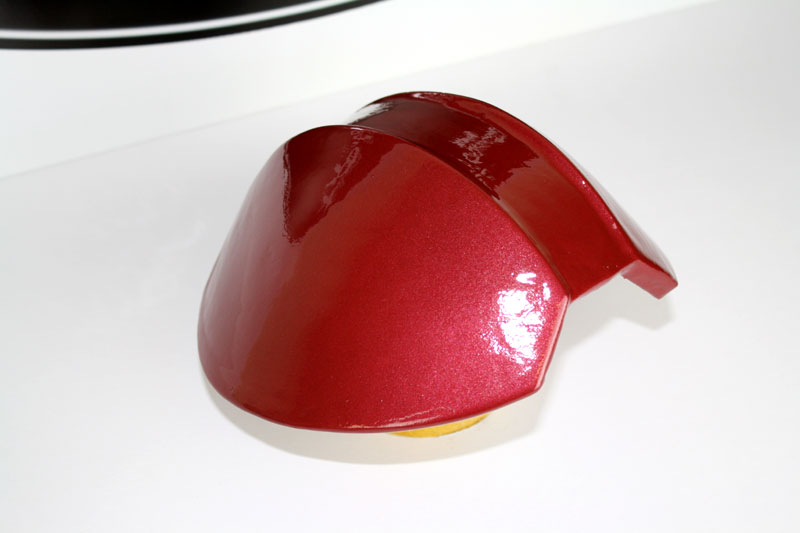
Many of us are working on foam suits, and they look great in raw foam form. But I know we all worry about what they'll look like when it's time to paint. Many builders have crossed this hurdle using various techniques. If you're one of them, I'd like to learn from your wealth of experience, and if we could bring the various methods together into one thread for discussion, that would be a really huge resource.

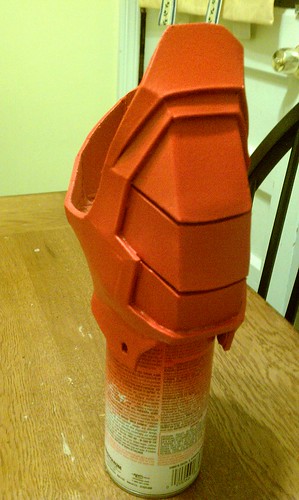
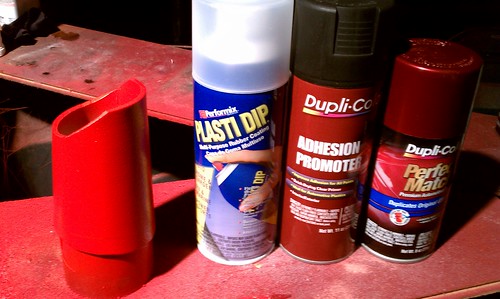
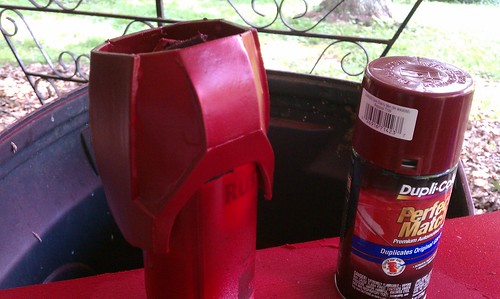
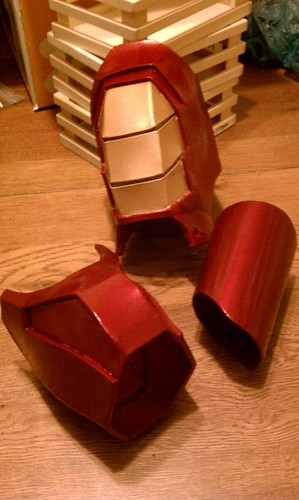
Whether it's with PVA glue, 'rondo', plasti-dip, smooth-cast, urethane, plaster, or whatever, can we start a running thread where builders can detail their finishing process, the materials they used, their top-tips, their results, and what they would do differently in the future?

I could help curate the thread if needed!
 
I made anya Stroud for Halloween last year all from foam. I coated the foam about 10 timeswith a mixture of pva glue and water, which was fine when it dried I then used car spray paint and plastic paint to colour. The pva sometimes cracked though, which I was gutted about, but all in all, it made the costume look battle worn so not too bad, I don't know what method is better to stop the cracks though! If anyone can help would be great :)
 
Sounds like a good idea.

I never made Ironman armor, but I have made armor out of EVA foam.

One thing I did that I don't think anyone else had done was after I was done sealing, and painting my armor I brushed clear uncolored minwax over it so it would be glossy.

I have noticed that it has started to slightly yellow since last June when I covered it. Still it worked at the time.
 
Here's DocHoliday78's method:

Paint is Duplicolor.

Here are the steps:

1. heatseal with heatgun
2. 1 coat watered down elmers
3. 2 light coat modpodge
4. 1 coat bulldog adhesion promoter
5. primer
6. paint
7. clearcoat and put bulldog adhesion promoter after to give it more flex

And here's an example of the type of finish this method gives:

Finished mark 7 arms for a customer just wanted to share:)
19250-m-arms1.jpg

19251-m-arm2.jpg


Here's IndieFilmGeek's Method:

My final method of paint was:

A. 2-3 coats Plasti-Dip. Sometimes more than that depending on how much I wanted to disguise my mistakes. Just remember to put on lots of thin layers rather than over-do any one layer.
5814246016_8d143c3b91.jpg


B. 2-3 coats of Dupli-Color Adhesive Promoter. Read the direction. This brand suggested only 3-5 minutes between coats and then follow with the auto paint IMMEDIATELY.
5792497344_431c1bec88.jpg


C. 2-3 coats of Desired Color (Dupli-Color Dark Cherry Metallic auto paint for the RED, Dupli-Color Sunburst Gold for the GOLD) It will LOOK dull, but we'll fix that with the next coat.
5747649508_4ea09539cd.jpg


D. 1 quick coat of
Rustoleum Clear Gloss Spray Paint for Plastic (should make sure humidity is not high or it will 'fog' and not be clear)
5868105781_d50e534525.jpg


E. Blackwash with dark water based paint (thinned). This makes the edges 'pop' and gives the suit more clarity when worn.
6239368941_b244f79a46.jpg


F. Small amounts of Silver Rub-n-Buff (to emulate paint chipping)
5802319804_b61a28b89a.jpg

**Just for reference, that wrist pieces is fiberglass painted with auto primer and the Metallic Dark Cherry paint. The forearm piece is EVA foam painted in the above method. To be honest, in the end I couldn't even tell the foam from the hardened pieces... which I guess is the goal, right? :lol


If you have any other questions, please feel free to ask. I only got through this project because of the folks on this forum helping me out -- So, I want to do the same if I can!

Keep building! :):thumbsup


Here's XRobots method:

VIDEO: XRobots - How To plastic coat foam & expanded polystyrene prop and costume pieces - YouTube

Text, from here: XRobots.co.uk - Plastic coating your Plastazote / EVA / Polystyrene foam / cardboard props and costumes

I've used a lot of Polyurethane resin for casting costume pieces, but I've found that it doesn't stick to Plastazote foam well, and it will melt Expanded Polystyrene foam. So we need some sort of primer that you can coat the foam with, which will also stick to the Polyurethane. The answer is PVA.

PVA is white glue/wood glue which can be purchased cheaply from most DIY/home stores and craft shops. It will stick to Expanded Polystyrene, Plastazote, EVA foam, cardboard, and many other materials. This acts as the perfect primer for Polyurethane fast cast resin. Here is some testing I did with a sample of Plastazote and Expanded Polystyrene.

Firstly, three coats of PVA were applied to the samples, note that PVA dries clear:

Once it had dried, I brushed two coats of Smooth-on 65D over the top surface. PVA is water soluble so if you touch it with a wet finger it gets sticky again. I'm pretty sure this means that Polyurethane resin applied in liquid form will bite into the surface and stick fast.

You can see here that it has run off the edges, if I'd continued to rotate the piece as the resin set, then it would have evenly coated the piece - you can see a better example in the YouTube video below. [VISIT LINK ABOVE]

After a light sand, priming and painting with standard rattle cans, you can see the results below along with a comparison of the finish with painted foam from by Iron Man foam build. Obviously, since the surface is plastic you can fill any gaps with car body filler and sand it smooth to finish it as perfectly as you like...

And an example of the finish with this method:

Here is my foam test piece:

coating11.jpg


And Stealth's Method:

VIDEO: TUTORIAL - Painting Foam Costumes - Part 4 of "Using PEPAKURA for FOAM Costume Building" - YouTube

I'm sure there are others out there though. So feel free to add on.

-Nick
 
Last edited:
Nick Fox, that's EXACTLY what i'm talking about! :thumbsup :thumbsup

The more posts the better. If there are builders out there who don't have time to make a big post, or have this info in their own build thread, just send me a PM and i'd be happy to gather info from your thread like NickFox has done and post it here.
 
Nick Fox, that's EXACTLY what i'm talking about! :thumbsup :thumbsup

I already had a section in my bookmarks for those tips, so it was fairly easy. I just went back actually and added images of the resulting finish for Doc's Method and Xrobots' Method, just to give people a quick, at-a-glance idea of how they shape up

Here's my thread on Epsilon...

GAH! How did I forget yours?! I knew there was one other biggie I was forgetting about. I still can't wait until people really start experimenting more with Epsilon to see how far we can push it...like we do with everything.

-Nick
 
Thanks for posting, booksandcorsets! I probably never would have found your thread even if i searched because i never would have known to search for 'epsilon'.

Really good looking results.
 
how well does the plasti dip->modpodge->adhesion promoter-> paint->gloss stand up to bends and wrinkling? My spartan suit was just modpodge primer and paint and clear coat and there are areas of chip paint after a while of use. has any1 tried to see if fabric paint or acrylic would work on foam and keep its flexibility and show less wrinkling?
 
Last edited:
When I first started using foam I just primed and painted with a lot of acrylic paint and a brush.

It was not bad, but I did not have seams to hide.
 
Last edited:
Just one more thing. I have been using a heat gun on all my parts prior to glueing. I have found that if i do it after the glue softens and moves the parts out of alignmrnt. Also just now i was trying to form tubes from foam. So i first heated them in the round shape heald them with tape, 5 min in the freezer perfectly formed...GM
 
Wow, that's a cool tip, murdoch. After freezing, the parts stay in that shape indefinintely? Have you seen them try to flatten themselves back out over time?
 
Wow, that's a cool tip, murdoch. After freezing, the parts stay in that shape indefinintely? Have you seen them try to flatten themselves back out over time?

Actually it did start to loose its shape, but if you just wanted it to hold just until you finished glueing i think it's a big help. But it has not flattend out either...GM
 
Great thread guys:thumbsup
I also use heat to form shapes and use more valley cuts both of which means less separate parts and/or less joints. Regarding finishing I went down the 'X Robots' method using PVA & plastic coating with excellent results. Anyway they say a pictures worth a thousand words........
DSCF1225_zps076dc00c.jpg

I would say a thousand and one with that pic. Looks awesome man...GM
 
Absolutely fantastic finished product. I can only hope that my costume comes out like that.

Please describe: How long of do you spend getting that surface finish? Is it alot of sanding and smoothing before paint? After paint? Did you apply a clearcoat?

I'm just doing a boots and gauntlets for my costume, and i want them to look as good as your work there. Again, amazing stuff, i'm so jealous!

Thanks mate here's the process I use:

4-5 coats P.V.A ( my foams Plastazote so needs a few coats)
2 coats of the Resin (15 mins apart to avoid delamination)
Light rub down with 240 wet n' dry
Coat of Adhesion Promoter
Coat of high build primer
Fill any pinholes/imperfections ect with Bumper filler
Rub down with 240
Another primer
Rub down with 400
Another primer
Possibly another coat and flat depending on the finish
Flat with 800 used with soapy water
3 coats of colour
Flat with 1200 and soapy water
3 coats of Clear (2nd & 3rd coats heavy)
Leave 24 hrs, flat with 1200 again
Use rubbing compound
And finally polish & wax

HTH Cheers:thumbsup
 
Wow, do you work in an autobody shop? Sounds like you should be painting Astons and Bugattis! I've never very much had patience, When i get to the paint stage, i just want to get color on it so bad that I always rush.

I think since i've got a whole month, i really should take my time and follow your example, because the results are so worth it. Thanks for the procedure, it's great info.
 
My favored process for foam armor pieces:

Layer the whole piece, inside and out, with a few coats of watered-down PVA glue (50-50 mix).

Line the inside of the piece with cotton muslin cloth (or cheesecloth, or old t-shirts), glued down with straight PVA. It's not as strong as fiberglass, but it's lots cheaper and I always have the materials for it lying around.

Primer and paint.
 
This thread is more than 8 years old.

Your message may be considered spam for the following reasons:

  1. This thread hasn't been active in some time. A new post in this thread might not contribute constructively to this discussion after so long.
If you wish to reply despite these issues, check the box below before replying.
Be aware that malicious compliance may result in more severe penalties.
Back
Top