Duel Truck

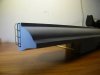
More work on the trailer. I first used paper to cut out a pattern then used a styrene For Sale sign I picked up at the hardware store. The sign was big enough to I could cut this out in one sheet.

100_6603.jpg 100_6604.jpg 100_6605.jpg

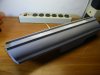
I then rolled the sign and warmed it up a little so it can have a little curve to it.

100_6606.jpg 100_6607.jpg 100_6608.jpg 100_6609.jpg
100_6610.jpg 100_6611.jpg

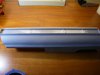
I will work on the side parts next.
 
I added some side pieces to the trailer.

100_7140.jpg 100_7141.jpg 100_7142.jpg 100_7143.jpg

I couldn't make the side strips all in one piece so I had to do this.

100_7144.jpg 100_7145.jpg 100_7146.jpg 100_7147.jpg

I'll be busy with the putty,sanding, primer, repeat routine to hide the gaps and bumps.

100_7172.jpg 100_7171.jpg 100_7173.jpg 100_7174.jpg 100_7175.jpg

I'm happy to see the overall shape start to come together.
 
Great progress Randy-san.
The way you build the trailer is fantastic.
Don't forget to conceal some gunpowder and a few bags of gasoline for the final shot.:p
 
I'm shure that's gonna be fun!

I'm both looking forward to it and a little intimidated by it because I don't want to mess things up with a horrible paint and weather job. I plan on practicing with an old model car using the same paints first and hopefully get all my mistakes on that instead of the truck.

Great progress Randy-san.
The way you build the trailer is fantastic.
Don't forget to conceal some gunpowder and a few bags of gasoline for the final shot.:p

Thank you Katsu-san. Because you are so clever and creative, I'm sure you would have come up with a much better way to do this ;) Great idea about the gun powder and gasoline. I will have to open the driver's door too. My wife will wonder what I'm doing when she hears the explosions.
 
ve, I'm sure you would have come up with a much better way to do this ;) Great idea about the gun powder and gasoline. I will have to open the driver's door too. My wife will wonder what I'm doing when she hears the explosions.

:lol no way!!

In fact, when i was a high school boy, i saw the movie 'Towering Inferno' i was so impressed and soon I built that Glass Tower with some woods and plexiglass.
That was a great model of 6 feet tall.
Then I put the fire on it. It started to burn like a torch. My room was filled with smoke and ceilling was burnt a bit. I was in a panic.
My mom quickly broke into my room and saw what happened.

Of course she bust me like hell. That was really A towering inferno.
 
Katsu-san, I did things like that too. I built structures out of shoe boxes, cardboard etc. and had toy monsters rampage through. I set one of them on fire to help fulfill my visual imagination but poured a bunch of sand on it when it started getting out of control. I buried the stuff so my parents wouldn't know. I'm glad I didn't set the neighborhood on fire.
 
Good lordy! Looking at those pictures are freakin' impressive! Seriously, the filling and primer alone looks a lot like metal already.
 
Thank you. Normally I don't like this stage of building because of the time it takes to wait for everything to dry. But this time I actually enjoyed it.
 
Thank you. Normally I don't like this stage of building because of the time it takes to wait for everything to dry. But this time I actually enjoyed it.

You're welcome. Like I've said before, I'm looking forward to seeing this build complete, and I've got a feeling that it will be awesome.
 
Remember to keep that tanker out of the sun and away from hot sources at all times. The styrene will start to sag after a while anyway but heat will increase the speed of that many times. Sagging will help the decrepit look the tanker had in the film but you don't want to overdo it. If you want to prevent any sagging: fill it up with PUR-foam.

Looking forward to the next installment.
 
Thank you RKS for that info. I didn't even think about any sagging issues over time. I do have some expanding foam which I use for other stuff my wife and I work on. I'm going to do a little brainstorming on this. Thanks again.
 
Took advantage of the three day holiday here and many thanks to my wife for being understanding while I lost myself in the world of model building.

I started working on the top of the Fruehauf tanker.

100_7765.jpg 100_7766.jpg 100_7768.jpg 100_7769.jpg 100_7771.jpg

After this had time to fully set, I added the other parts, some putty and some sanding.

100_7842.jpg 100_7843.jpg 100_7850.jpg 100_7852.jpg 100_7851.jpg 100_7853.jpg

Then I worked on the tires. Originally I was going to use one set of tires on the outside and another set from a different kit on the inside. But when I really took a closer looks at this, I didn't like it at all because not only did the treads not match but they are not the same size.

100_7858.jpg

So I took one of the tires and inner rim, made a mold and cast the tires I need. A much better match.

100_7854.jpg 100_7862.jpg 100_7864.jpg 100_7863.jpg 100_7857.jpg 100_7865.jpg 100_7859.jpg 100_7860.jpg 100_7861.jpg
 

Attachments

  • 100_7922.jpg
    100_7922.jpg
    433.1 KB · Views: 160
  • 100_7923.jpg
    100_7923.jpg
    528.6 KB · Views: 49
  • 100_7924.jpg
    100_7924.jpg
    533.4 KB · Views: 56
I built the ladder out of some metal tubing and scratched up the caps on top of the tanker.

100_7922.jpg 100_7924.jpg 100_7923.jpg 100_7925.jpg 100_7926.jpg 100_7927.jpg

I added some silver paint to the wheels. Not sure how much will show through after the weathering.

100_7928.jpg 100_7929.jpg

Then some primer.

100_7953.jpg 100_7951.jpg 100_7954.jpg 100_8313.jpg 100_7956.jpg 100_7955.jpg 100_8314.jpg

Thanks for looking.
 
This thread is more than 6 years old.

Your message may be considered spam for the following reasons:

  1. This thread hasn't been active in some time. A new post in this thread might not contribute constructively to this discussion after so long.
If you wish to reply despite these issues, check the box below before replying.
Be aware that malicious compliance may result in more severe penalties.
Back
Top