Nike Mag V2 Mod Discussion (Page 58 Shopping List)

Status
Not open for further replies.
Yea I was thinking the same thing with a sock. Make a vid @cavx. I might even try tonight too while the missus is at the gym

I did set up a video camera, and I did record the first part of my first toe mod, but the batteries (I swear they were new out of the pack) went flat or something because after a few minutes the camera shut down, so no good footage, sorry.

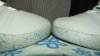
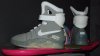
Anyway, I think I have had success. Initially I got a massive hollow in the toe box of the first shoe, and even though there was a heap of paper in there, a quick re-heat and stuffing with a sock seems to have fixed that. I did both with and without a cloth tee-towel. You can see what is going on without the towel, but you need the towel if pressing the hot iron onto the shoe. The laces didn't flatten as much as I had hoped but still better than out of the box.

Because these shoes are US8, the toe is really short and rounded and so I think the larger sizes will have a better end result.

1779906_10152258688533841_1521967717_n.jpg

1896983_10152258687848841_1128655032_n.jpg

1977084_10152258689023841_891280390_n.jpg
 

Attachments

  • 1779906_10152258688533841_1521967717_n.jpg
    1779906_10152258688533841_1521967717_n.jpg
    97.9 KB · Views: 104
  • 1977084_10152258689023841_891280390_n.jpg
    1977084_10152258689023841_891280390_n.jpg
    51.6 KB · Views: 127
  • 1896983_10152258687848841_1128655032_n.jpg
    1896983_10152258687848841_1128655032_n.jpg
    56.3 KB · Views: 101
Awesome work cavx. I went to do it but decided to work on another project for my costume for supanova. Trying to figure out arduino is not fun lol. Is your hat the miraj cap?
 
Last edited by a moderator:
Awesome work @cavx. I went to do it but decided to work on another project for my costume for supanova. Trying to figure out arduino is not fun lol. Is your hat the miraj cap?

Thanks Greeky04. The hat is a Diamond Select that I bought (and probably paid too much for I think) at Brisnova 13. I heard they were on sale and decided it was to be one of those guilty pleasure purchases. I also scored a RAMBO IV knife for my RAMBO knife collection among other things.

If you are going to Supanova, we should catch up. I will be doing the "almost Marty" again. Should have at least a strap light done this year. I was hoping to have the jacket done but not gonna happen for this one. Maybe, Brisnova 14.
 
cavx i nearly bought the diamond select hat but i held out and found the miraj hat on ebay, i got the medium but should have got the small and i paid a bit for it but glad i did. yea we should catch up and chat in person. ill be dressed as buzz lightyear one day and ken from toy story the next day.
 
Last edited by a moderator:
cool, DJ - what colours are you going to be replacing the gold with? I've been thinking about getting a black pair of V2's and removing the gold paint and swoosh, and putting a white swoosh on and repainting the text on the back white too. You know, like the old 90's Nike basketball shoes where they were mostly all black with the Nike stuff white (air DVST8 or similar, shown below)
View attachment 293280

Gotta go buy a new iron to try Emmet's idea, mine coughs up rust when I put water in it, lol! So glad I tested it on a random cleaning cloth first......

i'm going to keep it solid black the sole LOL but thats just my preference ,im doing the swoosh in floresent yellow el and moding the tong in pleather wile i have the toe opened waiting to get material today for that ,
didn't have a confirmation on the iron mod tec before i did the toe mod looks great trying to figure a way to do the tong with the toe closed i just cant stand that crapy shiny material thats short to boot lol
 
Those Nike Footwear bag inspired customs look great Brad. Or should I say they look rather Mag-nificent? (Corny joke)

Also, thanks for the new confirmed toe mod technique guys, can't wait to try it out tomorrow on an old pair, and then if all goes well do it on my current pair. Speaking of my new pair, I got them in the mail recently and when I opened them up I noticed :eek a few glue stains on the upper from when they were made...grrrrrr it made me mad!

try to use a iron and 100percent cotton shirt to get glue out bro :D make shure you move the shirt around to suck up glue pending on what type of glue it is ??
 
So is anyone tempted to just remove this toe reinforcement that by-itself seems to cause the space-boot-bulge? I am, since it would be more screen accurate, but I'm thinking that many prefer the toe area to have more support despite this not being screen accurate...

Also, has it been confirmed that this steaming of the toe area creates a lower/flatter toe area than cut-and-glue method? And if this is the case, and if the shoe fits a bit more snugly as a result, if it is still advisable to order a FULL size larger than your normal size, assuming you will still be leaving the collapsed toe support in?

Thanks much!
 
is still advisable to order a FULL size larger than your normal size, assuming you will still be leaving the collapsed toe support in?

Thanks much!

It's always been just the opposite. These shoes fit BIG so you always need to order SMALLER than your shoe size. The steam method actually makes more room than the cut and glue method.
 
It's always been just the opposite. These shoes fit BIG so you always need to order SMALLER than your shoe size. The steam method actually makes more room than the cut and glue method.

Ah crap. That's what I meant. Full size smaller. Interesting about the steam method leaving more room. Thanks for that info.
 
It's always been just the opposite. These shoes fit BIG so you always need to order SMALLER than your shoe size. The steam method actually makes more room than the cut and glue method.
From what could tell from the pair I did last night, all you are doing is changing the shape. The volume of the toe box stays the same. The cut and glue method would be likely to change the volume.
 
ImageUploadedByTapatalk1393984093.751432.jpg
Just got mine! Did the toe mod by emmet last night, and i have ripples. Only used an iron though by spraying the toebox with water and soaking a wet towel over it. I have yet to find a steamer. This method could be a bit tricky. Two things that bother me though is the shorter toebox compared to the RD, and the slightly fatter swoosh. Ordering the parts as soon as i have the time.

Oh, i not sure if this has been mentioned but i found that using a rubber eraser removes dirt(from handling and some minor glue stains ive had with my pair. Just rub it gently til it comes off.


Sent from my iPhone using Tapatalk
 
i am now itching for my pair to turn up!!!,.. ordered from Karin as suggested multiple times on here, little bit disappointed that its taken a week for a tracking number to be given to me though,,, and as normal with stuff from china via EMS it doesn't even work for tracking yet!,... ( takes sometimes up to 3 days before any updates show or the package turns up before you can even track it haha) , when they do arrive i am doing the toe mod straight away,. then will see how brave i am to get involved with the EL side of things! this site has helped me so much!
 
Thanks to airair and DL4567 I made two improvements to my mags. :)

First of all I managed to get the matte effect back from the ClearShield clear coat. What I did wrong when sealing the mags was to put too much of the clear coat on the shoe. If it is applied too thick it will dry looking semi-gloss. I repainted the soles with an almost dry brush and the result is perfectly matte. So the soles are not going to yellow AND will still be looking matte. YAY. :cool

On the left image the upper shoe is brushed matte already, the lower one still is semi-glossy, on the right image both are painted matte.

View attachment 292083 View attachment 292082


Toe box iron mod:

airair did explain very well how the toe box is built up. Like he said, the white rigid stuff gets really soft as soon as it is heated up and will become completely rigid again when it cools down.
In my first attempt the rigid material crumbled and caused ripples. That's because when it becomes soft the overstretched grey fabric is allowed to shrink back to it's regular shape. This made the softened rigid material ripple underneath.

Knowing this I was able to remove the ripples entirely now. I did heat up only one segment of the toe box at a time. I used the hot steam coming from the iron. It is pretty easy to do: You need to put one hand inside the shoe, put a protective fabric on top of the shoe, "shoot" some steam into the area you want to modify, and then hold and stretch the hot fabric of the shoe flat with both hands until it is cooled down.
Then move on to the next segment and so on.

All the ripples are gone now, the toe box is pretty slim and all this without tearing up the shoes at all. :)

And here is how they look. Probably not the slimmest toe box out there, but I like it. What do you think of this mod?

View attachment 292084 View attachment 292085

View attachment 292086 View attachment 292087

View attachment 292088

Amazing work Emmit. Any chance you can shoot a quick video illustrating the process. I'm having a hard time making out the visual. Additionally, can you show the iron you recommend to steam it out? Once again great work.
 
Never mind, I figured it out...I was using the wrong side of the wire tape...durrrr...but thanks JediFyfe, you are awesome, thanks for being willing to help out a noob like me!

Just curious, where did you order your wire tape from? Thanks.
 
I got a seller on ebay ? you can buy 2 el sheets for under 45.00 usd //////////////5"x6" EL Panel Back Light Board Display Backlight Green US $21.99 each. Seller information
elwireseller (2847 )
99.5% Positive feedback

I just ordered and received 2 of these from a similar name seller - elwireseller_uk

Not sure what the difference is. Anyway, I received the 2 5"x6" EL Panel sheets and I cannot get them to light up with the 9v Inverter. I haven't tested the 12v that came with it. Am I missing something here to light these up? Would love some tips since these didn't come with instructions. Thanks.
 
Congrats on getting them working.

I'm curious because I cannot get the 9v Inverter to light my EL Sheet up, but the 12V inverter that came with the EL Sheets works fine. Any ideas? Model number on the 9v inverter is IPTC 100-200CM CL-ELI

This is a common question in the thread. Seems to come up every time a first timer gets their EL sheet. Don't worry it's completely normal. The 5x6 sheet is too big for the 9v inverter, but will work with the 12v. Once you cut the EL into smaller pieces, the 9v will work fine.
 
Status
Not open for further replies.
Back
Top