You are using an out of date browser. It may not display this or other websites correctly.
You should upgrade or use an alternative browser.
You should upgrade or use an alternative browser.
Nike Mag V2 Mod Discussion (Page 58 Shopping List)
- Thread starter Taff83
- Start date
-
- Tags
- back to the future
- Status
- Not open for further replies.
airair
Sr Member
Do any of you guy's know how or if i can do the rechargeable 9v battery setup but instead of using the adapter that they come with if somehow i can set it up so i can recharge the 9v battery with a mini or micro USB setup. Thanks for any help or advice anyone can offer
or any mini or micro USB set up that can be used.
I think a few have used a specific external recharger and then wired that to the 9v battery clip and added a dc pin. I think Taff83 has done it on here.
It means you must use that specific charger for that battery. I think it is a chinese make, this one I think. There are probably other ones out there I think.
Brand New 9V Li-ion Rechargeable battery 750mAh BL 6F22 | eBay
Its somewhere on this thread, you might have to do a search to find the specific post, there was some pictures posted up if I recall correctly.
- - - Updated - - -
I posted up a new video in higher quality of a conversion so you can see the differences again of what the mods can do to the overall look. This is before I flattened the lace rib area so that was still to do.
Last edited by a moderator:
Taff83
Sr Member
Looking good Airair ")
With reference to the charger and batteries I'm currently using the 880mah that someone posted with the charger for the 750mah, seem to be working ok so far
Here is a link to it on eBay:-
http://m.ebay.co.uk/itm/321332910168?nav=SEARCH
If your using usb if memory serves me right it is 5v? so not sure if you could charge using 9v batteries "shrugs shoulders"
Best way I found was to wire a dc jack into the buckles then just use a dc plug/port with 9v connectors on the other end, works for me and I strongly recommend making your pair rechargeable unless you don't mind taking the batteries out to charge them, I even redid some wiring on my BTTF jacket and made it dc rechargeable, looks odd plugging my jacket into the wall but hey, it's nearly 2015 so not that odd
Do any of you guy's know how or if i can do the rechargeable 9v battery setup but instead of using the adapter that they come with if somehow i can set it up so i can recharge the 9v battery with a mini or micro USB setup. Thanks for any help or advice anyone can offer
or any mini or micro USB set up that can be used.
With reference to the charger and batteries I'm currently using the 880mah that someone posted with the charger for the 750mah, seem to be working ok so far
Here is a link to it on eBay:-
http://m.ebay.co.uk/itm/321332910168?nav=SEARCH
If your using usb if memory serves me right it is 5v? so not sure if you could charge using 9v batteries "shrugs shoulders"
Best way I found was to wire a dc jack into the buckles then just use a dc plug/port with 9v connectors on the other end, works for me and I strongly recommend making your pair rechargeable unless you don't mind taking the batteries out to charge them, I even redid some wiring on my BTTF jacket and made it dc rechargeable, looks odd plugging my jacket into the wall but hey, it's nearly 2015 so not that odd
Last edited:
DL4567
Sr Member
It was me who previously posted about the 880mah LiteLong brand batteries. I switched away from the BlueBaby's because the one in my left shoe stopped working on only the second wearing, when a connection inside the battery broke from the weight of my heel. The LiteLong's may very well do the same thing, I'll have to try them and see. I ordered and received a set, but have yet to wear the shoes again. For someone ordering new batteries from scratch, I'd stay away from the BlueBaby's as they are no longer the highest mah available, and we know for certain they have the possibility of breaking inside.
Emmet
Member
I have to admit that I haven't read all 142 pages (I will - promised) and don't know if this has been posted before. I found an easy way to flatten the toe box and wanted to share it with you.
When ironing the lace area of the shoes I also tried to steam-iron the toe box and it almost immediately started to become soft and collapsed.
I stuffed the toe box with an old shirt and used the steaming iron to work the toe box down. It is important to steam the complete toe box from one lace area to the other, not only the tip of the shoe.
The result is far from perfect as the inner fabric will start to ripple in the process and this effect will be slightly visible.
But as I want to wear this pair I am completely fine with the looks.
It is a quick and very easy way of slimming down the toe box without tearing the shoe apart.
Looks good. Any other pics? Top and front shots? I would also have to imagine that since you aren't removing any of the fabric, that eventually the toe box will pop back into what it was before. You are basically squishing the fabric down instead of shrinking it.
Emmet
Member
Actually, there seems to be a material inside the toe box that reacts to moisture. When steaming the toe box this material went soft.
Now after it had time to dry the toe box feels sturdier again. Does not pop back. Could there be some thin cardboard material inside? More pics to follow.
Now after it had time to dry the toe box feels sturdier again. Does not pop back. Could there be some thin cardboard material inside? More pics to follow.
Emmet
Member
Almost forgot... I read somewhere that the mags will start yellowing on the clear soles, the mid soles and heel cups.
I did some research and found this outdoor UV protective clear coat that stays flexible after drying.
It is used for prints that will be displayed outdoors, but works well on the mags also.
ClearShield Type C Matte Quart (WBCMCANQT)
Water-based, non-yellowing clear coating that has excellent exterior durability and are highly flexible - Great to use on canvas that needs to be stretched as the top-coat will not crack. ClearShield Type C contains state-of-the-art UV inhibitors that protects your print.
Pros of ClearStar Type C:
Information Sheet
http://www.itsupplies.com/ClearShield/ClearShield-Type-C-Matte-Quart-WBCMCANQT
Used it on the mags already. It is very easy to apply, even with a simple brush.
It stays rubbery when dry, does not crack or chip when wearing the shoes.
I did some research and found this outdoor UV protective clear coat that stays flexible after drying.
It is used for prints that will be displayed outdoors, but works well on the mags also.
ClearShield Type C Matte Quart (WBCMCANQT)
Water-based, non-yellowing clear coating that has excellent exterior durability and are highly flexible - Great to use on canvas that needs to be stretched as the top-coat will not crack. ClearShield Type C contains state-of-the-art UV inhibitors that protects your print.
Pros of ClearStar Type C:
- Use Instead of Film Laminates
- Contains State-Of-The-Art UV Inhibitors
- High-Performace
- Highly-Flexible
- Waterproof
- Will Not Yellow
- Use for Pigment and Solvent-Based Inks
Information Sheet
http://www.itsupplies.com/ClearShield/ClearShield-Type-C-Matte-Quart-WBCMCANQT
Used it on the mags already. It is very easy to apply, even with a simple brush.
It stays rubbery when dry, does not crack or chip when wearing the shoes.
airair
Sr Member
Actually, there seems to be a material inside the toe box that reacts to moisture. When steaming the toe box this material went soft.
Now after it had time to dry the toe box feels sturdier again. Does not pop back. Could there be some thin cardboard material inside? More pics to follow.
the material inside the toebox is a rigid piece which goes soft when heat is applied to it.
I normally unstitch the grey fabric at the toebox, then peel off one side of the grey fabric (either the top or bottom layer), then its easier to stretch the top layer of grey fabric without having to remove this rigid piece.
I've noticed this piece is sometimes very easily peeled off, and sometimes it stuck quite strongly to the scrim fabric thats under the grey fabric.
One a few pairs, I actually removed this piece completely, and it leaves the fabric soft and sock like.
You can see it here.
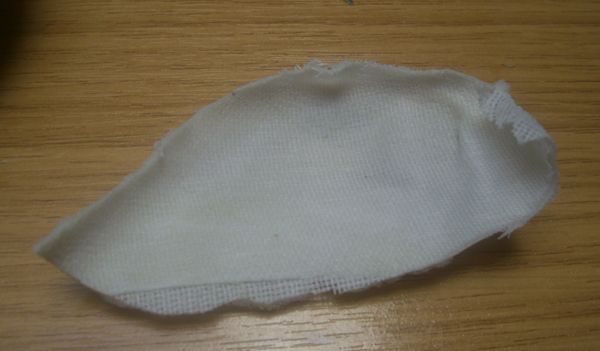
here is a pair which I completely removed that rigid piece. It leaves the grey fabric much softer though and sock like, and easier to stretch, but if you are wanting a more solid toebox, then its probably best to leave it in.
Come to think of it, when you actually steamed over the toebox and the sides with the iron, it makes sense that the grey fabric shrinks slightly, as the grey fabric actually seems over stretched slightly over the rigid toebox insert.
Can you post some more pics? How much did it shrink by? It will be interesting to see how much it shrinks.
Great tip, I will give it a go on a next pair and see how it comes out.
It might save a lot of pain/hassle when doing the toebox!
Last edited:
DL4567
Sr Member
Very intrigued! Even though you say it ripples, it looks perfect in that pic. Yes, please post more pics.
I did some research and found this outdoor UV protective clear coat that stays flexible after drying.
It is used for prints that will be displayed outdoors, but works well on the mags also.
Used it on the mags already. It is very easy to apply, even with a simple brush.
It stays rubbery when dry, does not crack or chip when wearing the shoes.
I did indeed notice the glossy sheen in the above picture and wondered what it was.... that explains it.
Emmet
Member
I did indeed notice the glossy sheen in the above picture and wondered what it was.... that explains it.
The ClearShield is supposed to be matte and that is how it turned out on the printed parts of my hoverboard decal (hard to tell but it is perfectly matte):

On the shoes it looks more like semi-gloss. :behave But I don't want the shoes to yellow, so I will have to live with the semi gloss.
Will add some more images tomorrow.
Off topic: Can anyone tell me how long it takes the standard V2s to fully charge? :confused
Last edited:
Emmet
Member
Thanks to airair and DL4567 I made two improvements to my mags.
First of all I managed to get the matte effect back from the ClearShield clear coat. What I did wrong when sealing the mags was to put too much of the clear coat on the shoe. If it is applied too thick it will dry looking semi-gloss. I repainted the soles with an almost dry brush and the result is perfectly matte. So the soles are not going to yellow AND will still be looking matte. YAY. :cool
On the left image the upper shoe is brushed matte already, the lower one still is semi-glossy, on the right image both are painted matte.


Toe box iron mod:
airair did explain very well how the toe box is built up. Like he said, the white rigid stuff gets really soft as soon as it is heated up and will become completely rigid again when it cools down.
In my first attempt the rigid material crumbled and caused ripples. That's because when it becomes soft the overstretched grey fabric is allowed to shrink back to it's regular shape. This made the softened rigid material ripple underneath.
Knowing this I was able to remove the ripples entirely now. I did heat up only one segment of the toe box at a time. I used the hot steam coming from the iron. It is pretty easy to do: You need to put one hand inside the shoe, put a protective fabric on top of the shoe, "shoot" some steam into the area you want to modify, and then hold and stretch the hot fabric of the shoe flat with both hands until it is cooled down.
Then move on to the next segment and so on.
All the ripples are gone now, the toe box is pretty slim and all this without tearing up the shoes at all.
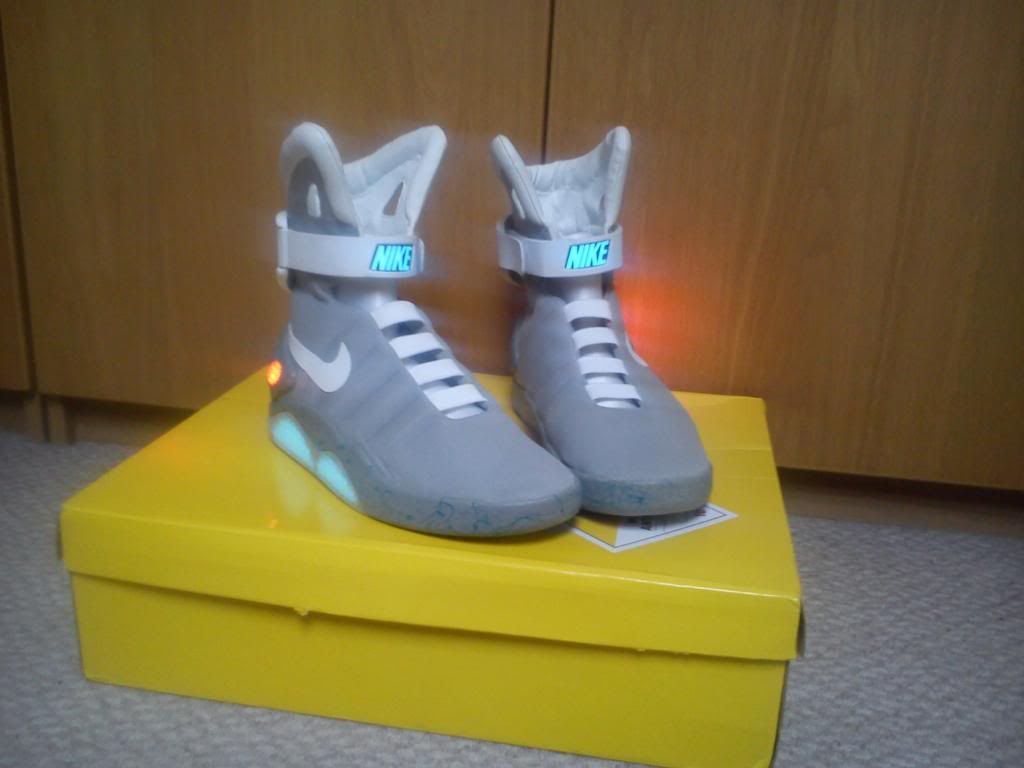
And here is how they look. Probably not the slimmest toe box out there, but I like it. What do you think of this mod?


First of all I managed to get the matte effect back from the ClearShield clear coat. What I did wrong when sealing the mags was to put too much of the clear coat on the shoe. If it is applied too thick it will dry looking semi-gloss. I repainted the soles with an almost dry brush and the result is perfectly matte. So the soles are not going to yellow AND will still be looking matte. YAY. :cool
On the left image the upper shoe is brushed matte already, the lower one still is semi-glossy, on the right image both are painted matte.
Toe box iron mod:
airair did explain very well how the toe box is built up. Like he said, the white rigid stuff gets really soft as soon as it is heated up and will become completely rigid again when it cools down.
In my first attempt the rigid material crumbled and caused ripples. That's because when it becomes soft the overstretched grey fabric is allowed to shrink back to it's regular shape. This made the softened rigid material ripple underneath.
Knowing this I was able to remove the ripples entirely now. I did heat up only one segment of the toe box at a time. I used the hot steam coming from the iron. It is pretty easy to do: You need to put one hand inside the shoe, put a protective fabric on top of the shoe, "shoot" some steam into the area you want to modify, and then hold and stretch the hot fabric of the shoe flat with both hands until it is cooled down.
Then move on to the next segment and so on.
All the ripples are gone now, the toe box is pretty slim and all this without tearing up the shoes at all.
And here is how they look. Probably not the slimmest toe box out there, but I like it. What do you think of this mod?
Last edited:
DragonGalvy
Sr Member
nice! That sounds like it might be much safer to try on my wear pear than cutting them open. I need to repaint the midsoles and heel cup anyway because of the yellowing (I got mine very early in the peice and they have seen a lot of sun since)
Thanks for sharing another way of doing things.
Thanks for sharing another way of doing things.
airair
Sr Member
great job, I think thats probably one of the best toe modifications done on here, if not the best, it looks perfect.
How stiff is the toebox now after it dried back to its original hardness?
I think this is a much better way I think, because opening up the toe and glueing it back down can be tricky and you don't always get the exact same finish on both feet.
Great job and thanks for sharing a great tip. I guess out goes the glue and in comes the iron?! :thumbsup
PS I just got the iron out and went over a few of my own pairs which have slight wrinkles in them (thats after I cut them and glued them back), and the iron trick with a thin towel has done the trick, its smoothed out the toebox completely on them, the rigid part goes soft with some iron steam heat, then dries back to its original hardness and not a single wrinkle!
Emmet, top job! such a simple thing and no need to cut anything up again!thumbsup
How stiff is the toebox now after it dried back to its original hardness?
I think this is a much better way I think, because opening up the toe and glueing it back down can be tricky and you don't always get the exact same finish on both feet.
Great job and thanks for sharing a great tip. I guess out goes the glue and in comes the iron?! :thumbsup
PS I just got the iron out and went over a few of my own pairs which have slight wrinkles in them (thats after I cut them and glued them back), and the iron trick with a thin towel has done the trick, its smoothed out the toebox completely on them, the rigid part goes soft with some iron steam heat, then dries back to its original hardness and not a single wrinkle!
Emmet, top job! such a simple thing and no need to cut anything up again!
thumbsupThanks to airair and DL4567 I made two improvements to my mags.
First of all I managed to get the matte effect back from the ClearShield clear coat. What I did wrong when sealing the mags was to put too much of the clear coat on the shoe. If it is applied too thick it will dry looking semi-gloss. I repainted the soles with an almost dry brush and the result is perfectly matte. So the soles are not going to yellow AND will still be looking matte. YAY. :cool
On the left image the upper shoe is brushed matte already, the lower one still is semi-glossy, on the right image both are painted matte.
View attachment 292083 View attachment 292082
Toe box iron mod:
airair did explain very well how the toe box is built up. Like he said, the white rigid stuff gets really soft as soon as it is heated up and will become completely rigid again when it cools down.
In my first attempt the rigid material crumbled and caused ripples. That's because when it becomes soft the overstretched grey fabric is allowed to shrink back to it's regular shape. This made the softened rigid material ripple underneath.
Knowing this I was able to remove the ripples entirely now. I did heat up only one segment of the toe box at a time. I used the hot steam coming from the iron. It is pretty easy to do: You need to put one hand inside the shoe, put a protective fabric on top of the shoe, "shoot" some steam into the area you want to modify, and then hold and stretch the hot fabric of the shoe flat with both hands until it is cooled down.
Then move on to the next segment and so on.
All the ripples are gone now, the toe box is pretty slim and all this without tearing up the shoes at all.
And here is how they look. Probably not the slimmest toe box out there, but I like it. What do you think of this mod?
View attachment 292084 View attachment 292085
View attachment 292086 View attachment 292087
View attachment 292088
Last edited:
Vormz
Sr Member
TProbably not the slimmest toe box out there, but I like it. What do you think of this mod?
They look terrific Thomas! Congrats!
Your ideas are brilliant and it look way easier than "cutting" the shoe.
You make me want to buy a pair (as you made me want to finish my hoverboard)
airair
Sr Member
Would you say this is the same type of thing that they use in the clear uv protectant spray cans?
or is it a better solution?
I found a uk version, it says it comes in gloss, semi gloss or matte, so maybe the matte version is ideal, but it seems more expensive than the US version.
ClearShield Liquid Laminate waterbased UV coating - Liquid Lamination
or is it a better solution?
I found a uk version, it says it comes in gloss, semi gloss or matte, so maybe the matte version is ideal, but it seems more expensive than the US version.
ClearShield Liquid Laminate waterbased UV coating - Liquid Lamination
Almost forgot... I read somewhere that the mags will start yellowing on the clear soles, the mid soles and heel cups.
I did some research and found this outdoor UV protective clear coat that stays flexible after drying.
It is used for prints that will be displayed outdoors, but works well on the mags also.
ClearShield Type C Matte Quart (WBCMCANQT)
Water-based, non-yellowing clear coating that has excellent exterior durability and are highly flexible - Great to use on canvas that needs to be stretched as the top-coat will not crack. ClearShield Type C contains state-of-the-art UV inhibitors that protects your print.
Pros of ClearStar Type C:
Specifications
- Use Instead of Film Laminates
- Contains State-Of-The-Art UV Inhibitors
- High-Performace
- Highly-Flexible
- Waterproof
- Will Not Yellow
- Use for Pigment and Solvent-Based Inks
Information Sheet
IT Supplies - ClearShield - ClearShield Type C Matte Quart WBCMCANQT
Used it on the mags already. It is very easy to apply, even with a simple brush.
It stays rubbery when dry, does not crack or chip when wearing the shoes.
Last edited:
Emmet
Member
How stiff is the toebox now after it dried back to its original hardness?
It is stiff enough not to show your toenails through the outer fabric when wearing the shoes- no one seems to have mentioned it before, but if you slim down the toebox of the V2s, it is getting pretty tight in there.
PS I just got the iron out and went over a few of my own pairs which have slight wrinkles in them (thats after I cut them and glued them back), and the iron trick with a thin towel has done the trick, its smoothed out the toebox completely on them, the rigid part goes soft with some iron steam heat, then dries back to its original hardness and not a single wrinkle!
Emmet, top job! such a simple thing and no need to cut anything up again!
I am glad this helped you out.
You make me want to buy a pair (as you made me want to finish my hoverboard)
I'm sorry Yann.
On the other hand, your hoverboard turned out really well!
Would you say this is the same type of thing that they use in the clear uv protectant spray cans?
I think ClearShield is a very advanced product and you won't find a substitute too easily.
It is made to be used on truck trailer canvases and they have to stand heavy strain - like a shoe does.
These UV protective sprays are meant for sealing drawings and paper prints, I don't think they can do what ClearShield does.
This tuff is so easy to apply with a simple brush and stays flexible after drying.
The matte version is virtually invisible on the mid soles (if applied correctly that is). It is water-based, but water resistant once dried. It is even resistant to chemicals and abrasion. All this makes it perfect for the Mags.
There is a ClearShield test set available. It contains a set of 100ml bottles of glossy, semi-gloss and matte ClearShield. Maybe you can try to find one of these in your country.
I used the glossy product on the clear soles and the matte product on the rest of the soles and heel cup. I even went over the clear LED-bubble to frost it, looks perfect.
Last edited:
airair
Sr Member
Well i've had a look for clearshield in UK, but its a rip off, far too expensive. almost £55 for 1 litre. Way too much for just what is essentially a laminate for Inks!
I'm pretty sure there is an alternative out there, their uv protective coating can't really be that special, there are probably some other cheaper variants out there, will have to do a search.
The clearcoat sprays that are available i'm pretty sure are also acceptable if you put two or three layers on. I have one from Rustoleum which i use on the ankle bubble after sanding, and that is uv protective and non yellowing.
So I guess they must have some good marketing there to have such a high price!
I may just stick to the spray or probably any uv protective liquid from the DIY stores.
It is stiff enough not to show your toenails through the outer fabric when wearing the shoes- no one seemed to have mentioned it before, but if you slim down the toebox of the V2s, it is getting pretty tight in there.
I am glad this helped you out.
I'm sorry Yann.
On the other hand, your hoverboard turned out really well!
I think ClearShield is a very advanced product and you won't find a substitute too easily.
It is made to be used on truck trailer canvases and they have to stand heavy strain - like a shoe does.
These UV protective sprays are meant for sealing drawings and paper prints, I don't think they can do what ClearShield does.
This tuff is so easy to apply with a simple brush and stays flexible after drying.
The matte version is virtually invisible on the mid soles (if applied correctly that is). It is water-based, but water resistant once dried. It is even resistant to chemicals and abrasion. All this makes it perfect for the Mags.
There is a ClearShield test set available. It contains a set of 100ml bottles of glossy, semi-gloss and matte ClearShield. Maybe you can try to find one of these in your country.
I used the glossy product on the clear soles and the matte product on the rest of the soles and heel cup. I even went over the clear LED-bubble to frost it, looks perfect.
Last edited:
Emmet
Member
So I guess they must have some good marketing there to have such a high price!
I don't think so. The product is made for professional use and this leads to huge trading units. That makes it expensive. You only need 25ml for a pair of mags. The price wouldn't matter if they would sell smaller amounts.
If you should find a good alternative, please let us know.
Most users from european countries should be able to order the ClearShield test set of three 100ml bottles (matte, semi-gloss, glossy) for 17 Euros. I don't know, maybe they are selling the matte one separately, didn't ask for that.
http://www.lfp-shop.de/dokumentenschutz/lacke/clearshield/clearshield-testset/5243100099
Last edited:
- Status
- Not open for further replies.
Similar threads
- Replies
- 10
- Views
- 2,910
- Replies
- 5
- Views
- 1,022
- Replies
- 4
- Views
- 941
- Replies
- 12
- Views
- 1,604