Phase II Enterprise Study Model

Well, when you think about it, only the primary and secondary hulls of the refit are usable, with most of the rest of the kit going to waste. And even those parts would need pretty extensive modifications. In the end, the cost of a refit kit and the time/labor that someone would need to put into those parts would most likely cost more than if I included ready to use primary and secondary hulls.

The thing that keeps coming to mind is that when I showed my two-thirds scale 33 inch Enterprise model, people assumed it was a straight build of an existing kit. It would be nice to do this as something different enough from any commercial kits to stand out in a crowd.

The other thing that I can't help thinking about is the trouble that Steve Neill went through with his kits (admittedly with only a few people, but still). So yeah, it would be better to make the master for someone who already does this type of thing and let them deal with making the parts and selling the kits.


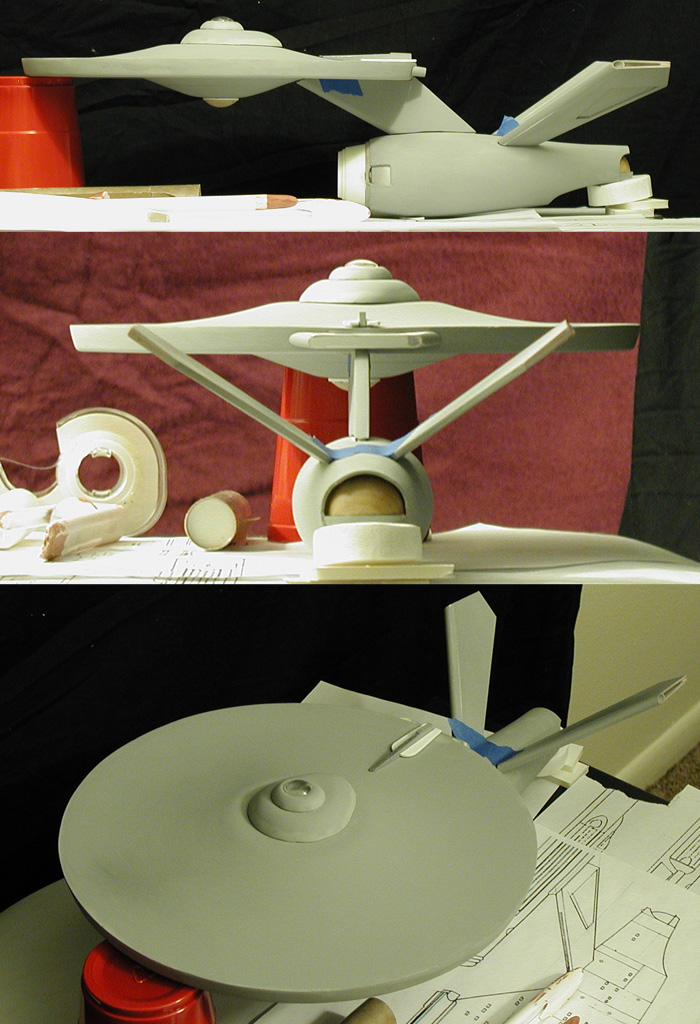
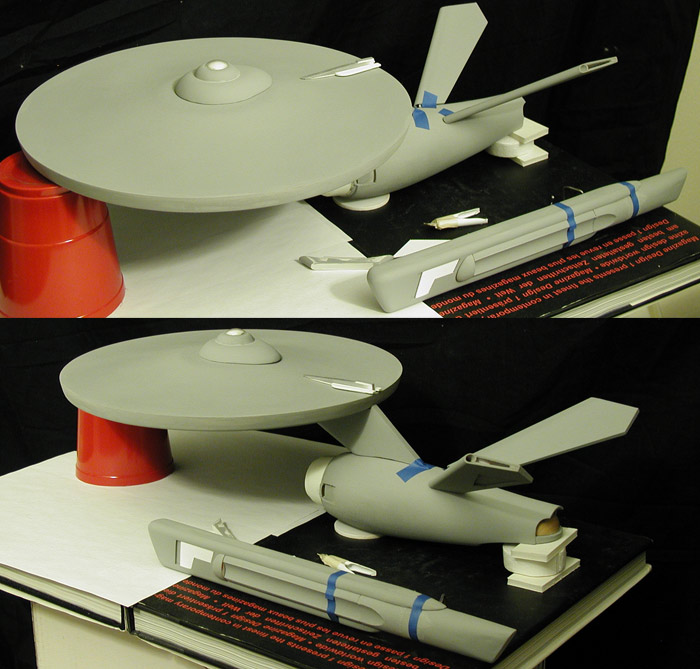
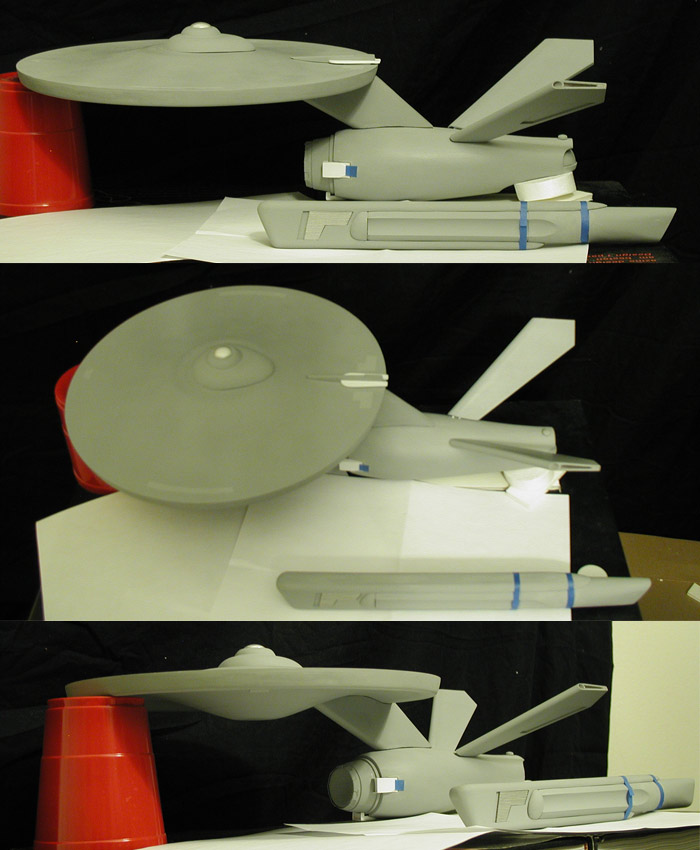
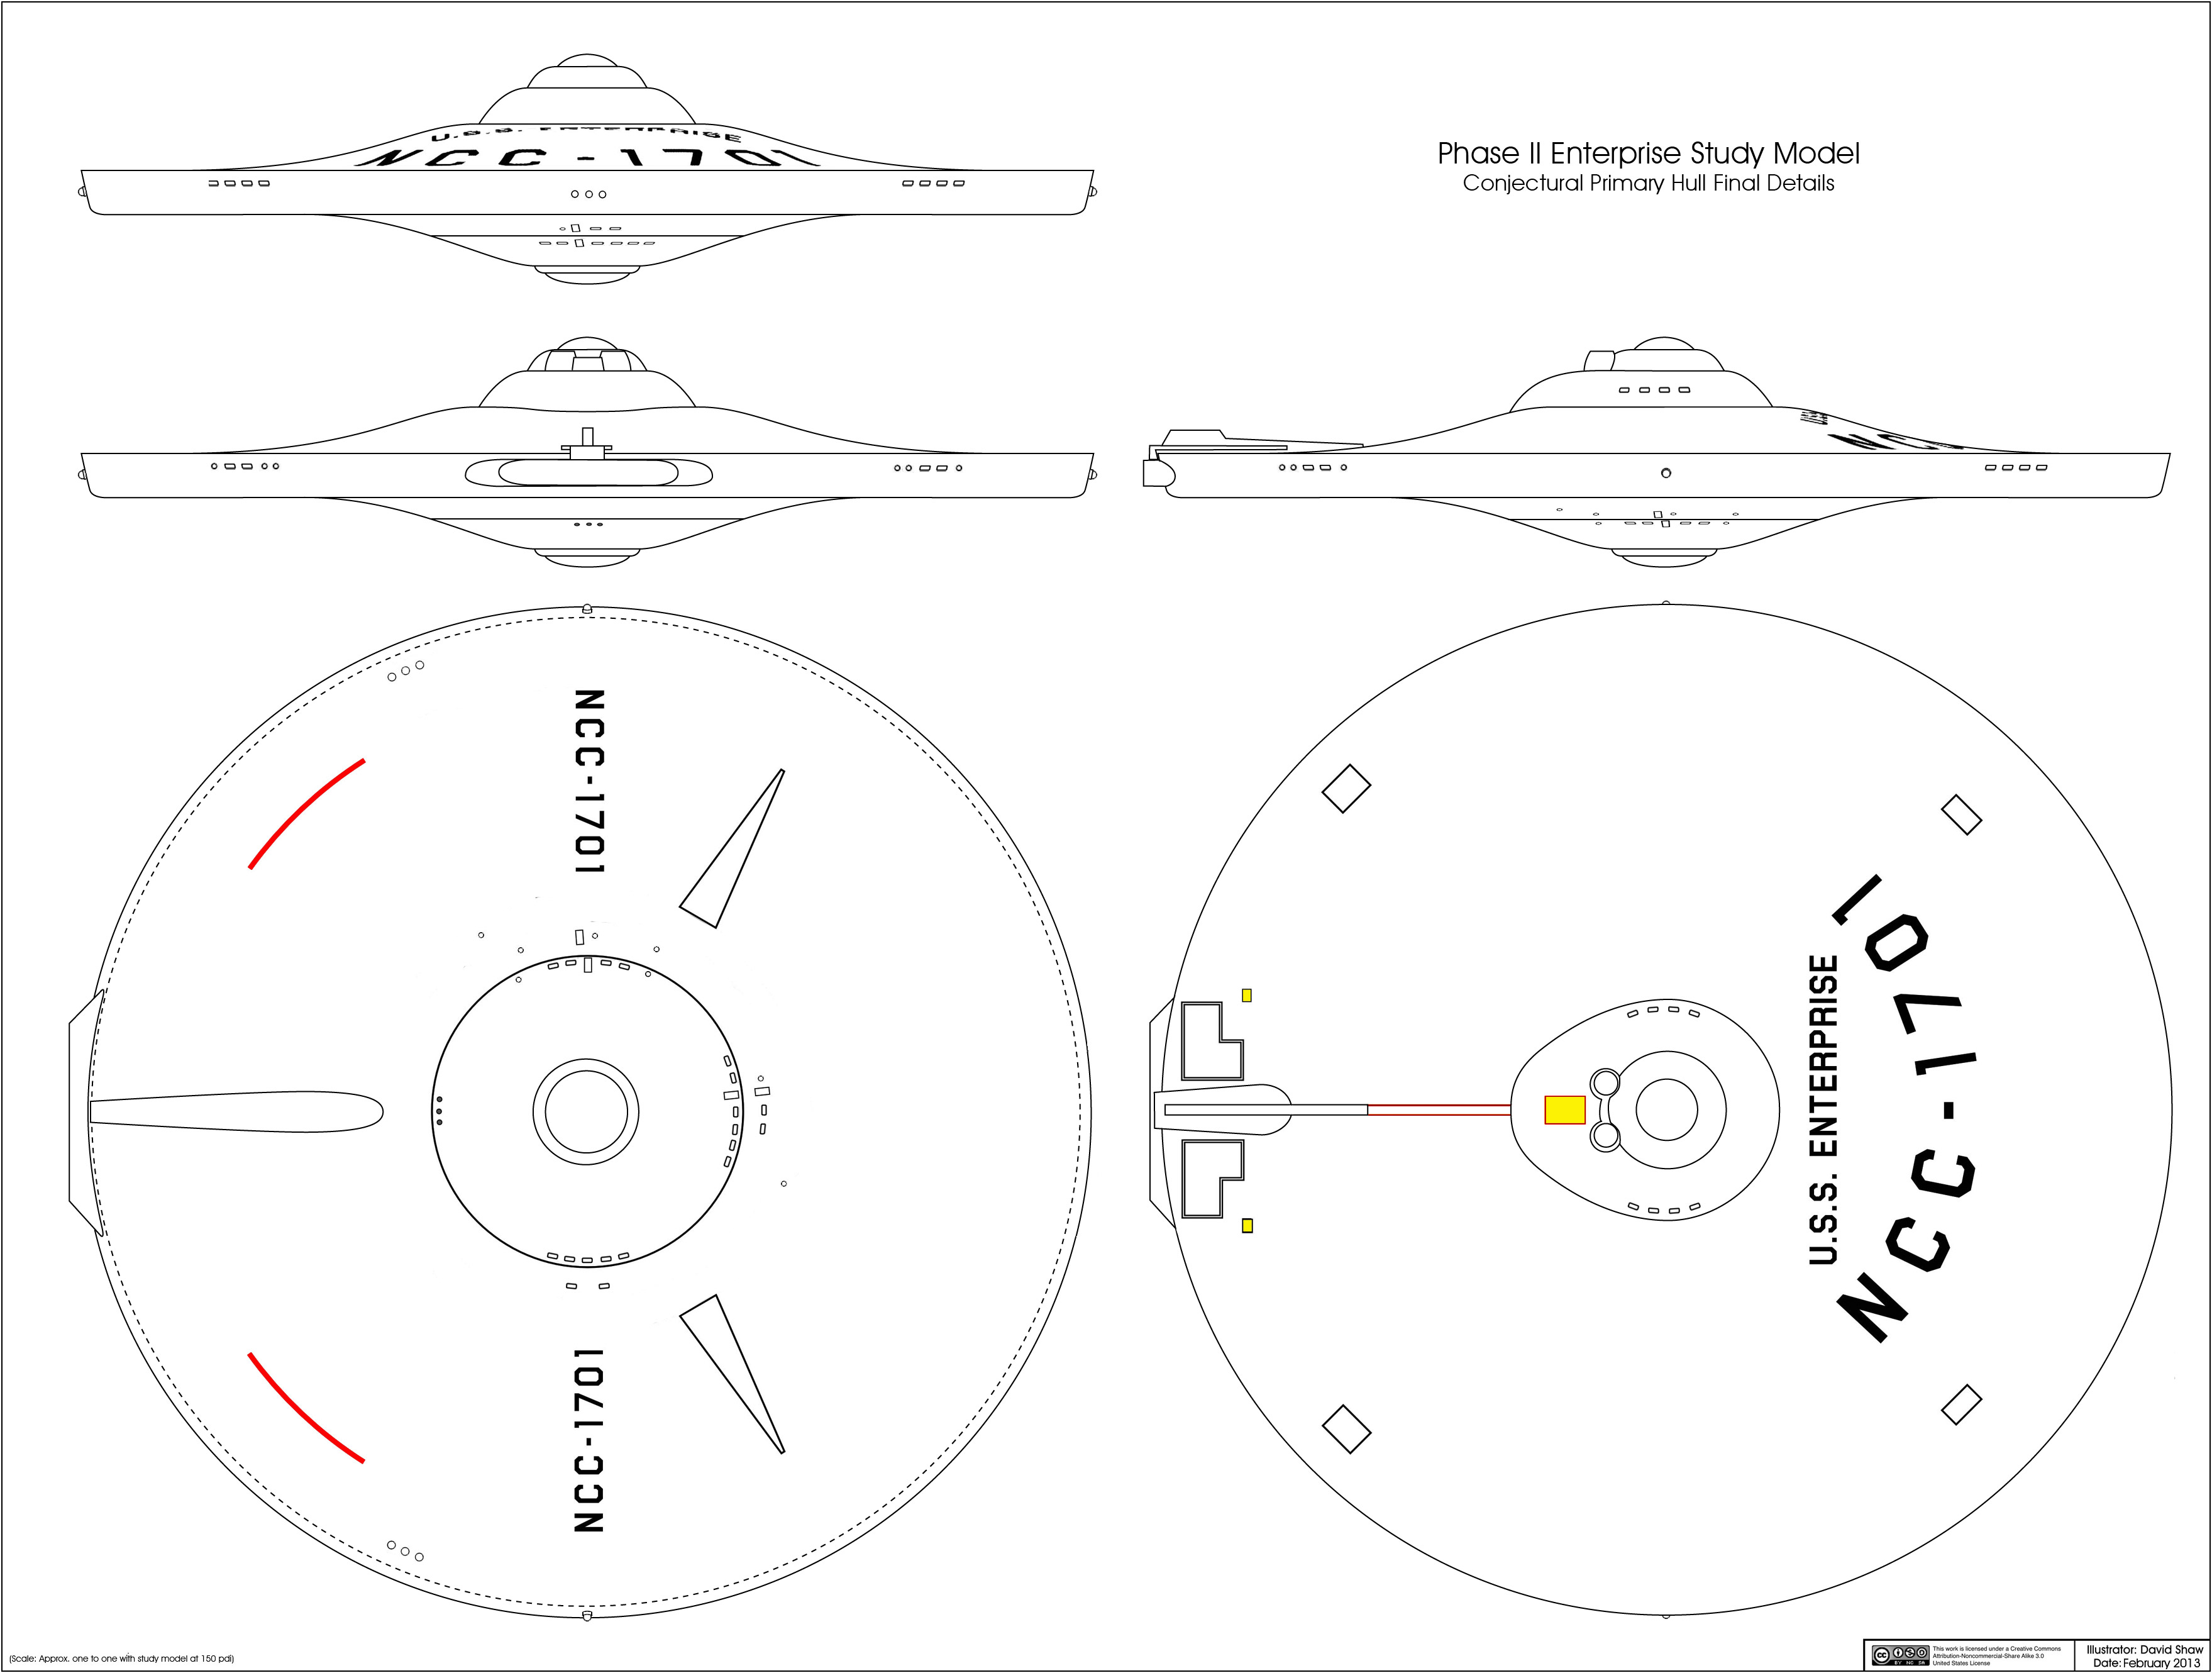
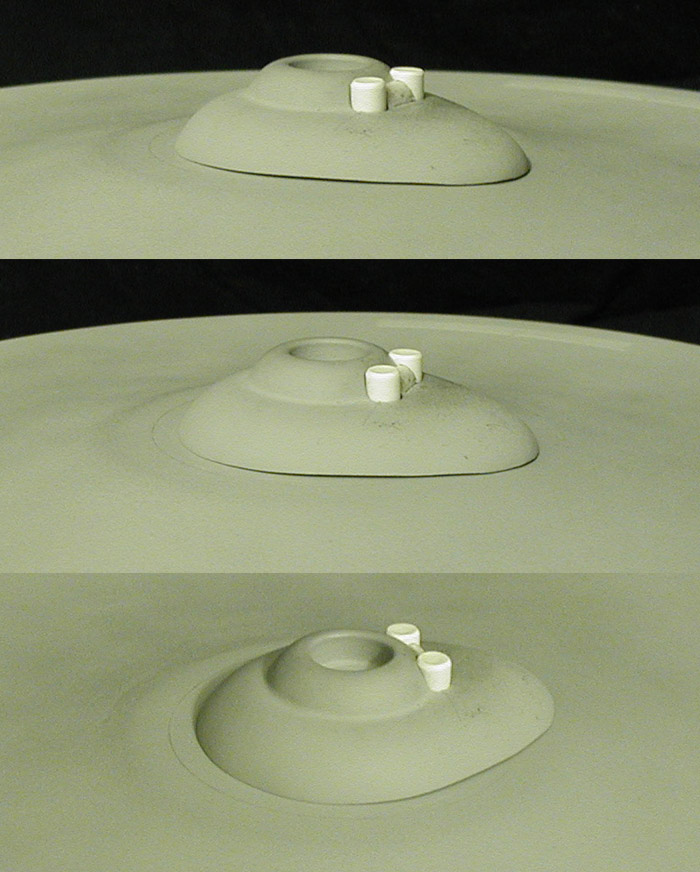
... and all that is assuming that this turns out to be something people would want. So we'll have to see how the finished model actually looks to get a better idea. I mean it seems like a nice design so far, but I'm not too far from the state of the only existing photos of the studio model under construction. How the final model turns out might be better or worse than I imagine. In that way this model is different than my other models where I was trying to match existing models (or photos of models) and could see what I was shooting for.
 
I had hoped to get more done over the last weekend, but I ran out of primer. Here is another set of test assembly images (mainly to check overall alignment)...

p2_1701_030.jpg

And this set is with the model upside down so it isn't having to fight gravity (which better shows how the primary hull, dorsal and secondary hull fit together)...

p2_1701_032.jpg

Based on what I've gathered from these tests, I think everything should eventually come together without a significant amount of work. Beside being curious about how it'll look, I want to make sure that before I invest a ton of time finishing up any of the parts that they'll actually come together as planned. If I can catch assembly issues early, I can fix or rebuild problem parts before I've spent too much of my time on them.

I really wanted to see (and show) how the nacelle elements are coming along, but without primer it is hard to tell. At any rate, here is the major pieces of the nacelle sitting and waiting for me to get back to them...

p2_1701_031.jpg

And that is about where I'm currently at. I should have some more free time over the next few days, so I hope to make some more progress on the nacelle during that time.
 
I was able to get primer and some styrene strips (for the indented side grills of the nacelle) yesterday and gave some of the nacelle parts their first primer pass to see where things stand. I'm about where I thought I'd be (which means I still have a long ways to go) but having everything a single color helps point out where I've actually gotten pretty close to what I wanted and what areas actually need more attention.

Because the rocket tubing that I'm using for the middle section of the nacelle isn't coated on the inside, I hit the indented sections with a Krylon clear coat. I'll most likely glue those parts in place later today and start in on sculpting the tapered part of the indent towards the rear. I've also made accommodations for the gaps/seams that Jefferies had drawn in his plans for this part of the nacelle.

Below is a test assembly of some of the nacelle elements, including a test forward grill I quickly cut out to see how the thickness of the corrugated styrene would work with what I had built.

p2_1701_033.jpg

Once I'm happy with the middle section of the nacelle, I'll cut down the rear section and graft them together. I don't want to do this too early because making the rear section was way harder than making the middle section.

I also spent some more time on the primary and secondary hulls, but the progress on those doesn't really show in photographs of the parts.
 
So I've been working on a lot of little things that don't tend to be interesting enough for updates (and don't lend themselves to nice progress images). I did start attaching the rear nacelle to the middle section and I attached the bridge to the B/C deck. I'll most likely start in on the turbo lifts later today or tomorrow and then give the whole part a primer coat to see how it is turning out.

p2_1701_035.jpg

I've also been working on the platforms for the tops of the nacelle support pylons, trying to get their shape correct (I'm basing them off the Price/Loos model because Jefferies' plans were a little short on details for them).

I'm hoping that I'm within a few days of finishing the work on the primary hull so I can finally attach the dorsal to it. The upper rim edge is almost where I want it, and I'm pretty close to being happy with the under side surface, and I've finished everything that needed to be done on the dorsal as a separate piece.

There is still a lot of work to be done on the secondary hull, just not anything really interesting in the immediate future.
 
Thanks!


I've been applying time to this when ever I can, but most of what I've been doing isn't all that interesting to see. Mainly puttying, sanding, priming, noting what needs more work, and repeat. I did close up most of the opening where the dorsal meets the primary hull, so I'm most likely days away from joining these parts together. I'm also nearly ready to cut the front off the secondary hull (which means I'll be putting more time into the deflector assembly soon) which I need to do before attaching the dorsal.

At any rate, here is another series of test assembly shots...

p2_1701_036.jpg

p2_1701_037.jpg

Here is a quick inventory of what has been started and what needs more attention...

- The impulse engines and linear accelerator assembly have been started, but are missing a few pieces. What has been made needs additional cleaning up.
- The bridge has been attached to the B/C deck structure. I still need to make the turbo lifts and smooth out the bridge base before I can consider making a mold of the part.
- Lower sensor dome assembly main pieces are started, but are still quite rough.
- I need to start adding seems to the hangar doors. The fantail edge needs to be smoothed and sharpened a bit still.
- The engine mounts are started, but need some reshaping towards the rear. These are based more on the studio model than the Jefferies plans, and they'll be attached to the support pylons at about the same time the supports are attached to the secondary hull. The plan is for them to be even with the upper rim of the primary hull. The nacelles will be attached to them after nearly all the painting is done and the decals applied.
- I started in on the weapons assembly, but because it intersects both the lead edge of the dorsal and the top of the secondary hull, getting the part to the shape needed will have to wait for that area of the model to be completed. Once in place, the upper and lower support edges can be made.
 
Despite the fact that it's sitting on a cup and two books, my mind keeps rejecting that scale, and seeing this as a 5-foot studio miniature! It's really starting to look like that infamous model shot of the Phase-II!
 
He Gods!!! How did I miss this? :eek

The levels of research, comparison and modification are astounding! You are certainly on track to knock this one clear out of the ball park! Awesome work....
 
Thanks for the encouragement!


I feel really bad because most of the work I've been doing on this project lately really doesn't show up all that well in the photos, so it is hard to show my progress.

I'm nearly ready to attach the dorsal to the primary hull. I figure at some point I need to accept the part for how it is and keep moving forward with the build... plus this is a study model (even if it also serves as a display piece when finished).

Beyond attaching the dorsal, I need to start thinking about attaching the bridge/B/C deck piece... which in turn means I need to start thinking about getting the supplies for making that part. Originally I planned on doing the bridge/B/C deck and nacelles at the same time, but the nacelle master needs quite a bit more work, and it'd be easier to go through a number of trial-n-error stages with the bridge/B/C deck part than the nacelles.

I'm still working on the deflector assembly... sanding, puttying, priming and repeat. I taped it to the secondary hull for these shots mainly so you guys could see the replacement disk I made. It might not have made that much of a difference in the overall look of the model, but it also wasn't that much additional work either.

I also was curious how the grills would look if they were something else other than white, and seeing as these aren't the final pieces anyways... I painted them steal. Jefferies noted that the larger grill bands on the nacelles were to be a reflective metal with blue/green internal lighting behind them, so I'm guessing (at this point) that the other grills would also be some type of metallic color as well.

Anyways, here are some more shots...

p2_1701_039.jpg
 
I've spent most of the last week working on the secondary hull, which is about where I wanted it. The work has been focused on some of the detail areas towards the front, getting the aspects done that are far easier to do with the secondary hull by itself.

Below are some images of the secondary hull...

p2_1701_040.jpg

And a few more, including a couple from earlier to show the progression of my modifications.

p2_1701_041.jpg

I got the silicon rubber this week, and so I did a test mold of the bridge/B/C deck. Actually, it might be test in name only as the mold seems fine for what I need it for (I was mainly worried about bubbles in the mold). Here is the master and mold together...

p2_1701_042.jpg

So I'll most likely get some Alumilite White in the next day or so, cast the bridge/B/C deck part and then add the turbo lifts to it. I wasn't expecting to have this part this soon, so I'm debating adding it to the primary hull now or waiting until after the primary hull, dorsal and secondary hull are together. I'm mainly worried that it might get in the way while I'm working on finalizing the nacelle supports and working on their alignment (though having this part attached on my last TOS Enterprise didn't seem to give me too many issues).
 
Made a little more progress...

The biggest change is that I've attached the dorsal to the primary hull today. Even though I based the design of the dorsal off contours taken from my primary hull, I still need to go back and do some gap filling around the top edge. But for the most part, it fit quite nicely and everything seems to be working out as I had planned it.

Here are a few test assembly shots after the dorsal was attached...

p2_1701_043.jpg

The only other thing of note in those images is that the bridge/B/C deck is the final part, not the master. I'll most likely be adding the turbo lifts to it in the next couple days. And if that goes well, I'll attach it to the primary hull.
 
Thanks!


Well, I think this is as good a time as any to address one of the biggest gaps in data on the Phase II Enterprise... the primary hull details. And to do this, let us set the wayback machine to 1977...

wayback_1977.jpg

Lets start out with Jefferies describing the circumstances under which he was designing the Phase II Enterprise...

From Star Trek Phase II, The Lost Series:
"Consequently, in updating the ship, I did the drawings at night in the Hiltonat Tucson, because Little House was shooting on location there."

"Basically what I did to it was change the power units, and make a slight change in the struts that supported them. I gave the main hull a taper, then went flat-sided and thin with the power units, rather than keeping the cylindrical shape."

"Trying to work out the logic of the refit, I knew a lot of equipment inside would change, but I didn't see that there would be any need to change the exterior of the saucer. Certainly, though, the engines would be the primary thing to change. Part of the theory of the ships design in the first place was that we didn't know what these powerful things were or how devastating it would be if anything went awry, so that's why we kept them away from the crew. And that meant they could easily change if you had to replace one."
And from Redesigning the USS Enterprise NCC-1701:
Jefferies says he wasn't keen to make drastic changes to the Enterprise, "As far as I was concerned, about the only thing we could update was the engines, so I changed the design of the pods and the struts. I still wanted an absolutely plain exterior. Anything that man makes is going to break down; why put him outside in the worst possible environment when you can put him on the inside?" Jefferies goes on to say that he had actually prepared drawings that showed the Enterprise with flat nacelles when he'd originally created the ship. He had planned to present them if Roddenberry didn't like the first version of the Enterprise he saw but since they hadn't been needed he'd file them away for future use. These drawings provided the basis for his redesign. "I did the new working drawings with my board on the bed of the Hilton hotel in Tucson," he recalls, "because we were on location with 'Little House.' I came back and had them printed. [Model maker] Don Loos had the engine pods finished, and was working on the struts, but around that time I had to quit. They'd call up and say, 'We're having a meeting; come down right away.' I had to say, 'Hold it - it's interfering too much.' Mike Landon was beginning to look out of the corner of his eye at me."
So from this we can conclude that Jefferies was away from home (and most likely away from most sources of information on the Enterprise) while drawing up his plans for the Phase II Enterprise. We can also see that he didn't plan on the details of the primary hull to change much in the refit.

What else do we know about this point in Star Trek history and Jefferies' place in it?

Well, when not on location for Little House, Jefferies had an office almost directly above Roddenberry's. Jefferies did have some drawings from TOS, but the original plans for the Enterprise were in Richard Datin's possession at this time. The 11 foot model had already been donated to the Smithsonian and the 33 inch model was sitting on Roddenberry's desk (it wasn't loaned out to Robert Abel & Associates yet because they didn't get involved in the production until early December of 1977).

So from this we can conclude that Jefferies had most likely planned on using a combination of his own drawings (like those used in the TOS Writers Guide) and the 33 inch model (which had been updated to reflect changes made to the 11 foot model to the production version). In fact, when looking at the Phase II Enterprise's secondary hull window placement, it somewhat reflects the arrangement of windows of the secondary hull of the 33 inch model (so he might have either taken notes from the model or had some photos of it to work with).

Given all that, I've decided (for finishing the plans of Jefferies' version of the Phase II Enterprise) to use a combination of the TOS Writers Guide diagrams and the 33 inch model's primary hull details to finish the unfinished areas of Jefferies' drawings. The primary difference being that while I'll use those as a placement guide, the geometry of the windows on the primary hull will reflect those of the windows on the secondary hull (slightly smaller rectangles with rounded corners).

Below is a quick-n-dirty version of what I believe Jefferies intended the Phase II Enterprise's primary hull to look like (I left the grid lines off so they wouldn't obscure the other details)...

 
I've made some progress this week, though most of it in small areas that aren't all that visually interesting. But I also made quite a bit of progress on the turbo lifts. Below are some test assemblies of the bridge/B/C deck, the turbo lifts are in place but not glued in yet (they still need a little work).

p2_1701_044.jpg

Once the lifts are in and the whole of the bridge/B/C deck part primered (and not needing any additional work), I'll attach the part to the primary hull. Once the bridge/B/C deck, lower sensor platform base and impulse engines are attached and all the puttying is done and the whole assembly primered, I'll attach it to the secondary hull.

So it is coming along... slowly but surely.
 
The primary hull details seem to jive with what I've felt it should look like as well, except I've considered also adding the three AMT dimples into the saucer as it seemed that the concept artworks were interpreting them as docking hatches for the polygon shaped travel pods. I figure if there were going to be a pair on the secondary hull below the starfleet insignia and NCC-1701 markings, might as well have them on the saucer also. Only other thing I might also leave off would be the bottom saucer triangle shapes since I've not seen them pop up in the concept paintings for the ship either.
 
I ended up throwing out Mike Minor's artwork as source material as it seemed he was out of the loop when it came to the design and construction of the Enterprise. His art work was based on an AMT model (possibly the 18 inch study model built by Brick Price) rather than the studio model and he seemed to have a hard time with the geometry of the nacelles (which, if you have access, should just be a straight forward process of drawing of what you see). Had Minor's artwork shown signs of using the original 33 inch TOS Enterprise model as a source for some of the details, I think I might have given his work more weight. But everything shows (specially the inclusion of the deflector dish) that he was on the out side looking in and scrambling to fill in details in the absence of information (because Jefferies wasn't readily available to answer questions).

By comparison, Minor's other Phase II artwork is much better... but that was because he had direct access to Joe Jennings, John Cartwright, Lee Cole, Lewis Splittsberger and Janet Stokes. Any of their work he was translating into illustrations he could go back to them for feedback on and make modifications. Jefferies was occupied during regular business hours or was on location, and Price and Loos were working on the Enterprise off sight.

In studying Minor's artwork I did figure out that one of the aspects that troubled me the most wasn't really his doing. In the painting that was used for the TMP posters and ads there are bizarrely place windows all over the ship. As it turns out, those were added later and weren't part of the original painting. This is a quick restoration of that painting...

alt_phase_II_minor_painting.jpg

In the end, Minor's artwork's flaw is a lack of data... which is the same issue we've all been facing with regards to the Phase II Enterprise for all these years. This changed with TMP where he had better access.

As for the docking hatches, I'm still debating whether to include them. They weren't part of the original design and were added at the last minute (and don't even show up in Minor's artwork). The studio model didn't have them (in any of it's various stages of construction) and it wasn't included in the final molds for the secondary hull.

My guess is that the sequence was changed from a hangar deck shot to a docking hatch shot because of time and budget constraints... and it let Magicam show up Price/Loos (they were vying for getting to construct the Enterprise, and eventually were successful). Magicam was disparately trying to make a name for themselves, and being a Paramount subsidiary were able to position themselves nicely during the game of musical chairs as Phase II transitioned to TMP.

With the triangles on the underside of the primary hull... they were there on the 33 inch model and considering how Roddenberry pushed for more and more detail on that model when it was being constructed in 1964, odds are that most everything that could be included from that model in terms of details would have been added to the Phase II Enterprise. It was an ongoing battle between Roddenberry and Jefferies as to how much stuff should be on the surface of the Enterprise, and I don't see Roddenberry giving any ground while he had the studio model sitting on his desk in front of him.

So that is a little more background on the genesis of how I've reached certain conclusions. Jefferies involvement in Little House meant that there was a small circle of people who were truly aware of how the Enterprise was supposed to turn out (and even then, they weren't always on the same page). And this all came about because Roddenberry insisted on Jefferies... and Jefferies really wanting to revisit the Enterprise design (while not wanting to give up his job on Little House).
 
I've said it once before but ill say it again...

AMAZING knowledge and information being shared here about the Phase II Enterprise design.

Great to know the background on Jefferies input, and where the Minor illustrations fit into the big picture. I had no idea the original art was later retouched for TMP.
 
Understood on your points. It will always be a judgement call with things like this since as far as we know, the Phase 2 model was never completed in a state where we ever saw it all fully painted and detailed. I will likely go a little different when I get around to finishing mine, but at least I know yours is going to rock the house when done and it will certainly be the most accurate based on available information.

Who knows, I might even just scrap my attempt to do one of these with the AMT kits and try doing one with the 1/350 Polar Lights kits instead (after I've got a few other simple to do kitbashes under my belt first).
 
This thread is more than 8 years old.

Your message may be considered spam for the following reasons:

  1. This thread hasn't been active in some time. A new post in this thread might not contribute constructively to this discussion after so long.
If you wish to reply despite these issues, check the box below before replying.
Be aware that malicious compliance may result in more severe penalties.
Back
Top