1:1 Millennium Falcon Cockpit Replica - Group Build

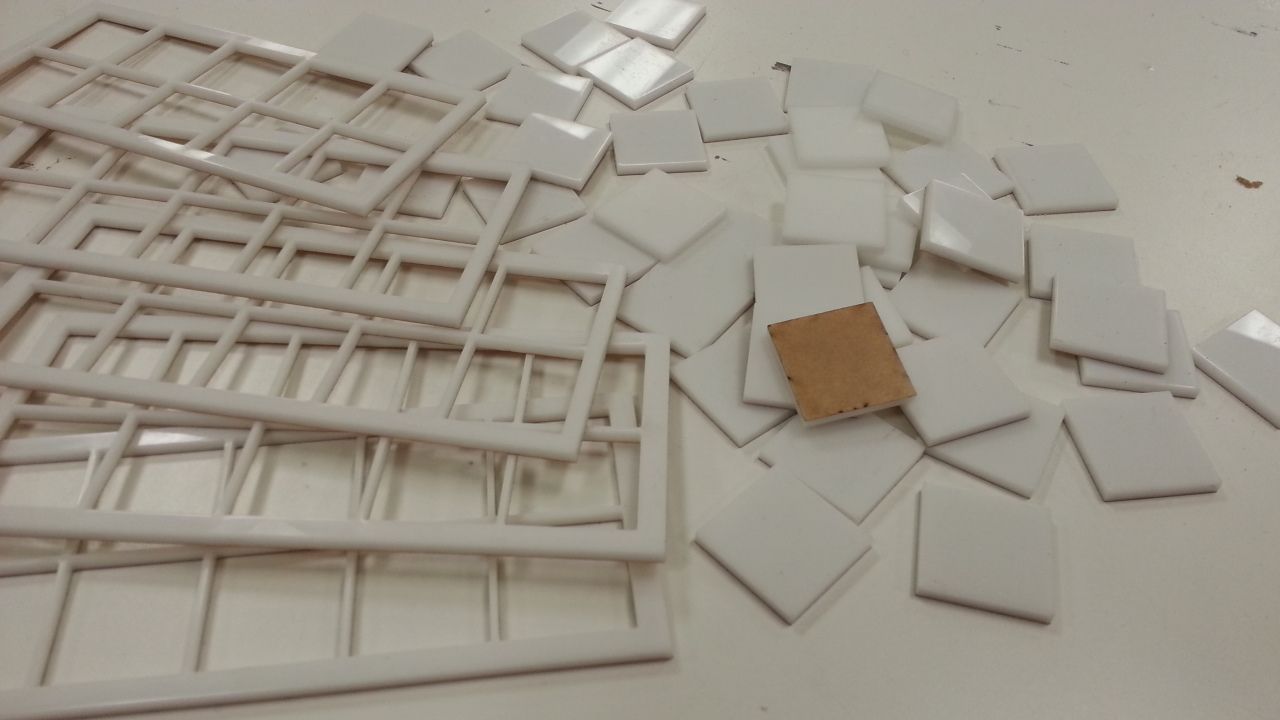
Hi Sofa - I'm not sure you're getting what I'm trying to say. Did you want the LIT PART of the tiles to look round, like in the above photo, or do you want the LIGHT looking more squarish, as in a fully-lit square button with no rounded edges as above? It will look good either way, but just curious.

Did they cut round holes behind each tile rather than square holes on the original prop? Weren't most of them actually fully-lit square buttons on the original prop, and not tiles? Again, I think it will look great either way, but I guess if it were me, I would (on the next two cockpits) laser cut SQUARE holes on each panel, rather than ROUND holes, if possible, to have more of a uniform square light shining through, as opposed to mostly round light behind square tiles, if you get what I'm trying to say? By cutting the square holes just a tad smaller than the tile sizes, then you can use that little boarder as what the tiles will adhere to when you glue them on. Ah, well. Have fun no matter which way you do it. :)

OH! I'm sorry... Yes, that is the exact look we're going for - square tile / round back light. It is the way the original designers did all the tiles. From what we can see, all the buttons are nothing more than backlit acrylic. Check out this screen grab - note the buttons above the cockpit door (also look at the far right / middle the white unlit button - see the round hole cut behind it)

Shadow of Reflection: Movie Screencaps R-S: Click image to close this window

Han looks a little drunk in this pic... but note the tiles bottom right
Shadow of Reflection: Movie Screencaps R-S: Click image to close this window

There's a better screen grab somewhere but I can't remember which movie or what part of the movie it's from. I understand what you're saying re: the square holes and it makes total sense but we're trying to stay as close to the original design as possible. :)
 
Last edited:
OH! I'm sorry... Yes, that is the exact look we're going for - square tile / round back light. It is the way the original designers did all the tiles. From what we can see, all the buttons are nothing more than backlit acrylic. Check out this screen grab - note the buttons above the cockpit door (also look at the far right / middle the white unlit button - see the round hole cut behind it)

Shadow of Reflection: Movie Screencaps R-S: Click image to close this window

Han looks a little drunk in this pic... but note the tiles bottom right
Shadow of Reflection: Movie Screencaps R-S: Click image to close this window

There's a batter screen grab somewhere but I can't remember which movie or what part of the movie it's from. I understand what you're saying re: the square holes and it makes total sense but we're trying to stay as close to the original design as possible. :)


OK, thanks for the screencaps SK. I was trying to look up a few as well. In this one, they look square, but in others, they do have that "rounded light edge" look.

Revel%u00252BSTAR%u00252BWARS%u00252BMillennium%u00252BFalcon%u00252BKit%u00252BNo%u00252B06658%.jpg

Frankly I never noticed too much. I might have to pop the blu-ray in for another look. lol.

It's all good either way though. Keep up the amazing work!
 
OK, thanks for the screencaps SK. I was trying to look up a few as well. In this one, they look square, but in others, they do have that "rounded light edge" look.

View attachment 287747

Frankly I never noticed too much. I might have to pop the blu-ray in for another look. lol.

It's all good either way though. Keep up the amazing work!

Hey T,

Here's the pic I found that made me realize the hole behind was a circle cut. Note the button just right of Leia's shoulder

Shadow of Reflection: Movie Screencaps R-S: Click image to close this window

Also, there are the screen grabs I use:

ANH: ::Shadow of Reflection: Version 23 - Top of the Class...:::
ESB: ::Shadow of Reflection: Version 23 - Top of the Class...:::
RotJ: ::Shadow of Reflection: Version 23 - Top of the Class...:::

- - - Updated - - -


hmmmmm... Can't be Cushing... Is it the control handles?
 
'At the Earth's Core - 1976' ...Probably old data but new to me. If only he knew a few weeks later them controls would be offing his attack force lol.
 
'At the Earth's Core - 1976' ...Probably old data but new to me. If only he knew a few weeks later them controls would be offing his attack force lol.

Yeah... but they let them go... it was the only explanation for the ease of their escape.

Did you ever identify those parts or were they just random greeblies
 
Not ID'd yet but they are on this month's check list. So far the ideas are/were a double windscreen wiper mechanism, steering parts of a go-cart, or something I heard many years ago was from an old arcade machine. That was before seeing this film scene today, with the whole thing attached to what looks like a real steering column. I'll have to buy the DVD.

Just checked out the trailer and there is a brief shot of the controls. Looking through the movie now. :)

- - - Updated - - -

@ 2:17

http://www.youtube.com/watch?v=lGFFjiXgpmA
 
Notice when Peter moves his side of the controls Doug's side moves too, could well be an aircraft control.

Ah, the controls don't always move together, like someone under the dashboard is providing the illusion lol ...Doh!
 
Last edited:
Hey T,

Here's the pic I found that made me realize the hole behind was a circle cut. Note the button just right of Leia's shoulder

Shadow of Reflection: Movie Screencaps R-S: Click image to close this window

Also, there are the screen grabs I use:

ANH: ::Shadow of Reflection: Version 23 - Top of the Class...:::
ESB: ::Shadow of Reflection: Version 23 - Top of the Class...:::
RotJ: ::Shadow of Reflection: Version 23 - Top of the Class...:::


The three bottom links don't work for some reason, but I'll take your word for it. As long as you're satisfied, that's more than good enough for me, as it's hard for me to judge from a picture here and there how something looks in person, or how it might look with multiple tiles all lit up at once, so I'm sure you know what you're doing. Things that may affect screen accuracy though (as a checklist) would be.... Are their tiles different? Do they diffuse light in the same way as yours?, Are they the same thickness? Are some "ROUND-LIT" like yours while others are fully "SQUARE-LIT" buttons? ...all of which may or may not make a difference in how the end result looks, and on if you have to break with screen accuracy a little bit here and there, but hey, I'm just glad you've decided to light them up at all !!!!!!! :) Should look awesome regardless of a few variables here and there. Still looks pretty darn-near perfect to me.
 
Greg,

Finally got some time in on the quad v.2. Mostly some metal work for the piston support
.

The front end- I tacked the right and left pieces together to get the holes lined up, then punched a hole large enough for the head of the piston
image.jpeg image(1).jpegimage(4).jpeg

I had to replace the tie bars from the pistons with some 1/4" all thread to mount the pistons in the rig

image(3).jpegimage(2).jpeg

then started welding the assembly together. I ran out of time this afternoon and didn't quite get to where I had hoped to, but the plan is to mount a 3" to 2" PVC reducer about 4" from this frame for the inner slide of the barrel to ride in. I'm not explaining it well, but I will keep keeping you up to date
image(5).jpeg
 
Hi, everybody,

I was able to get a bit more done on the quad v2 today, and was able to get to a nice milestone.

I picked up with attaching support arms for the inner slide holder, and mounting the 3" to 2"
reducer which will hold the 2" pipe that acts as the slide for the barrel.
IMG_2372.JPG
Threading the reducer for 10-24s and installing it on the frame.

IMG_2374.JPGIMG_2375.JPG

A couple of shots with the body of the gun alongside to show where things fit along the length
IMG_2376.JPGIMG_2378.JPGIMG_2385.JPG

I reinstalled the piston for Barrel 1, made sure the forward end was supported (since I haven't glued anything yet) and set about figuring out a way to attach the traveling barrel to the piston.
IMG_2386.JPGIMG_2387.JPG

I got a little video footage of the barrel operating, but I really needed a third hand. I will figure out a way to get the video on here at some point.
 
Hi Gang,

The team met last night to discuss the lighting / sound options. Great news: we all have our marching orders and big things are about to happen... A few more pics from last night.

More pics of the headset
20140219_211846_zpsce89372d.jpg


20140219_211836_zpsee094f2a.jpg


20140219_211823_zps25d2ce93.jpg


20140219_205805_zps19ff999b.jpg


First wave of buttons were laser cut
20140219_210308_zps23120d95.jpg


There's a lot going on in this photo... :)
20140219_205814_zps1d2308d5.jpg


More to Come!
 

Your message may be considered spam for the following reasons:

If you wish to reply despite these issues, check the box below before replying.
Be aware that malicious compliance may result in more severe penalties.
Back
Top