Star Wars The Force Unleashed II - General Rahm Kota WIP

The mold came out very clean. Next will be layering in bondo gel-coat and fiberglass cloth strips to build the rigid model shell.

kota_vambraces301.png

kota_vambraces302.png

kota_vambraces298.png


~ Vonnor
 
This evening I stuffed the mold with Rondo and fiberglass. Here's the left wrist-clip hard model fresh out of the mold. Still tacky, smelly, and carrying a lot of flashing.

kota_vambraces303.png


~ Vonnor
 
Yesterday I shaped, trimmed and primed the wrist clip hard model, then carefully notched the mounting grooves into the palm-side flap. It came out much better than the previous attempt. It still needs some minor contour corrections, but it will definitely work. The rectangular cutout will be added next.

The production piece will be cast in high-strength urethane and will be attached to the main assembly using a cap screw and a threaded aluminum backing plate. The screw will be visible and not be true to the CG reference, but will be necessary for real-life wear. The torque is likely to be too much for magnets at that mount point.

kota_vambraces311.png

kota_vambraces304.png

kota_vambraces305.png

kota_vambraces310.png

kota_vambraces309.png


~ Vonnor
 
This is looking really good but I kinda feel like this could be done cheaper with EVA foam? Love your work though. I wish I had the time/money/skills to work with the materials you're using.
 
Thanks guys!

Doing a lot this weekend. So far I've modified a new pair of gloves (the last pair had irremediable issues), stripped the cracked silver paint off the right hand-guard and re-primed it, and adjusted the edge thickness of the wrist-clip. I also added an epoxy putty back-fill that was pressed into the main assembly at the closure point to imprint the contours of the edge strips into the reverse of the wrist-clip. This locks the clip into position and prevents any lateral movement. The production piece will have a hex-screw backed by an aluminum clamp that will take the place of the green temporary clamps shown in the photos. The clamp will not be visible when worn, only the hex-screw. That is a necessary deviation from referential accuracy (one of two total in this build - more on number 2 later) to insure a rock-solid assembly.

The gloves have a 1.5" Velcro closure strap that goes all the way around the wrist. This not only allows for a very snug fit, but nicely pads the wrist-clip from digging into my skin. The edge of the clip digs tightly into the padded closure strap and holds the entire gauntlet assembly from slipping down onto my hand to interfere with the hand-plate.

It's all working much better than I anticipated so far. :D

More stuff tomorrow.

kota_gauntlet_left02.png

kota_gauntlet_left04.png

kota_gauntlet_left01.png

kota_gauntlet_left03.png


~ Vonnor
 
I filled all the tiny flaws with plastic putty, primed and sanded it with 800grit wet. I back-filled the whole thing with oil clay, then sprayed a clear-coat over it. When that dries I'll attempt to make a rubber block mold for pouring the production piece. The wolverine grooves are to help it get a purchase on the padded glove closure around the wrist. The tracks cut in the top of the tab will mate with the edge trim on the main assembly.

kota_vambraces313.png

kota_vambraces317.png

kota_vambraces316.png

kota_vambraces314.png


~ Vonnor
 
The lower half of the wrist clip rigid model was carefully masked off with clay, then a mold box was put up around it. The contours of the piece made it a major challenge to determine the split point between mold halves. As long as the halves can separate, and the air bubbles can escape during the pour, it's all good. The little gems are the registry keys to insure a perfect join, and the little straws on either side of the pour hole will let the air out as the resin goes in. I ordered some OOMOO25 for this mold. The pencil line is the approximate fill level. A half-inch plaster slab will top it all off.

kota_vambraces318.png

kota_vambraces320.png

kota_vambraces319.png


~ Vonnor
 
I poured the top half of the mold and capped it with a 1/2" plaster slab, then cleaned all the filler clay off the bottom half. I had to pull the rigid model completely off the rubber to do this, then re-seat the model to the mold and flip it all over. After shaping the pour-hole and spraying Ease-Release 200 over everything, I poured the bottom half of the mold and the plaster cap. I had some issues where the 2nd half of the mold stuck to the 1st half in a couple spots. This was due to my grabbing the mold and oscillating it to help get the model to sit tightly in place for the 2nd half mold pour. My fingers rubbed off most of the mold-release at those spots causing the new rubber to stick to the old. Luckily it was in places that don't effect the casting. Today I will microscopically pick all the debris out of the mold using double-sided tape, then bake the mold halves for a couple hours. If the TASK® 9 in my closet is still viable I'll attempt a casting this afternoon.

kota_vambraces322.png


~ Vonnor
 
Wow, that came out beautifully, nice job vonner :thumbsup

I like the way your going about this costume, foam is ok for cirtain things and situations, but it just isn't durable enough long term.
 
Just out of interest, what clay did you use for the mould box?

I pour a small amount of resin in my moulds first and slosh it about to get into tight spots. Also, a light dusting of talcum powder does a great job of stopping surface bubbles :thumbsup
 
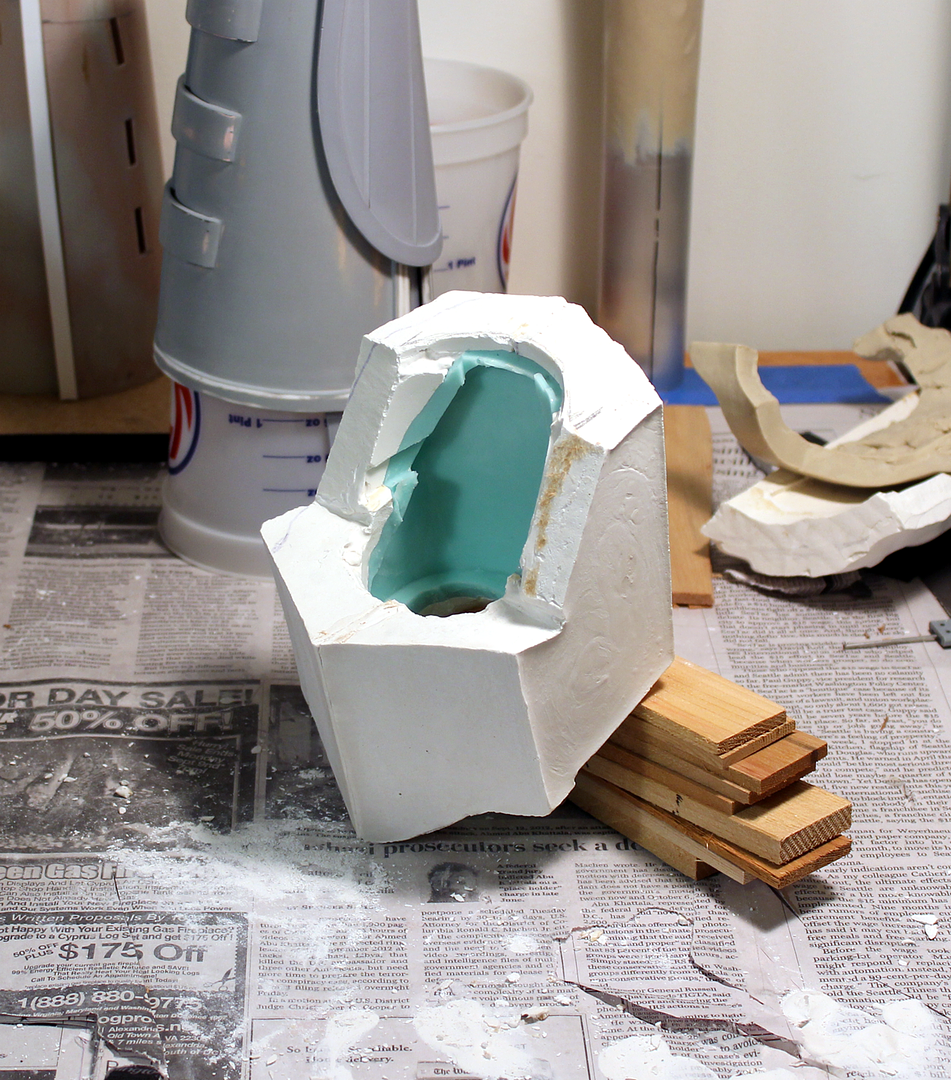
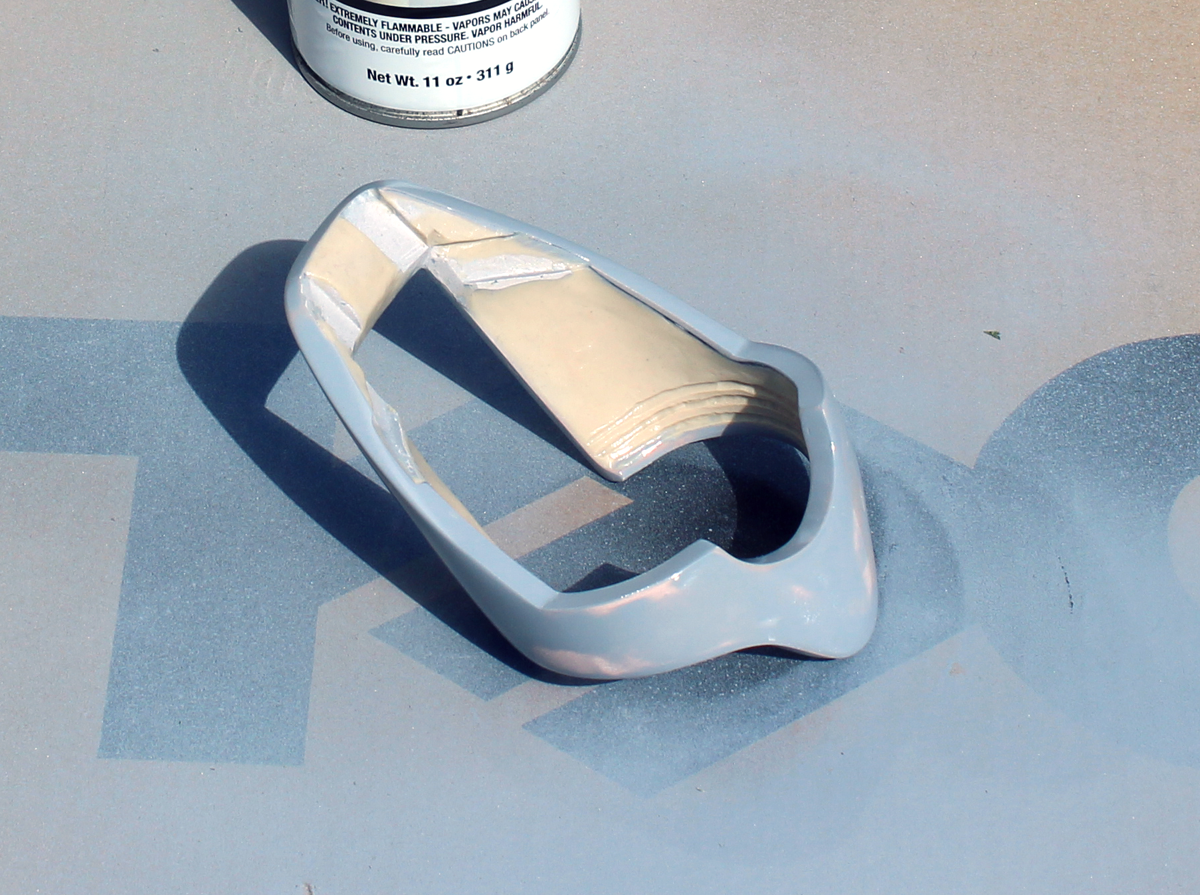
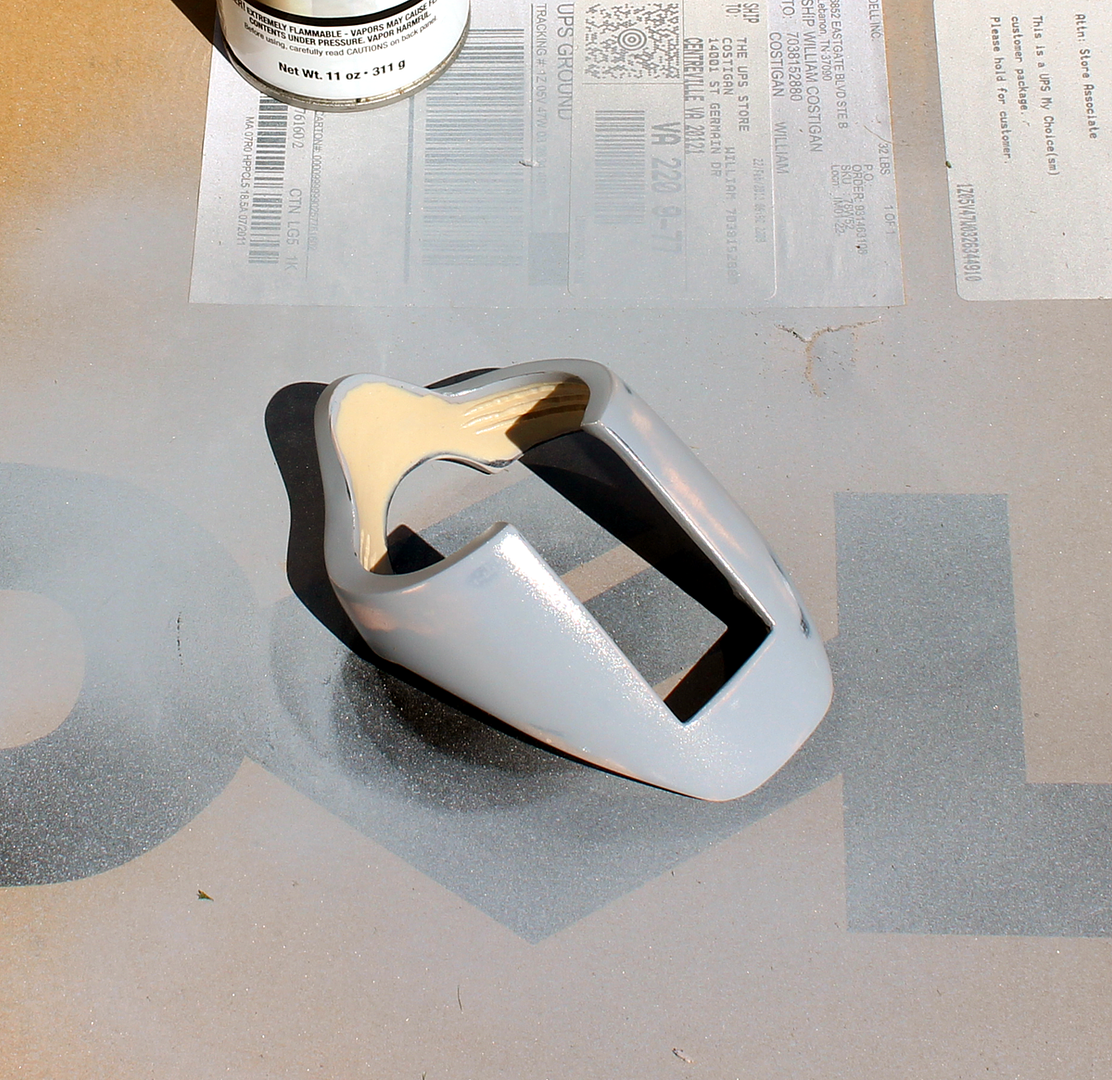
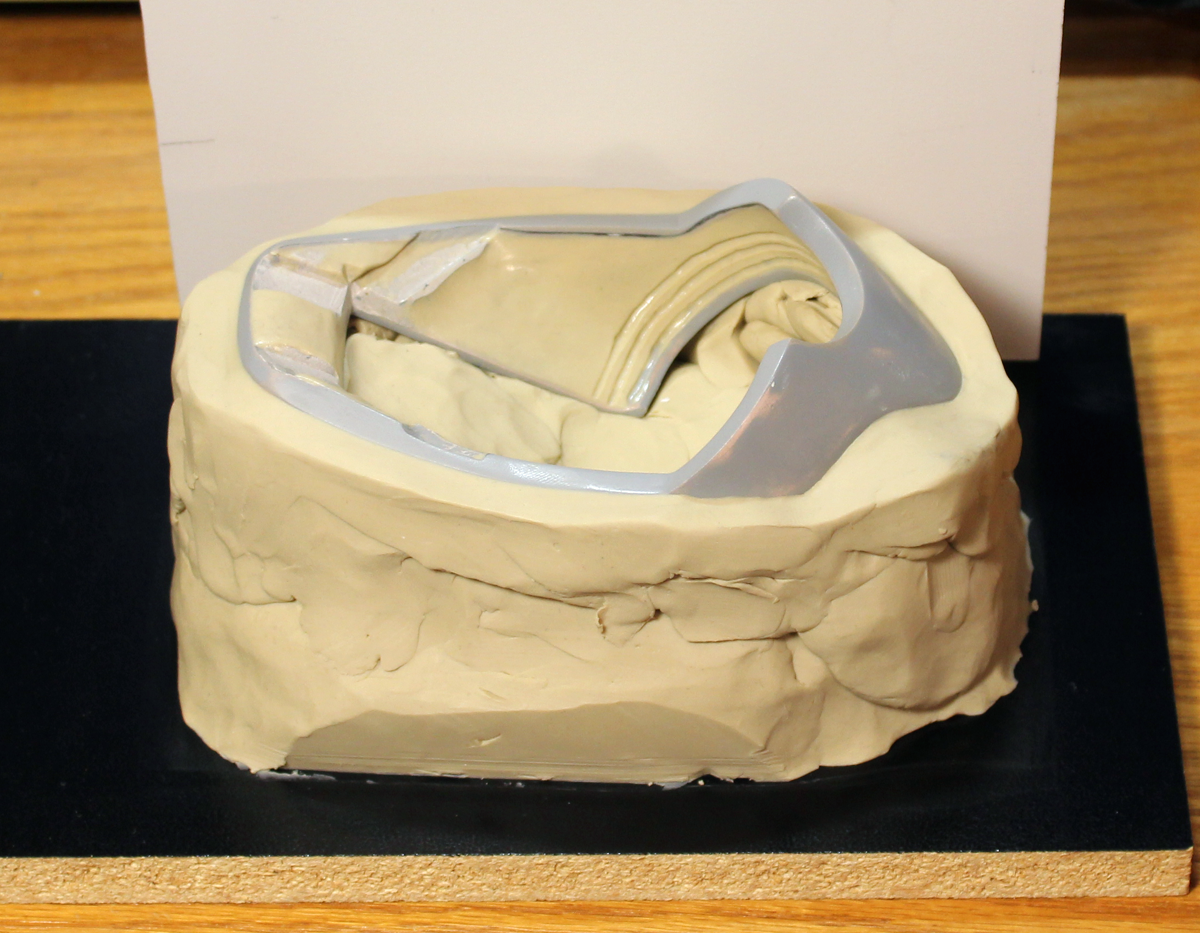
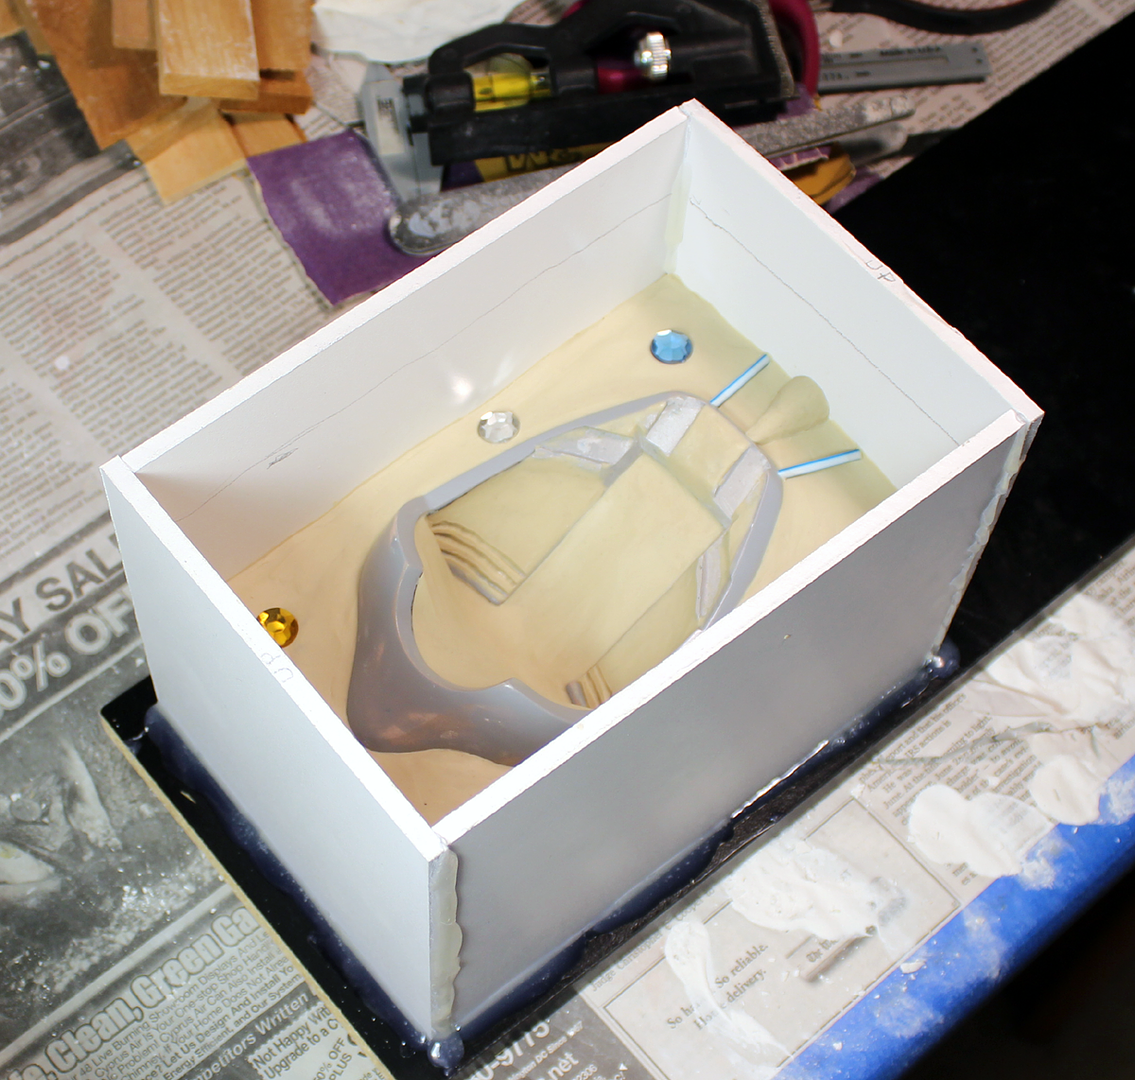
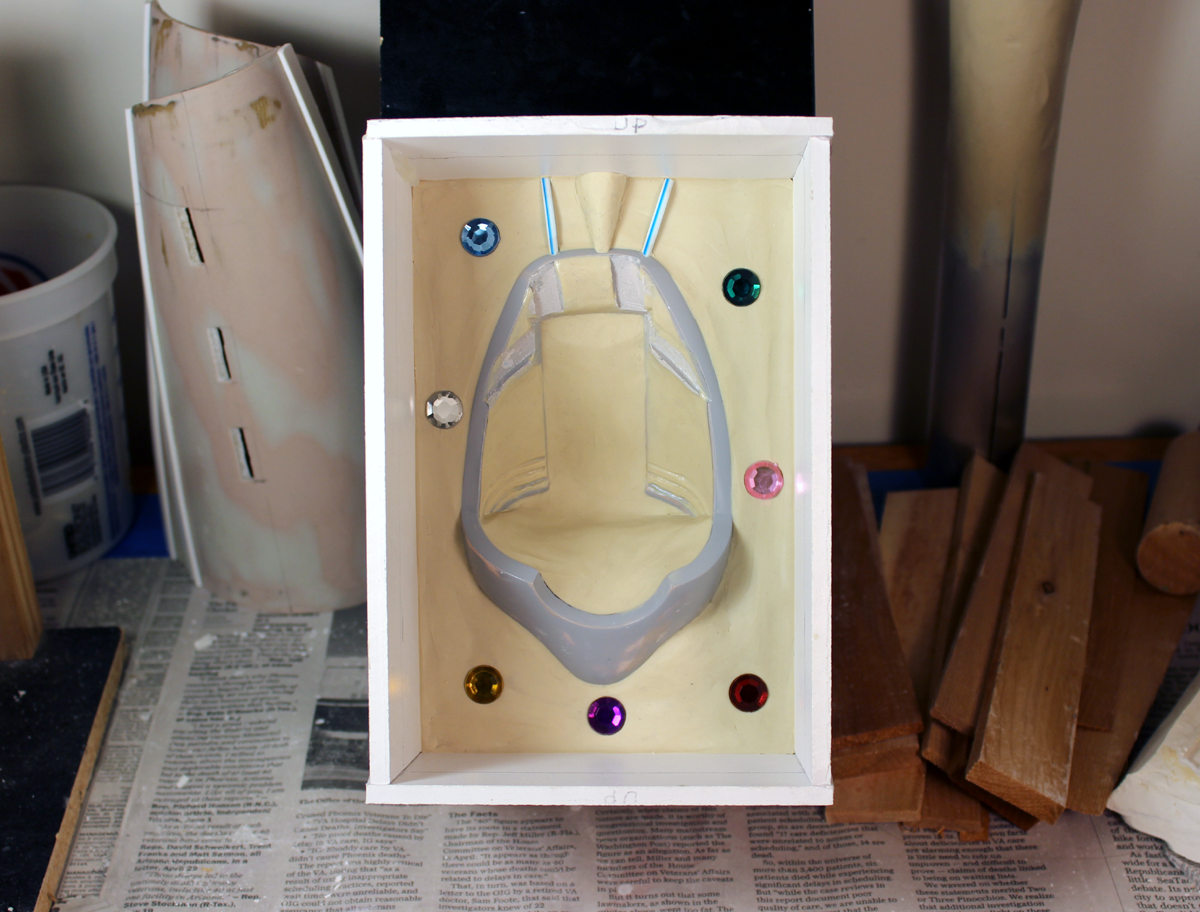
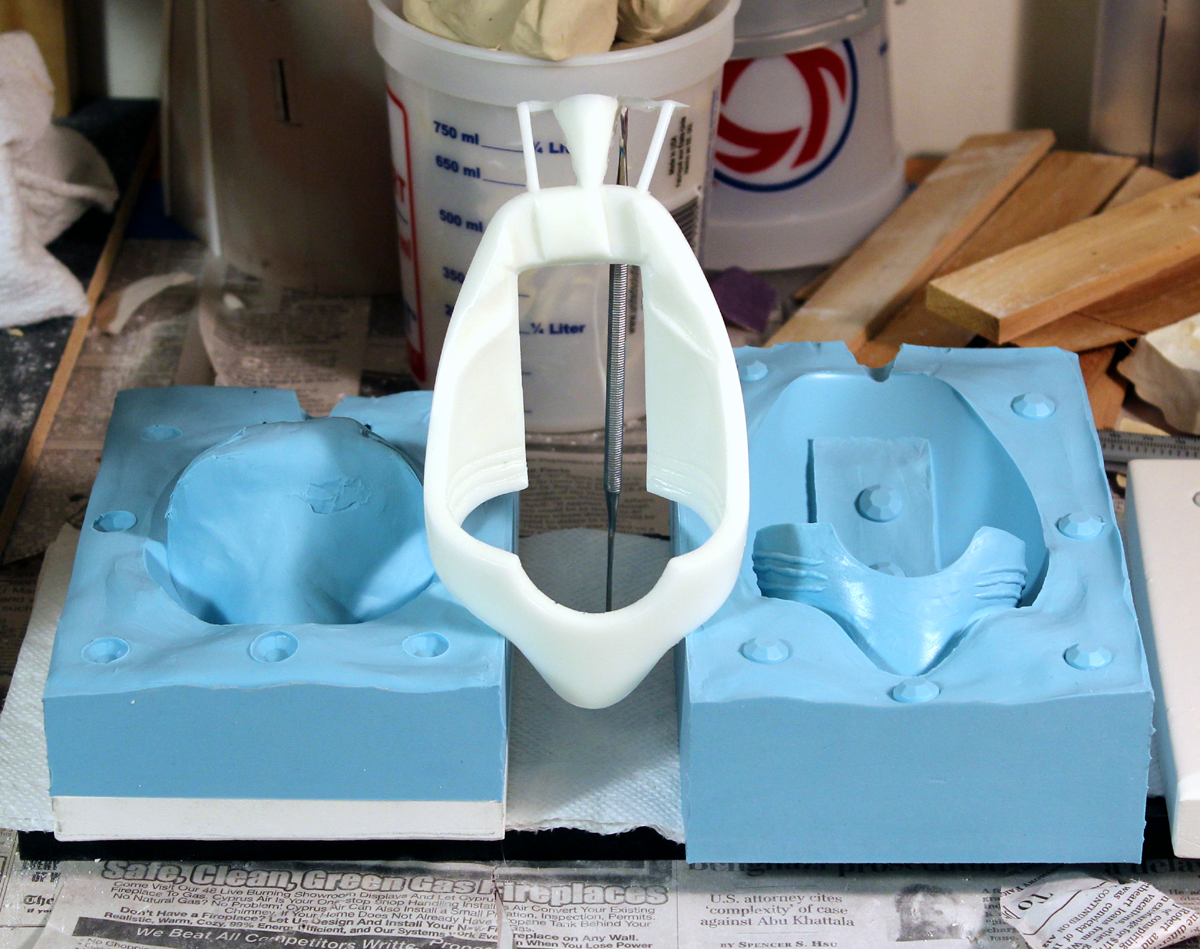
I used the same oil-based clay as for sculpting. I probably should have used some water-based clay. The oil clay stuck to the model and took a lot of cleanup between mold halves. Thank you for the talcum tip. I will do that next time, as I very often get some edge bubbles. I did have an assistant bumping the sides of the mold as I poured, and tipping the mold back and forth periodically. Due to the odd shape of the model, I feared for a few potential bubble spots.

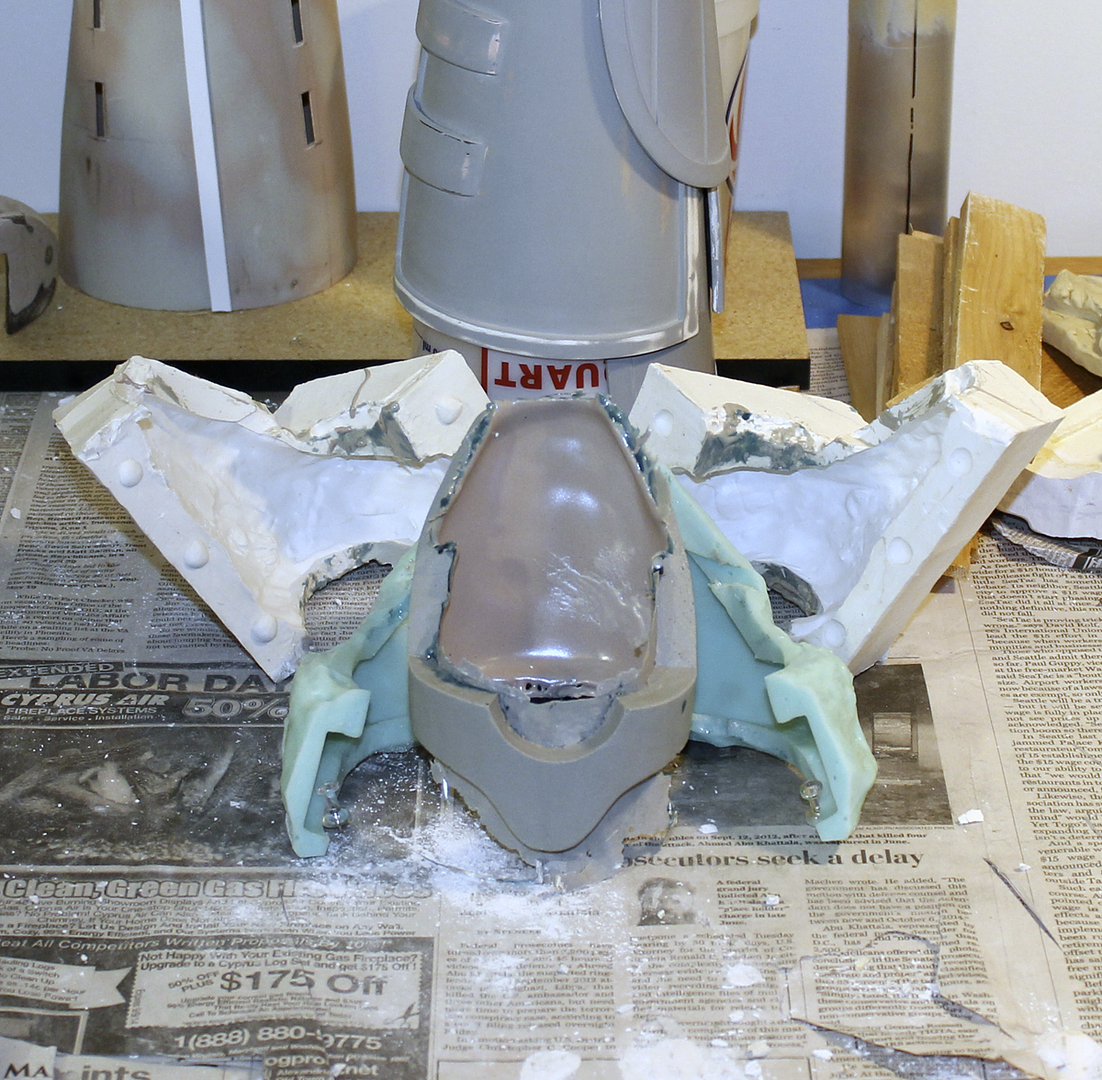
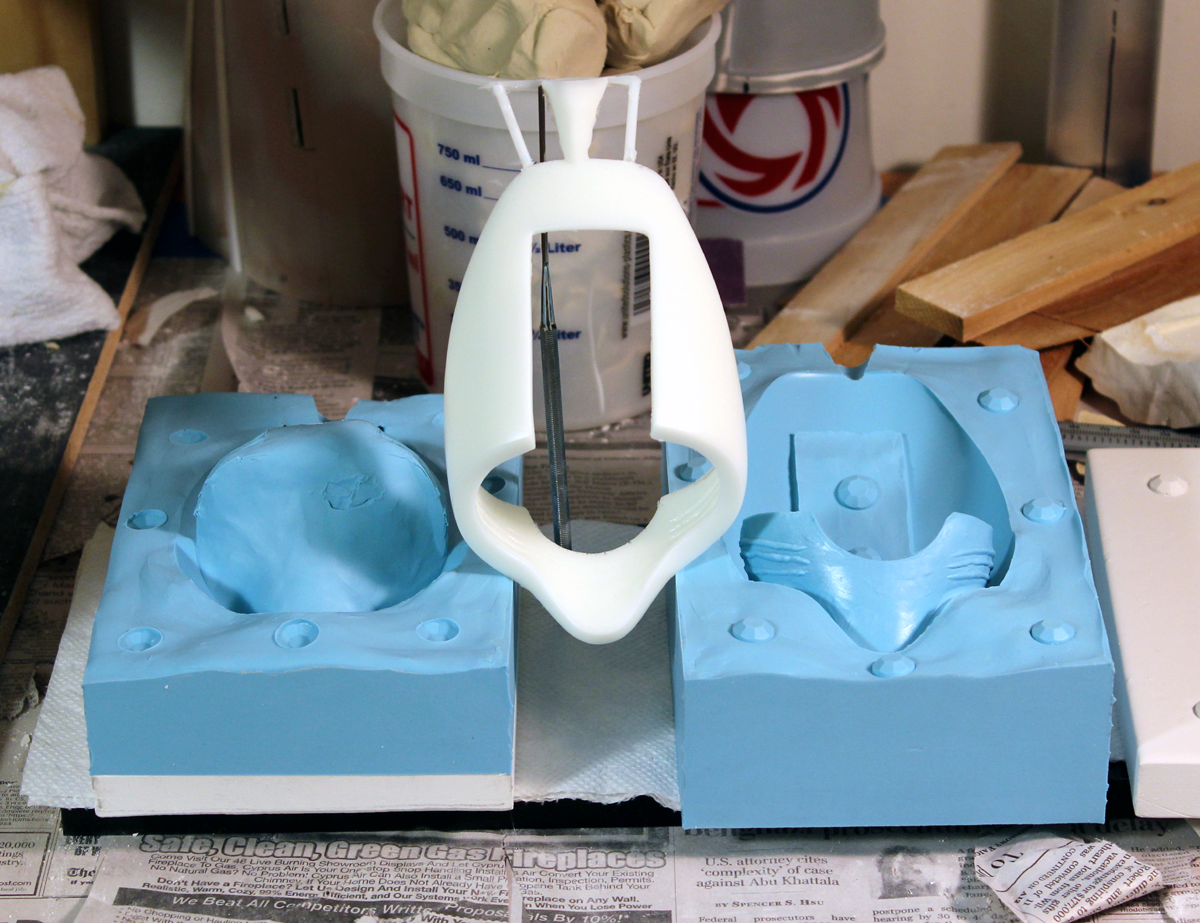
I'm about ready to de-mold the casting. I will see if the bumping worked.

~ Vonnor
 
Here is the rough casting. There were a good number of air bubbles throughout the piece, mostly on the edges. After de-flashing and sanding, many were exposed. I don't think it's bad enough to scrap the casting. but I did fill them all with PC-11 Epoxy Paste. That stuff is fantastic as a filler, but it does take 12-24hrs to dry (depending on temperature).

kota_vambraces323.png

kota_vambraces324.png

kota_vambraces325.png


More after the filler dries.

~ Vonnor
 
This past weekend I did final filler/primer and metallic silver. There were some surface imperfections but none that can't be either fixed or hidden by the weathering.

I do love the shinies.

kota_vambraces331.png

kota_vambraces326.png

kota_vambraces327.png

kota_vambraces329.png

kota_vambraces330.png


~ Vonnor
 
Now that the left gauntlet assembly is complete, the right gauntlet build begins. I expect this to go much faster than the first one, for two reasons.

Less trial and error: Lots of mistakes were made and lessons learned on the left arm assembly, so I already know how to build each element. Less time trying to figure out how to build the piece. I can just build it.

Less unnecessary pre-production detailing: Most of the parts do not need detailing on the intermediate steps. For example, I did not bother to square up the edges of these cross straps, since I have to finish-sand the fiberglass production straps anyway. Why do it twice? This was repeated many times while building the left gauntlet.

I hope to get these in a mold tomorrow, and cast the fiberglass straps on Tuesday or Wednesday this week. I am also going to do the final painting on all the finished armor parts so far, with the dark iron metallic coat ready for scratch-weathering.

Onward it rolls.

kota_vambraces333.png

kota_vambraces334.png

kota_vambraces332.png


~ Vonnor
 
Armor parts so far (L to R):

Right shoulder bell
Left gauntlet assembly
Right hand guard (weathered test casting in front)
Left hand guard
Left wrist clip
Left elbow guard
Left forearm plate

All have a thin even coat of Rustoleum metallic Soft Flat Iron except the Left hand guard and Left elbow guard. Those were coated with Rustoleum Oil Rubbed Bronze as a test, but are too brown for the tone I was looking for. They will be sanded down and re-spritzed with the Iron color. The bronze tone will work much better for the final low-light dirt on all the pieces.

The Left shoulder bell will get the Soft Iron coat tomorrow. I ran out of paint before I could hit it.

Note my Kitchen Witch and her escort in the BG. ;)

kota_armor_set_01.png


24 total armor parts to this costume (counting gauntlet cross-straps individually). 12 are completed. I consider it a milestone.

~ Vonnor
 
Yesterday I did the first pass at the weathering. 800 grit wet sanding of the darker top-coat. This is just to get the overall variegated patina seen in the CG references. This will be followed with some low-lighting and a wash of darker "dirt" that's a bit more color rich, then final screen-accurate scratching.

These photos show a test fitting. Note the main assembly still needs sand-off. I wanted to check spacing and clearances with the gloves on. I will need to open up both the elbow end and wrist clip about 1/8" diameter, but they both have enough allowance for that. It's a ton of hand-sanding though.

I had to add a non-accurate 6-32 hex-screw (just barely visible in one pic below) to clamp the wrist-clip to the main assembly.

kota_vambraces337.png

kota_vambraces335.png

kota_vambraces336.png


More to come.

~ Vonnor
 
Lots of things going on.

First, I have started on the tunic. I am using stretch twill cotton that surprisingly takes a press very well and resists wrinkling. The sleeves will be cut off below the elbow and sewn to a brown spandex forearm that will hide under the gauntlets. The collar has yet to be engineered.

Second, I have decided to commission a much more accurate Rahm Kota lightsaber hilt. Don Close of Do-Clo Custom Sabers will hopefully be cutting the metals, and I will be doing the wrap. One major improvement will be the accuracy of the Tsuka-Ito. After thinking about the topology for three years I have finally figured out how to get a diamond pattern on just one side of the hilt rather than on both sides. I did a proof of concept with some scrap leather and it looks very nice. The 2D orthographic drawings below are sans-dimensions in deference to Mr. Close.

Third, I am still doing the first-cut weathering on the completed armor parts. It is going more slowly than I thought it would due to the darker iron metallic coat being too thick. I had said "live and learn" when I did that on the last project... Oh well, at least I'm still alive. ;)

Some pix:

kota_tunic_01.png

Kota_saber.jpg

rahm_kota_lightsaber_blueprints.png

wrap_poc.gif


Hope to get the tunic finished next weekend. Stay tuned.

~ Vonnor
 
This past weekend was spent sand-weathering the rest of the armor parts, casting the right gauntlet cross-straps in fiberglass, and putting a collar on the tunic.

Here is a small teaser (sorry for the blurry focus):

kota_teaser01.jpg


This costume might actually happen. :D

~ Vonnor
 
This thread is more than 6 years old.

Your message may be considered spam for the following reasons:

  1. This thread hasn't been active in some time. A new post in this thread might not contribute constructively to this discussion after so long.
If you wish to reply despite these issues, check the box below before replying.
Be aware that malicious compliance may result in more severe penalties.
Back
Top