ANH Hero DL-44 Discussion - Three ANH Greeblies Found

So was it just luck that the screw in the flash hider lined up on the bottom?

The flash hider isn't threaded. The threaded booster was tightened on the barrel, (pushing against the bull barrel to keep it from moving at all) and the position for the threaded hole for the socket head screw was marked. The hole was drilled and tapped, and the flash hider is still just held on by the socket head screw.

Does that make sense? There's got to be a better way to describe that...
 
Live fire update: Scottjua has posted video of his live fire blaster at the range and it looked great, but he discovered that the firing forces were moving the DEC parts around causing damage to the real barrel and the bull barrel from the set screws digging through the metal. When I ordered my DEC parts I was worried about the weight of the steel parts causing the gun to malfunction, so I also bought an aluminum flash hider and barrel.

Scott came up with an ingenious way to lock everything in place so there'd be no chance of anything moving around. He threaded his barrel and made a new aluminum booster that threads onto the barrel locking the bull barrel firmly in place. I thought that sounded great and Scott very kindly offered to modify mine as well. Here's what he did:

Threaded the outside of the real barrel, which he said was NOT easy.

View attachment 306802

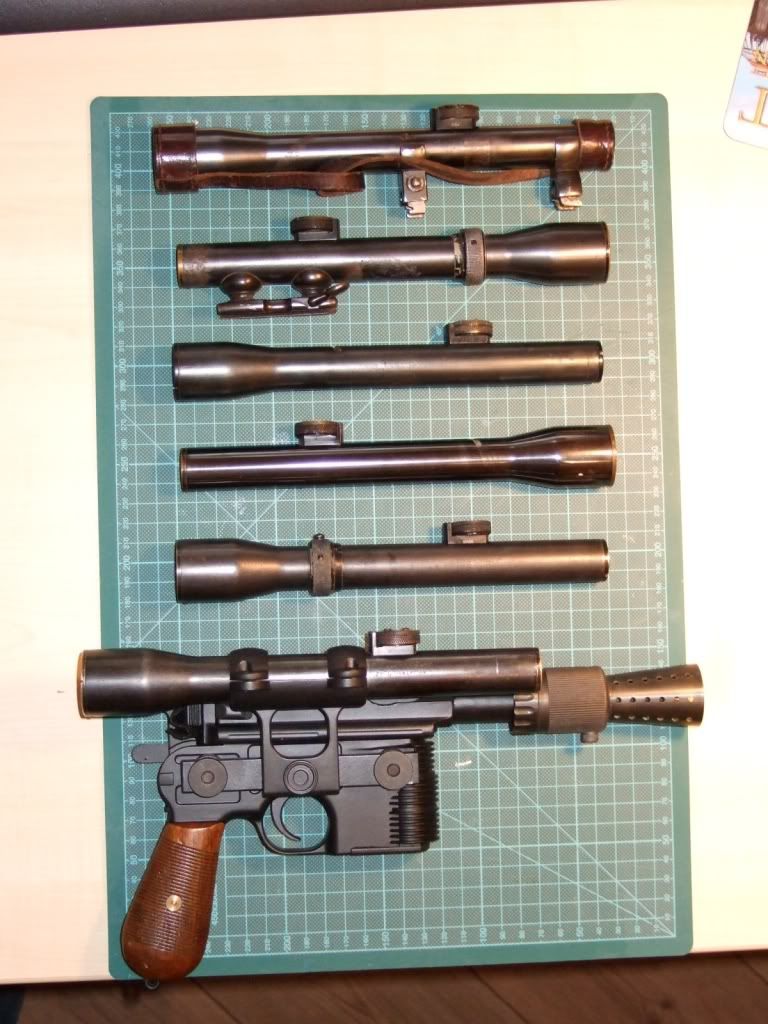
Here are the aluminum parts laid out:

View attachment 306803

The bluing didn't come out quite as well as it did on my steel parts because Aluminum Black is a pain to work with, but I think they still look pretty good. I did the bluing, not Scott. His work is top notch.

And here it is all together:

View attachment 306804

The only other difference between this version and the one with steel parts is that I replaced the aluminum grill with one made from plastic. The aluminum one kept getting chipped and as much as I liked the worn look, it wasn't right. I cut apart three plastic Tomtit replica parts and glued them together. I haven't weathered it because I figure it will get beat up all on its own. I'm pretty happy wiith how it came out.

View attachment 306805

Hopefully the lighter parts attached to the upper receiver will allow the gun to function properly. Time to take this thing to the range!

I never get tired of seeing simple, yet effective solutions applied to complex and difficult problems. It's never not entertaining to me to see the many different interpretations and clever ideas that different people apply to the very same problem. If I ever decide to build a live fire ANH (In the VERY distant future), I would do mine EXACTLY like yours came out; she's beautiful. Scott's work is second to none, and I also like the way the bluing came out on yours too. I do have a question though; was the crossbar secured by threaded rods that were drilled and tapped into the frame, or are they brazened onto the outside of the frame? Also, do you have any plans for the t-track and piston greeblies sight? Finally, I have one last question:

Does the DL-44 make you feel like a smuggler-rouge now?

:lol
 
Vanitas,

Thanks for the kind words! To answer your questions:

- My crossbar bolts are TIG welded in place. I didn't do the welding, but I did have to clean it up, and it wasn't easy. The good thing is that it's rock-solid.

- I'm avoiding thinking about the sight greeblie at the moment since I like the gun so much without it. I did get the DEC parts and will have to do something about it eventually.

- I'm sure I will feel much more rogue-smuggly once I've actually put some rounds through this thing!

Thanks for the info about the crossbar bolts, I wasn't 100% sure as to your method before. As for the sight greeblies, they all depend on what you consider to be canon, as there is a great deal of wiggle-room there. And finally, I'd love to see a video of you blasting away at the range-I can't imagine what the faces of the range-dudes will be when they see it... XD

You sir, get :thumbsup :thumbsup from me!
 
I'd better clarify how I did the crossbar bolts so I don't send anyone down the wrong path. Two nuts were welded to the frame of the Mauser, and then the threaded rods are screwed into those. Here are some pics:

#1: Nut welded in place before cleanup.
Weld 1.jpg

#2: After cleanup.
Blaster Progress-41.jpg

#3: A bit of trickery: Kpax commented that the outside diameter of the nut was a little small, and pointed out that I could fix that and hide some of the ugly weld by making a sleeve to go around the outside of the nut. So I did.
Blaster Progress-42.jpg

#4: Looks like this when assembled, prior to bluing.
Blaster Progress-48.jpg

When blued everything just blended right together and you don't even notice the weld beads. That said, my guess is that the original prop had the scope mounts welded on the same way. Check this out:
Weld Bead.JPG
Looks like a weld bead to me!

I don't mean to turn this thread into a build log, but I didn't want to confuse anyone!
 
That " weld bead" on the HERO could also be a big gouge from turning a nut with a pliers. There are also the same type of gouge on the center thumb nut on the mount ... If you look close... Which I did. ; ). Look above the nut on the HERO pic too. Same gouge in circle around the nut. !

maybe the nuts were threaded on the HERO and then soldiered ?

very cool work!
Can't wait to see more range vids and pics,
 
Unless the original prop had the spacer knobs welded on, AND the threaded rods flush mounted, and secured, with the inside of the Mauser. Perhaps I am mistaken, but instead of doing either method of securing the crossbar, be it welded or drilled and tapped, I imagine that a careful combination of the two would yield the highest combination of strength and solidity. We know that the DL-44 was firing dummy rounds, likely Hollywood-modified rounds, which are specially customized to have a brighter flash and bigger boom than any real gunfire. If I was holding an old gun in my hand with a big, heavy, bulky scope mount and scope slapped on the side of it, then I'd sure as heck want everything to be as secure and as strong as it could possibly be. Sure, I'm reaching, but that's my idea on how the crossbar was likely secured to the real prop. :lol
 
I've thought about this issue too, especially with some people talking about making a live-fire version of the prop. Seems to me that you might not want to go drilling into where both the magazine of the gun is as well as the hammer and such in the back if you want to make sure it stays operational to fire. Welding a spacer makes sense to me and would explain why a spacer was used instead of, for example, the same check-nut behind the crossbar to tighten down the threaded bolt to the frame. Hmmm... interesting.
 
I've thought about this issue too, especially with some people talking about making a live-fire version of the prop. Seems to me that you might not want to go drilling into where both the magazine of the gun is as well as the hammer and such in the back if you want to make sure it stays operational to fire. Welding a spacer makes sense to me and would explain why a spacer was used instead of, for example, the same check-nut behind the crossbar to tighten down the threaded bolt to the frame. Hmmm... interesting.

If you were to drill and tap the body of the gun itself, then the threaded rod would be flush mounted to the internal sides of the body, to ensure that they would not interfere with the gun's functionality. It could be done either way, it's just a matter of personal preference.
 
I decided I was scared of drilling all the way through the real gun since I wanted to interfere with its functioning as little as possible. I have no proof that drilling through the frame is a bad thing, but it turned out not to be necessary since my scope mount is welded on. I could whack someone with this thing while holding the scope and it wouldn't budge.

Since it will probably jam when I try firing it, that may be the only effective way to use this weapon.
 
lol..

I shot mine again today (needed a break from the lathe and mill... and saber install)... with AL flash hider, my new booster, and no barrel... the Tokarev ammo cycles it fine. It won't cycle it with the steel bull barrel though.. So at least in MY gun, and my tight tolerances, weight of the parts is a factor. With the steel bull barrel I even got a stove pipe with the Tok ammo.

Need to try the AL Bull barrel.. and then I should be good.

Gun's action is just mega tight...

And before anyone decries me for using Tok ammo... I did lots of research on the loads, and this modern stuff is actually loaded the generally the same as the original Mauser loads. Modern Mauser loads are lower pressure than the old stuff...

After inspection ZERO issues with the locking block or bolt stop (which is new).
 
Last edited:
Way to go, Scott! Glad you seem to have solved your issues. I will finally be heading to the range later this week. I will report back here, hopefully with good news and good video.

In other news, I finished those Corellian Power Packs I was building. I decided to go with mini banana plugs for the three "connectors." I figure if this part was originally a relay or something, it was meant to be plugged in. So I made it pluggable.

Finished Packs-14.jpg
 
Very nice Hensoldt collections there, you guys! Interesting to see so many Hensoldt dialyt scopes divided amongst the RPF. :D

Interesting to see the varying reticle styles too.


-Carson
 

Your message may be considered spam for the following reasons:

If you wish to reply despite these issues, check the box below before replying.
Be aware that malicious compliance may result in more severe penalties.
Back
Top