DEC ANH Hero Blaster Kit Builds

Okay, so I'm a liar. No progress photos like I said before but I was in the middle of moving, so...there's my excuse.

So, here are my photos of the thing and I should preface this with, prior to this, I've never blued anything before and I have very little experience with working with metal of any kind. Bluing this was a pain and I I feel like this is the roughest-put-together DL-44 with DEC's kit ever slopped up on the RPF. However, after some finagling I did get the color down to something I liked and I am extremely proud of how it came out.

Rather than giving a run down of the things I did to it, I'll leave that to everyone to figure out.;)

IMG_5017.JPG IMG_5020.JPG IMG_5021.JPG IMG_5023.JPG
IMG_5027.JPG IMG_5028.JPG IMG_5030.JPG IMG_5042.JPG
IMG_5043.JPG IMG_5046.JPG IMG_5024.JPG IMG_5040.JPG
 
Real nice job with the mystery disc!

Thanks! That was probably the easiest thing to do on the blaster: sand the area down, stick on a circle, blue to taste.

I used some foil tape as a mask for the shape and I cut it out using a small compass I have and the smallest hobby knife I had around. I considered leaving it on originally because I couldn't help but think if this was what the original "mystery disc" was. It was a circle with a divot in the center, caused by the point of the compass, and it stuck to the ridge on close to the upper receiver. The idea came in my head that, maybe in production, that's how they knew this was the hero blaster for Han or was a prop meant for the Star Wars production: a little silvery circle on one side to easily identify it.

Bah! That's for another thread.
 
I purchased the accurate scope knobs as an upgrade. The kit is beautiful. Does anybody have a suggestion for "tightening" the adjustment rings? I don't want them permanent, just tighter so they can still move. I've been looking at shimming with something stiff and thin in between the rings, but haven't eyeballed the right material yet. All ideas will be welcome.
 
That is for the old knob assembly, the new ones are simpler.
If you want the feel looser, rub one or both knobs on sand paper to make them thinner,
to make the feel tighter rub the bottom of the middle post to shorten it,
There was nothing in between the dials originally but do what makes sense, just make sure to post pics!

OMG! I would never in a million years thought to sand down the axle! Awesome and such an obvious tip. I guess I'm too preoccupied with blue/blackening and weathering.


DEC posted this adjustment tip video a while back. Have you seen this?

https://www.youtube.com/watch?v=acdg5T028NU

Awesome quarryman, thanks.
 
Is anyone else having trouble getting the flash hider to take color? I put it in a zip lock with super blue with absolutely no change. The only thing I can think of is that my super blue seemed to have leaked in shipment, perhaps it lost its potency due to air leakage?
 
You probably have an aluminum FH in which case super blue won't work. Only aluminum black. Super blue works on the cast pieces but not alumnium.
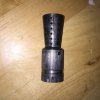
 
You probably have an aluminum FH in which case super blue won't work. Only aluminum black. Super blue works on the cast pieces but not alumnium.

I was wondering about that, I had seen the video and notes about using the super blue and assumed it would be good. Of course I am out of Aluminum Black so I will have to pick some more up tomorrow. Thanks
 
Yeah I got that too, tried sanding and then bluing with SB but not really any result. I'll resort to AB in the morning, though that won't give the result I'm after unfortunately. The cast parts work great with SB though.


Skickat från min iPhone med Tapatalk
 
Im going to have to order some more AB, let me know how it works for you. Not sure what else to try if that doesnt turn out well.
 
You probably have an aluminum FH in which case super blue won't work. Only aluminum black. Super blue works on the cast pieces but not alumnium.

Scott ... probably not the proper thread for this, but considering that I've heard many different answers for this question, do you know if it's possible to get a sanded-raw Denix to take Super Blue? I just want to be darn sure that it won't before I hit mine with Aluminum Black and I figured you're the one to ask. Thanks!
 
So I managed to dribble enough AB from the bottle to give this a try. The flash hider isn't as dark as it looks in this picture but I like the look a lot. To me it looks like the blackening you would get from shooting a laser out of it. I shoot a lot of real guns and the heat from that can definitely change the color of metal. A blaster bolt has to be a ton hotter than a bullet.

IMG_1961.JPG
 
The original part was parkerized. I'm not sure why people insist on going through the hell of bluing these. You can get bake-on parkerized finishes at a reasonable price and then weather it if you want that level of accuracy.
 
You can't parkerize AL. If you are talking about using a cerekote finish or something similar in a parkerized color the texture wouldn't look right and would be much harder to weather. I know DEC did some flash hiders in steel which could have been parkerized. My picture above was probably about 10 mins worth of work, I wouldn't call it going through hell.
 
This thread is more than 6 years old.

Your message may be considered spam for the following reasons:

  1. This thread hasn't been active in some time. A new post in this thread might not contribute constructively to this discussion after so long.
If you wish to reply despite these issues, check the box below before replying.
Be aware that malicious compliance may result in more severe penalties.
Back
Top