The Hand Cannon, a 12 gauge revolver -inspired by Fallout New Vegas

BohemianCruz

New Member
Hello Therpf Community! :)

After many years of looking around on this site and becoming more and more interested in creating props and costumes, I have decided to finally make an account! My experience in this field is very limited however I do have a good grasp of what I'm doing in terms of less complicated builds. (i.e. props that look like poo.). I wish to learn as much as I can from posting on this forum, but please excuse my inexperience. With that said I'd like to start my life on this forum with a build that I have become obsessed with, my very own Hand Cannon.

The Hand Cannon (I couldn't come up with a better name so for now this will due.) is a large 12 gauge, double-action, top-break revolver that will be wielded by a bad a%# bounty hunter in an upcoming short that I will be directing, writing and producing. Originally I wanted to make the ranger sequoia from the game Fallout New Vegas but I wanted something more unique and than the 45-70. spewing beast, but whats cooler than a revolver using large rifle rounds? A revolver that uses shotgun rounds of course. The revolver I designed is a hybrid love-child of the 1851 Colt Navy and the Model 3 Smith and Wesson, the ultimate gun of the old west.


The 1851 Colt Navy:
colt-navy-1851[1].jpg


The Model 3 S&W:
smith+%2526+wesson+model+500+by+asiav+defence%255D+%252816%2529.jpg


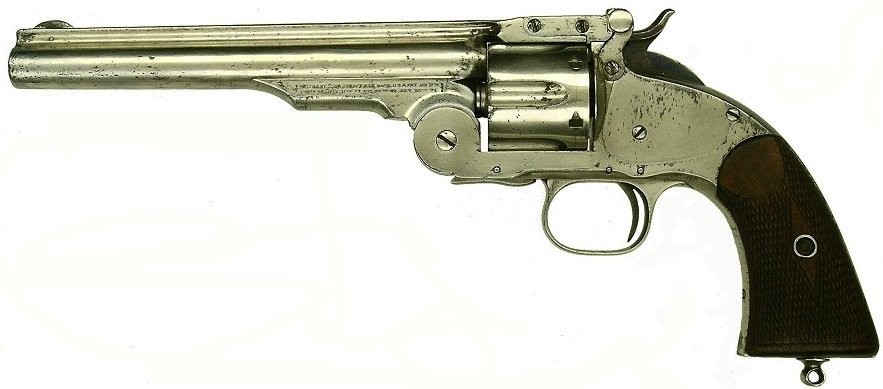
The Ranger Sequoia from Fallout New Vegas:
th


Here's what I have so far:
IMG_0651_2.JPG IMG_0652_2.JPG IMG_0653_2.JPG IMG_0654_2.JPG IMG_0655_2.JPG
(The hammer is just layered pieces of flash cards, elmers clear glue, and some paper clips for support.)

The prototype (made out of eva foam and pvc pipe.):
IMG_0656_2.JPGIMG_0657.JPG IMG_0658_2.JPG

(Btw sorry for the low quality pictures, only have my phones camera.)

Any way as you can see the revolver was going to use a very simplistic two part mechanism to have both the cylinder rotate and the hammer ****** while the trigger was pulled. However after looking at this for a while and doing some math I found that this mechanism will not work as well plus I cant have the option of cocking the hammer back then pulling the trigger and just pulling back the trigger. However after looking on the forums I found MrGreene fabulous Trigun: Functional Vash Revolver WIP in which he had detailed schematics for a proper double action mechanism.

Due to the size of my revolver I'll definitely need to scale the parts up until they fit my original deign, then redesign as needed. Hopefully I'll be able to draw the schematics on adobe or something but until then I'm left with my paper model. As this is still in work in progress I am very willing to take some criticism on this build and will be thankful for it. I will definitely keep posting as I progress through out this build.
 
Hey ya'll, got a small update but I'm really pleased with how its coming out.

Using the new mechanics I was able to redesign and draw up a full scale schematic on poster paper. The picture may not due the size of this schematic justice, it's giant. The weapon is so big in fact I am somewhat concerened how heavy the barrel will be once this comes to life but for now its on too stencils for each part.

IwaGKG5l_RoGtaA7fxyIIl9kQva0_I_vr3xjNA-L51H-WLL9XpyWFZuMLXx5YJdcPtcd07m4zBNlyt0YwU1xUFgU3rC156UB.jpg


Unfortunately there wasn't enough poster paper for the end of the barrel but it is the same as the old design for the barrel. The barrel length will be 10" with the entire gun coming in at a length of nearly 20" and a width of 3". I may need to end up moving the trigger/hammer for comfort reason however testing this it seems to be fine.


IMG_0669.jpg
 
Last edited by a moderator:
Hey everyone, sorry for not posting for a while, I've been busy with school for the past week but now I have a huge update for all of you. Also thanks for anyone keeping up with this noobish thread of mine, really appreciate it. :D

So here is what I have so far, I began by working on the main body of the gun. At first I was content at simply cutting out several layers of cardboard and mod podge; however, being very impatient I decided to cut up poster board I had lying around. While this did speed up the process quite extensively, It didn't allow for me to get in the proper mechanics without a serious amount of sanding. thus I went back to regular/ thin cardboard.
HtFga_vSCztYG_RoiaWtkIsfktcWlDpIGgZru0uW5syMmaf9MjaLq0Z8ce_v0c9qwljFxPW29PerkI3SPlVhFGzMh93wpiDa.jpg


The body of the gun near the hammer is basically more poster board layered and then sanded down. After I finished sanding I also covered it in mod podge for extra support. (I am using mod podge for gluing each piece.)
rE3R3lnt_IJCTjh_mH5_3atOEwh0mul0ilwP6q-BdurjH_xCFcBQ9wQ5Ph4JIT6nb4-4ZU8Eo7pwwzvJHy5sO49X_OTOd9kv.jpg


Here's the cylinder, just layered poster board with mod podge.
O1C7IvEbtXYWG7h_BnJQA4L1wcxCOyQfMKvhlrJFeVWQ3Hf7hKVEVEMbvASqqN2DjYVyOAa3JXTGd69i0FxZxEGEoPKOIc1t.jpg

ihvWBLqZOPJpiLO0JUv8-hj5Al7eNyHJLXGF5PrQOXmsSKT48QyHgGdm5BaUMqLMw-O3GVd-HhOolMf-R6ro_i_-xhYZ15K1.jpg


SrCozBGXhVCAX56h1dutEEnZAXNbW59umiZ1co5Iy6lC8nPWBsK5XVro3d_f14YUZ3kASsKNpY1-0-EqN0D9HJLYY2Eh7yPZ.jpg


Here's the body with the hammer and trigger mechanism. (I don't know if I should make the trigger and the hammer the same thickness, if someone could give some advice I'd much appreciate it.)
BxuzZuoWLusOkt1Twx-c2YwT9ZeW7zfzDx2XrFCpfowTG1cwg78myAdmYfaYAdY9o4RkYZl3SGRgVbDKE_ceuV1_R2ZI9JXf.jpg


This is the body with a moc barrel I made made some time before, the end result will be just as long.
WVc-Oo7fSODFY2q4yTaIxLz4Ov3ovKKYvMKwMJaHZDh_uFP7q_iYTtkGRuRWo7XqmRY_b-7oRbzPWmbyRA54DDpr2Dnz3-O5.jpg


And here is a comparison between my gun and a regular handgun.
M6JJRIXfLAT_JCwu8NumC4MZ8F0UW0OBH6FYXMi2w2BUU4znIvZ87HdHnMXw3Y6appwSiw1FP5-LiDnpoeLPyY3AVdwQ6HyN.jpg


I think for next time I'll try finishing up the body of the gun up with the mechanism fully finished. The next real step is making the top break mechanism work properly which should prove quite the challenge.
 
Last edited by a moderator:
Hello every one! Sorry about this, simple mistake the image size was way to big. Fixed post is down below.
 
Last edited by a moderator:
Hello again everyone! I've been a bit busy with school for a while but that things are starting to get easier for me I decided to get back to work on my prop. Also thanks to cinder the handyman on instagram, I will be attending my first con at Kamikaze in 2016 at the La convention center. I'm supper excited to attend the convention and can't wait to get to working on my cosplay for it. I will be attending the con as an ncr ranger with a custom look so that my ranger is unique. Anyway, with those things out of the way let me show you guys what I've been up to.

So while getting back into my project I discovered some overlooked flaws in my pieces, that many of them like the hammer for the gun were not flat. This is a major problem because in order for the mechanism to work properly all the pieces need to be perfectly level so that none of the parts get stuck. This happened due to the glue warping the card-stock that I had used for the hammer. In order to get around this I decided to remake the warped pieces out of balsa wood. I also went back to the original drawing and saw that their is also an inner mechanism inside the hammer that needed to be made in order for the mechanism to work smoothly.
tno1lHxtYLWEfsfoTq2VCGr1t5aG4FzHcjhPOUDopZL5lAj8FYgJi-o8nDuDUvSCG2W-K4MMkgqvy8zKmwONLVtmWPI8NDfe.jpg
C5FRVhRO1Bp5Jq9eZpasw0TLeFslbpO0riByiaGbjDUBVMIINwLMO0KiaDKW4fA6JEQPZ3eU4cCfc_Seah6ozb7weGAJ8Y-P.jpg
O6-5jvhzefLUxzUrcXB3RqReYjxG5RqzUYgFeiyAZOw49C0fSw50hbpVitpCdYSrn0yIKEpVkvGjDGJLyJ1Nx2L7X0GXqa75.jpg


Here is how the newly made hammer looked with the cardboard body of the gun. Although the picture isn't the greatest, the hammer looks much better than the card-stock version.

wPidsDxaG0NTQM_8Zsx0zd7dz0zYwuxrFZ_KTwMZqkyPEJg4TZMMkYrSEirrywAdfVjesayAPEwUzHu8D0obyU2k0isYCJkC.jpg


Now here's the part where things started to take a turn for the worse. I began to start fiber glassing (for the first time ever!) the "big" body pieces of the gun which at first was going very smoothly and according to plan. As you can see I am using fiber glass mats instead of the cloth, as soon as I'm done with the bag I'm using I will need t go out and buy the cloth version because this fiber glass is just so unnecessarily difficult to work with and is very messy. As you can see the fibers just easily pull apart and get everywhere, making it all the more likely that some of it will get on you causing some annoying itching.
L-1nmn_Ux6p-s4nBYehy9ByFe5Jo8108OdbGMWT1CgJWVBnCkYnARN6BUSylg9BB2lzaI__A3Q-sy0rs-sHDMY1DIMaALIbx.jpg
xuUYdycM1n9Zw6LtqKpmz-_8WviVB7F5xIElptgKAnDuABLTeO_PHid3dmhOID7Tv8zJVJWv846J8e2FLl-27VVaJwypV5ds.jpg


Here are the "mostly finished" pieces that I fiber glassed, as you can see they look... bad, very bad. The combination of the resin warping the cardboard and me unevenly sanding these pieces has caused it to become, well unfix-able really. I can't really see myself saving these pieces as they won't fit into each other any more and I don't want to spend anymore time trying to fix something when I can just start from scratch. Which brings me to the point that I am starting from square one again, except with much more knowledge on what I need to do this time. I am going to recreate these pieces and many more pieces of this build out of MDF and balsa wood seeing how I've had much better results with those materials. I'm crossing my fingers and hoping this will look and feel better.


bPNSY1po3DPQVOJEolTK0GwUS1OPCXI3P-B2l__nRaijGDtxfCTKUtQL4fH9Qt1sSnY9JA_slpXtQRc6ij2YX2cUi728NOXG.jpg
IMG_0907.jpg IMG_0908.jpg

Also I wanted to give you guys a sneak peak for the cosplay that I will be doing for Kamikaze this year. So here is the sketch I drew up for it.

vx901p6EYUCxZC_Tt_HIyPr5k-J3BrsJ7bjjqoFWzuxFr2LRXXIEWQZ6mQzgtwM_u8J8HTVOHj5PjJcZY0cyD-w6_LuhKODj.jpg
I'm really excited to be making this and I can't wait to see how it will turn out. :D

I'm wondering if I should post a WIP thread for this NCR ranger build, let me know what you guys think. Thank you everyone who's been watching this thread for keeping me inspired, it really means a lot to me. Also I do have an Instagram account specifically for my props and more up to date progress,you can check me out there, my user name is Bohemian_props.


IMG_0909.jpg


IMG_0907.jpg


IMG_0908.jpg
 
Last edited by a moderator:
This thread is more than 8 years old.

Your message may be considered spam for the following reasons:

  1. This thread hasn't been active in some time. A new post in this thread might not contribute constructively to this discussion after so long.
If you wish to reply despite these issues, check the box below before replying.
Be aware that malicious compliance may result in more severe penalties.
Back
Top