You are using an out of date browser. It may not display this or other websites correctly.
You should upgrade or use an alternative browser.
You should upgrade or use an alternative browser.
Yet Another Gold Test
- Thread starter Astyanax
- Start date
Bloop
Sr Member
There was a thread a while back showing how metallic fingernail powders actually do a great job. Here's a YouTube of a guy doing different metallic finish comparisons, with the nail powder being one pretty much the best:
Here's the thread by RPFer Indy Magnoli where he finished a Mandolorian Armorer helmet with it:

 www.therpf.com
I never used it myself, but I keep it in mind to try if I have anything that needs a chrome finish in the future. The powder apparently goes a long way, too, so it's fairly inexpensive to use, even on larger items.
Here's the thread by RPFer Indy Magnoli where he finished a Mandolorian Armorer helmet with it:

Mando Armorer Helmet refinished using Nail Polish Powder!
We received this awesome finished Armorer helmet from MinuteFett a while back: The paint scheme was based on the dark coloring seen in season 1... but after seeing the Armorer in BoBF... I knew I wanted something shinier! Not too long ago I saw a YouTube video showing someone using nail...
I never used it myself, but I keep it in mind to try if I have anything that needs a chrome finish in the future. The powder apparently goes a long way, too, so it's fairly inexpensive to use, even on larger items.
There was a thread a while back showing how metallic fingernail powders actually do a great job. Here's a YouTube of a guy doing different metallic finish comparisons, with the nail powder being one pretty much the best:
Wow, that's quite a find! I'm sold, just ordered some and the finish gel. I'll add it to the list. I'll bet the surface doesn't even need to be primed. I'll try it with and without.
Thanks so much!
Bloop
Sr Member
You're welcome, I hope it works out for you! From what I recall, you just need a sticky/tacky surface to apply it to, so priming might not be needed. I'd guess it would just depend on your material if you need to prime first.Wow, that's quite a find! I'm sold, just ordered some and the finish gel. I'll add it to the list. I'll bet the surface doesn't even need to be primed. I'll try it with and without.
Thanks so much!
I've always got the best result from gloss black, chrome ( Molto) then a tinted clear lacquer. it's a poor man's version of vacuum plating as
they plate in silver first.
Yep, my tests #7, #8 and #10 are intended to do pretty much that, except over Alclad II polished aluminum instead of Molto (too expensive for the quantity).
It seems the tricky part is getting the tint right and keeping the coat very light. Do you have a formula that you like to use? Do you add colored lacquer to the clear or something more like food coloring? If so, how much of which colors?
Thanks!
belloq
Sr Member
Yep, my tests #7, #8 and #10 are intended to do pretty much that, except over Alclad II polished aluminum instead of Molto (too expensive for the quantity).
It seems the tricky part is getting the tint right and keeping the coat very light. Do you have a formula that you like to use? Do you add colored lacquer to the clear or something more like food coloring? If so, how much of which colors?
Thanks!I t
FYI, I think Alclad makes color tints you can add to Alclad clears.Yep, my tests #7, #8 and #10 are intended to do pretty much that, except over Alclad II polished aluminum instead of Molto (too expensive for the quantity).
It seems the tricky part is getting the tint right and keeping the coat very light. Do you have a formula that you like to use? Do you add colored lacquer to the clear or something more like food coloring? If so, how much of which colors?
Thanks!
FYI, I think Alclad makes color tints you can add to Alclad clears.
Yes, the Candy Lacquers. I have yellow and red, and I think I have a mix that might work (5:1 proportions). But if you have any other suggestions of the proportion of yellow to red, I'm all ears!
Thanks,
flimzy
Master Member
JediMichael
Master Member
Just watched that video above. That metallic fingernail powder really does give a nice chrome effect. Who would have known.
It always seems, the stuff not meant for models and props always seem to work the best for them.
Now that I think about it, many years ago....probably 2004, friends and I went to a costume store and they had this powder, that you just dipped your finger into and rubbed on your skin. It was most silver, but something similar, but you didn't coat the skin first with anything. It easily washed off with normal soap and water afterwards. I never even thought to use it for any projects like this....but it might have also come off, since it was meant to be a temporary face makeup.
Either way, its cool thinking outside of the box type stuff.
PART 6: Alclad II Pale Gold (buffed & unbuffed) over black gloss over primer
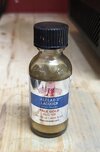
I was not impressed with the Alclad II pale gold at all. Yes, I was hoping for something as shiny as the polished aluminum, but I couldn't even buff it into that kind of a look. Numerous problems:
When I tried to use the recommended Alclad Micromesh product, I started with the very finest grit. No effect. Added pressure, and the paint started coming off. So I switched gears for a different section, and very lightly buffed with the lower grit (3500) Micromesh first, working my way all the way up to the high grit. No extra shine, and again paint started coming off. It was as if the gold was a hard lacquer shell (which it is), which allowed no access to the metal flakes inside.
So while this paint might be good for dirty, aged gold effect, it's not suitable for a shiny bright gold.


And at proper viewing distance:
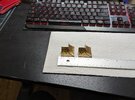

I was not impressed with the Alclad II pale gold at all. Yes, I was hoping for something as shiny as the polished aluminum, but I couldn't even buff it into that kind of a look. Numerous problems:
- The initial shine was very dull.
- The color is too brown.
- Buffing did not improve things.
When I tried to use the recommended Alclad Micromesh product, I started with the very finest grit. No effect. Added pressure, and the paint started coming off. So I switched gears for a different section, and very lightly buffed with the lower grit (3500) Micromesh first, working my way all the way up to the high grit. No extra shine, and again paint started coming off. It was as if the gold was a hard lacquer shell (which it is), which allowed no access to the metal flakes inside.
So while this paint might be good for dirty, aged gold effect, it's not suitable for a shiny bright gold.
And at proper viewing distance:

Last edited:
PART 7: Alclad II Candy Yellow+Red over Alclad II Polished Aluminum over black gloss
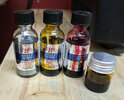
Hmm, interesting lesson learned here: when you combine a lot of variable factors (color mix, transparency, # coats, etc.), you must repeat those factors exactly in all areas for consistency. So while this approach might work for some people, it's definitely for more advanced painters who can replicate the same thing repeatedly; that's not me. There are many possible combinations when trying to figure out how thick a coat should be laid down, with what color combinations. These all have to be done by "feel"; one wrong press of the airbrush button and the part is ruined.
So I tried a 5:1 ratio of Candy Golden Yellow with Candy Red. I also tried Candy Golden Yellow only. I went light and heavy with each, and was just not satisfied. Here are the cons, and they are big ones:
That being said, a light coat of either does seem to give a decent PALE gold effect. Any heavier than that, and it seems to go artificial yellow.


And at proper viewing distance:
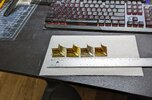

Hmm, interesting lesson learned here: when you combine a lot of variable factors (color mix, transparency, # coats, etc.), you must repeat those factors exactly in all areas for consistency. So while this approach might work for some people, it's definitely for more advanced painters who can replicate the same thing repeatedly; that's not me. There are many possible combinations when trying to figure out how thick a coat should be laid down, with what color combinations. These all have to be done by "feel"; one wrong press of the airbrush button and the part is ruined.
So I tried a 5:1 ratio of Candy Golden Yellow with Candy Red. I also tried Candy Golden Yellow only. I went light and heavy with each, and was just not satisfied. Here are the cons, and they are big ones:
- Its very difficult to consistently apply the same layer to multiple parts.
- The extra layer had the effect of darkening the gold
- I was unable to get a satisfying gold.
That being said, a light coat of either does seem to give a decent PALE gold effect. Any heavier than that, and it seems to go artificial yellow.
And at proper viewing distance:

Last edited:
How is the durability for the Alclad stuff?
I know for example some of their colors you cannot mask over as it messes up the finish
I checked the Polished Aluminum: It seems quite durable, given a couple days to fully cure. A piece of yellow Frog Tape did not peel off any of the finish, and I was not able to press fingerprints into it. A more aggressive tape like cellophane tape did begin to pull off some of the shine, but not whole flakes of paint. I feel comfortable enough with it that I would not clearcoat it if it was for display, maybe even for light handling.
The candy colors ARE clear lacquer, so they're rock hard once cured.
Last edited:
PART 8: Yellow and red food coloring with Liquitex High Gloss Varnish over Alclad II Polished Aluminum over black gloss
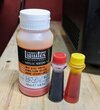
(Yes, I dumped food coloring directly into the Liquitex bottle!)
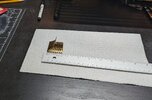
Wow, super interesting. I was able to get quite a nice shine on this part. Following an online guide, I placed 16 drops of yellow and 6 drops of red food coloring in a 4oz bottle and shook. There is a little bit of a technique to applying the colored lacquer: I painted it on thick and quickly, and then I very quickly painted it "off" using my paintbrush and a paper towel. The varnish badly wants to pool in lower areas and then dry in orange clots. So before it gets tacky, I use the same brush, wipe it off with a paper towel and remove as much of the varnish as possible. And repeat until all the varnish is visibly gone. And that's the first coat. Then wait 3 hours between coats.
I had to do this 8 TIMES to get what you'll see below. TWO DAYS of painting a small part.
And while it's shiny and well protected, there are those few key cons here:
I think there are absolutely good applications for this approach, and I am keeping my bottle. The darker gold/brass will give me an amazing foundation for a weathered Headpiece for the Staff of Ra, for example. It might even serve for a Chachapoyan idol (with a touch less red). But not for a bright gold for an Ark of the Covenant. It's a truly excellent brass color. I love it for that.
And I do LOVE how well protected and shiny the part is!


And at proper viewing distance:

(Yes, I dumped food coloring directly into the Liquitex bottle!)
Wow, super interesting. I was able to get quite a nice shine on this part. Following an online guide, I placed 16 drops of yellow and 6 drops of red food coloring in a 4oz bottle and shook. There is a little bit of a technique to applying the colored lacquer: I painted it on thick and quickly, and then I very quickly painted it "off" using my paintbrush and a paper towel. The varnish badly wants to pool in lower areas and then dry in orange clots. So before it gets tacky, I use the same brush, wipe it off with a paper towel and remove as much of the varnish as possible. And repeat until all the varnish is visibly gone. And that's the first coat. Then wait 3 hours between coats.
I had to do this 8 TIMES to get what you'll see below. TWO DAYS of painting a small part.
And while it's shiny and well protected, there are those few key cons here:
- It came out too dark (maybe less red would work?).
- It wants to pool in the lower areas (see the bottoms of the feathers).
- It takes too many coats and hours!
I think there are absolutely good applications for this approach, and I am keeping my bottle. The darker gold/brass will give me an amazing foundation for a weathered Headpiece for the Staff of Ra, for example. It might even serve for a Chachapoyan idol (with a touch less red). But not for a bright gold for an Ark of the Covenant. It's a truly excellent brass color. I love it for that.
And I do LOVE how well protected and shiny the part is!
And at proper viewing distance:

Last edited:
PART 9: Rub'n Buff Gold Leaf over primer (buffed heavily)
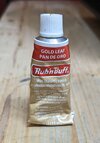
The Rub'n Buff approach was kind of a disaster.
Over a primed part, I rubbed it in to the part really well, using paper towels to get into all the small areas, and then gave it an hour to dry. Using a soft t-shirt, I buffed and buffed and buffed. On the smoother surfaces, it did pick up a bit of a shine (which doesn't hold up under very close scrutiny), but in all the nooks and crannies, I was unble to get any decent buffing going. I even tried fine-tip cotton swabs, but those either did nothing or started taking the wax off. And the color's not right either. Perhaps it's meant for a more smooth surface, like spoons or picture frames?


And at proper viewing distance:
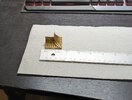

The Rub'n Buff approach was kind of a disaster.
Over a primed part, I rubbed it in to the part really well, using paper towels to get into all the small areas, and then gave it an hour to dry. Using a soft t-shirt, I buffed and buffed and buffed. On the smoother surfaces, it did pick up a bit of a shine (which doesn't hold up under very close scrutiny), but in all the nooks and crannies, I was unble to get any decent buffing going. I even tried fine-tip cotton swabs, but those either did nothing or started taking the wax off. And the color's not right either. Perhaps it's meant for a more smooth surface, like spoons or picture frames?
- Too dark/aged of a gold color.
- Unable to buff in tight spaces.
- Buff too hard or with too abrasive a material, and it comes off.
- Not terribly shiny even when well buffed.
And at proper viewing distance:

Last edited:
PART 10: Custom Paints Inspire Candy Gold over Alclad II Polished Aluminum over black gloss
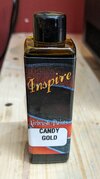
I'm really on the fence about this one.
It was super easy to airbrush over the chrome, and I feel it maintained its shine. The gold is not very bright. When sprayed lightly, it's too brown, and when sprayed heavier, it's too yellow. The lighter spray is definitely more dull in color. Perhaps I should have landed in the middle? It was very difficult to find that balance. After a few more tries, I might get it. But then can I repeat it consistently on all the parts without making any mistakes? One extra press of the brush and it's ruined...


And at proper viewing distance:
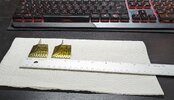

I'm really on the fence about this one.
It was super easy to airbrush over the chrome, and I feel it maintained its shine. The gold is not very bright. When sprayed lightly, it's too brown, and when sprayed heavier, it's too yellow. The lighter spray is definitely more dull in color. Perhaps I should have landed in the middle? It was very difficult to find that balance. After a few more tries, I might get it. But then can I repeat it consistently on all the parts without making any mistakes? One extra press of the brush and it's ruined...
- Maybe needs a drop of red?
- Seemed to lose some of its shine when the layer went on thicker.
- Spraying a consistent coat thickness on all parts will be a challenge.
And at proper viewing distance:

Last edited:
Similar threads
- Replies
- 0
- Views
- 728
- Replies
- 8
- Views
- 2,870

![IMG_3349[1].JPG](https://therpf-f28a.kxcdn.com/forums/data/attachments/1396/1396803-c3d8ca1141a81986a59e1c342df4b433.jpg)