You are using an out of date browser. It may not display this or other websites correctly.
You should upgrade or use an alternative browser.
You should upgrade or use an alternative browser.
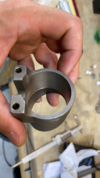
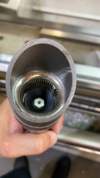
Various OT lightsaber WannaWanga parts (new ALU MPP shroud)
- Thread starter roygilsing
- Start date
I won’t be shaving my vintage MPPs...
Mine arrived yesterday Roy. Thanks so much!
I only need to take about 1mm more out of the internal bore for it to work and sit correctly on my real flashes. Going to get some new tools and skills! Also, this is a good time to mention that Roman has new tubes and MPPs coming. I am picking up one of his and might try the shave trick on that one!
Last edited:
This issue can be solved by shaving a tip of MPP body, which won't be shown on the outside.
Plus, the screw indent positions also differ on vintages.
Roy's shroud is dimensionally accurate to the real screen-used part.
Can't ask for more than that imo.
Interesting!
I hope you can do a video tutorial showing us how you shave down your vintage MPP tube to accommodate the inaccurate seating position of the V2 Shrouds.
Hi guys,
Sorry I haven't responded yet. I became aware of the issue and it is a bit of a conundrum. The shroud is supposed to sit a little higher on the tube than a thin walled aluminium shroud. That can be seen on the pictures of the screen used saber. And the location of the internal bore step is in the same location in my CAD model as in my V1 steel shroud. I noticed that it sat a bit high on the shroud I painted and photographed myself but it didn't feel weird or off. So now I have to investigate if the factory made the bore manually and inaccurate and inconsistent from one to the next.
I understand most of you can't do this change themselves and I don't expect to. I don't have a workshop myself to do it either. So I will try and see what else I can do to solve this. Perhaps after investigation I might have to redo the whole batch. Or perhaps I can find a local workshop who can do a modification.
Anyway, I'll get back to you about it and investigate this further. Please send me an email if you feel that something is wrong with your shroud. My apologies for this inaccuracy!
Roy
PrinceZip
Master Member
mmm, so its a case of... do as I say not as I can't do (because I will not be shaving down my vintage MPP) sounds like a ridicules suggestion, I thrust no one listens, lucky for the community Roy is fare more pragmatic & practical with his solutions & advice.
It's far easier shaving off a bit of MPP tube than to bore out a steel shroud.
Simple material properties.
Well, even I have to disagree with you there. I wouldn’t damage the found item and make it inaccurate instead of the replica part. Especially given the prices they command these days due to bidding wars driven by the two vocal members here. Time to move along you two.
”This bickering is pointless!”
-Tarkin

”This bickering is pointless!”
-Tarkin
I've yet to get mine in the mail but if it can fit in my chuck, I might be able to do the corrections.
What should be the distance from the internal step to the shroud edge tallest and/or shortest points if it is drilled correct to the model?
I understand what went wrong now.
The wall thickness of the protruding part of the emitter was supposed to be a little thinner. In such a way that the MPP tube would extend a bit (1mm) past the point of the machined area (left from the interior step. The factory made the wall thickness larger and therefore created a machined area with a step the other way which now blocks the tube 1mm too soon. I hope I explain it well enough to understand.
The fault is neither mine nor the factory, although they made the error of making the wall thickness 0.5mm larger without consulting me.
I will look for a solution for those who want it and for my remaining stock. (in which case you please send me an email including your order number).
Roy
While I don’t intend to use my two WannaWanga steel shrouds on my Larbel MPP, it is currently the only replica I have available.
Larbel on the left, WannaWanga on the right:

EDIT - Saw Roy’s explanation as soon as I posted this, it makes sense that this issue would affect all MPPs with accurate tube end to bulb release distances.
Larbel on the left, WannaWanga on the right:
EDIT - Saw Roy’s explanation as soon as I posted this, it makes sense that this issue would affect all MPPs with accurate tube end to bulb release distances.
I took one of mine down to the workshop and using a small dremel sanding bit, evenly removed the step and material all the way to the end of the shroud so that the dimensions are now much closer to Roy’s specs. A spindle sander would be even easier but I don’t have one. I then hand sanded up to 400 grit and it fits perfectly. This was less than 30 minutes of work for me and I’m no pro. I am very happy with it now. People might say that the interior wasn’t a machine finish, but the inside is painted and you can’t see cast versus machine finish.
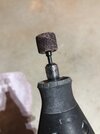
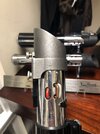
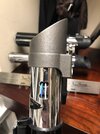
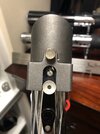
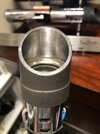
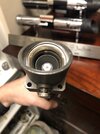
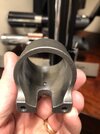
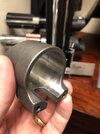
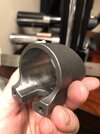
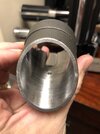
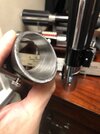
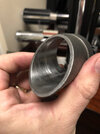


So to sand the whole thing it took less than 30 min? Looks like it's much easier to do than what I though. Should be able to dremel mine without too much troubleI sanded the whole thing flush. Roy mentioned in his post above that the wall thickness was thicker than he intended. By making it flush, it reduces this thickness and allows you to seat the shroud at any point you wish to tighten the thumb screw.
I sanded the whole thing flush. Roy mentioned in his post above that the wall thickness was thicker than he intended. By making it flush, it reduces this thickness and allows you to seat the shroud at any point you wish to tighten the thumb screw.
So the only thing holding the shroud in place is the thumb screw?
Similar threads
- Replies
- 127
- Views
- 7,050
- Replies
- 0
- Views
- 163

