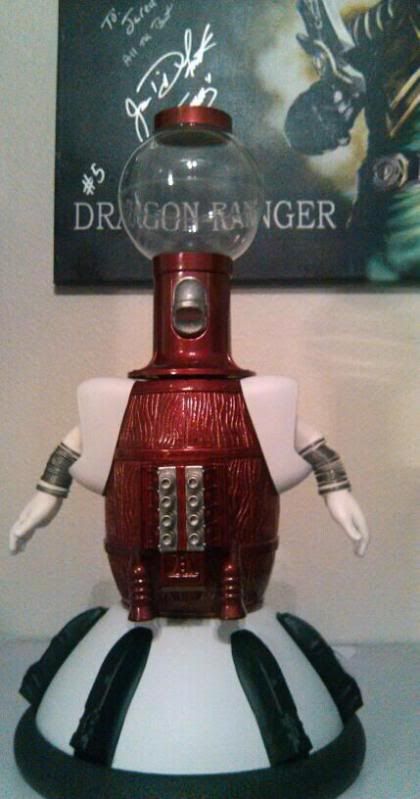
Tom Servo!

stupid question time.. you don't have to cut that superlong pipe any, do you? I assume it gets attached to the neck, and then that runs all the way to the bottom and that's how Servo's head is controlled?

Today's agenda, get the hands attached and screwed on to the barrel. Tomorrow we'll worry about the metal swivel piece, and pipe hole. Taking this one step at a time :).

I cut the pipe down to 9 inches, and then connect a 1/2 PVC connector to the bottom of that. Slide that pipe through the bottom of the bowl and slide it into the hole at the top of the barrel. The connector helps act as a bumper for the bowl. Then connect a 3 and a 3/4" inch PVC pipe to that and you have Servo's control rod!

To paint Servo's head, go ahead and attach the head to a spare PVC pipe and paint it disassembled. Here's a video on how to paint your bots:

http://sol.semo.edu/mst3k/botbuilding/Gary Glover Videos/Painting your bots.mp4
 
well, we got nothing done today..

But I did bring tom's head home, so going to try the blow drier trick now and see if it works.

I'm also a little confused on how the string attaches to the jaw. The Jaw Pulls up to open, but if you use the string, it'd have to pull down to work..does that make sense? Curious if anyone has any pictures of there's for better under standing :)

You need to install a small picture hanger inside Servo's head to act as a pulley for the mouth to work. Drill a hole through Servo's head, thread the picture hanger through there and thread the string from the PVC through the picture hanger and attach it to the jaw flange. Here's a video on how to do it:

http://sol.semo.edu/mst3k/botbuilding/Gary Glover Videos/Building Tom Servo - Part 1.mp4
 
And thanks for that video :). The only good reason for working in an electrical contracting warehouse is we have every kind of tool imaginable here, and that saw was in the back ready to go, so off came Servo's head :)..

and thanks for the video. I've now got the head primed and it's waiting to dry. We've also got the other parts re-wetted with water, sanded down, and primed. Once we get the remaining drill bits done for Servo's mouth, we'll paint them sliver and the engine stacks silver and then finish off with the red.

After that, I'll glue in the T-connector once the string is attached and try and assemble the rest of the body before the day is through.
 
378594_10150585456405211_530260210_11420799_51309964_n.jpg

some hopefully final bot painting.... then it's on to finishing the head. should at least be able to get that done today.
 
Today's progress... I got the rest of the engine block painted without wrecking the silver portions. I got the hole drilled in servo's bottom mouth. His barel seems to have come out decent enough for my skill level of spray paint, so I drilled a hole for the front to place my newly bought Tap bit in, so I can twist on his engine housing. I also got the rest of his head bowl evened out and sanded down.

On Monday, hopefully the paint on his head will have dried OK for a final. We'll drill the hook hole and begin final head assembly. we'll paint the little line center red on his engine block and place that on the body. His hands will finally be secured. And we'll get the remaining bits done on the bowl..

Do you have to cut away the excess plastic on the trains, or do those stay on and that is how they glue on to the bowl?
 
Today's progress... The only thing left to do assembly wise, is find a way to glue the train sets on. His barrel painting came out good. The wire drilling came out good... his 'shoulders' are screwed in so his arms can stay on...

The only snafu is the head. I think when I took the mouth off, I broke off the part of the bottom jaw that the spring connects too...if there is another way to get the spring to stay, I'll hot glue it on and hope that works.. otherwise, I may have to order another head from amazon.

final pics will come this week, and see what everyone thinks of my attempt :)
 
391156_10150592078830211_530260210_11447728_1993188980_n.jpg


His current state of completion. I've got to get the hands on somehow...I've got to get the train things glued on somehow, and his new head is coming tomorrow so I can finish him up..gotta use the testors small paint can to paint his middle engine block strip as well..
 
Replacement tom servo head came today... hopefully the paint can turn out good, and it'll be finished today or tommorow...pictures to follow
 
Today's progress...

replacement head came a day late. We got the dome properly sawed off. This time, the spring was removed first before popping the mouth off (doh!) and the holes drilled before painting. The head has a final paint. waiting for the dome top and mouth to dry.

This time tommorow, Mr.Servo should be done :)....then it's on to decide if I want to try Crow, who looks far more complicated :)
 
408687_10150598323520211_530260210_11466935_2101081954_n.jpg


Mr.Servo's bottom head, done the right way this time.. fully rigged for puppeteering. After lunch, i'll cut the last of the puppet rod that goes up his body. I'll sand off the top of his head so it's flat, glue on the part he bowl connects too, and finish it up...
 
405553_10150598476750211_530260210_11467281_899478426_n.jpg


Quick test fitting of the head. I THOUGHT the belt sander was in so I could smooth off his red dome, but no luck. have to wait for one of the trucks to come in and hope they have it. Right now, I'm trying to hot glue the trains on...if I have to, I'll also hot glue in hands to the springs and hope it doesn't show up so at least I can finish that up today..

Add on : And it's not Testors ;o)....The one testors that I DID have really was true to size in the picture, and no bigger than a shot glass :). I got what I THOUGHT was a dark red from home Depot, but it clearly turned out far lighter than the cap indicated :)
 
406753_10150598579215211_530260210_11467501_20208850_n.jpg


We got his trains on..but there is going to be some glue trimming that is needed...At least they SEEM to be staying on.... I don't think gluing the hands on the springs is going to work.

hopefully final picture tommorow
 
I finished mine last night. The testors ruby flake paint was an absolute nightmare. 2 out of the three cans at the hobby store didnt work at all. They started by spraying red sillystring looking paint out. Then when they got passed the glob, it sprayed out runny and globby. It messed up the paint on the head, and I didnt get as thorough a job as I wanted in the back of the barrel, but it'll do for now. I plan to call Testors tomorrow to complain and hopefully get replacement cans.

tom.jpg
 
Neil, you really don't need to glue the hands to the springs. I simply just grabbed the spring and carefully slid the hands in...works great and a hand only came off once during a con.

Great job, jtmtmtl! Yeah, those Testor's spray paints are a big pain in the ass. Fortunately, Tom Servo is easier to paint then Crow. I need to figure out a good way to make the paint stick to Crow's damn Tuppercraft trays.
 
397523_10150600926195211_530260210_11476423_1771693475_n.jpg


I got one of his hands on that way once, but it was only one ring, and then I noticed it was the wrong hand after ten minutes of trying ;o).. I finally got his head and dome glued on, so that's done.. only thing left is the hands :).
 
397790_10150608166105211_530260210_11502077_593637324_n.jpg

For the most part, finished! I've still got to paint his center engine block red...and for some reason, two of his train tops arn't sticking to the bowl, but other than that, he is all assembled and fully puppetable.... :) Far bigger in person than he looks on TV ;o)
 
This thread is more than 12 years old.

Your message may be considered spam for the following reasons:

  1. This thread hasn't been active in some time. A new post in this thread might not contribute constructively to this discussion after so long.
If you wish to reply despite these issues, check the box below before replying.
Be aware that malicious compliance may result in more severe penalties.
Back
Top