Thermal Detonator - Accurate 3D model and resin build (picture and info heavy)

I have built one of these, and have a bit of experience with the Alclad chrome. One trick I got from Gordon Tarpley (he does a few full C3PO builds and makes some tutorial videos on a few processes) is that Alclad Aquagloss is one of the few things that works well with their chrome, but it does dull it slightly. But following that with a coat of 2K gloss sort of "fills in" the micro imperfections of the Aquagloss, and brings it back to chrome again. I use a three-part airbrush 2K that I can mix in small batches (and use a top level respirator), so this works great for me.

cwhvP0m.jpg


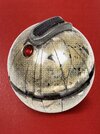
For the weathering, in the movie stills, it always looks to me like it chips to a brass color on the edges, so that is what I did on mine (painted brass, 2K sealed, liquid latex masking on the chips, Alclad chrome, Aquagloss, 2K clear coat). For the sound and light sequence, I used this instructables tutorial which worked great: Thermal Detonator Instructables

ie5Dord.jpg


The sound isn't coming through on this, but you can see the look of the finish. My IG post with the sound can be viewed here: Thermal Detonator video on IG
bOP5C0b.mp4
 
Thanks for sharing OddViking

That's valuable information. Did you try sanding the clear coat with very high grit (5000+) after it was fully cured to see if you could get even more shine?

And that's a very nice way to do the weathering, I agree with the "chipping" on the original prop.
You can clearly see it in this screen grab. Here it looks like pristine vacuum metalized coating with some "chipping", but it's very difficult to discern what colour it is. It looks less reflective than the "chrome", but the over all appearance of the TD is very shiny and reflective.
1675948868260.png


This is the "oldest" close-up picture I have found of it outside of screen grabs from ROTJ, look at the beautiful weathering, is the chrome coating oxidizing? You can tell the age by the amount of "spikes" left on the tank tread on the switch, in almost all the later pictures the majority of them are missing. The finish of the hemispheres looks a lot more spotty and discolored than it did in the film, but we can still see the chrome coating being reflective, especially on the lower half. We also get a great look at the initial chipping effect, but it's still very difficult for me to discern exactly what colour and finish it is.
1675949219377.png

And these are two of the clearest ones I have of the TD from the front, where we can compare the weathering pattern from the screen grab more clearly. These are more "recent" pictures (note most of the spikes on the tank tread being gone and more of the vacuum metalized coating having flaked off):
1675949383291.jpeg


In this picture from Rymo we can see that the vacuum metalized coating has turned almost a uniform brown, is this oxidation taking it's toll?
Interestingly enough we can also see that the initial chipping is reflective here, much more so than the initial vacuum metalized coating, which is very curious.

1675949594438.png


Comparing the screen grab and the two pictures above we can clearly recognize the weathering pattern (which also curiously enough seem to be the same, but not exactly. This might be due to wear, or light differences in the film and real life)

:
1675951080812.png

1675951479140.png

Anyone have any ideas as to why the chipping pattern looks less reflective than the chrome coating in the film, but more reflective than the chrome as the prop aged?
 
I really have no idea, I can't figure out how it got like that especially as chrome doesn't oxidize. It does look almost like how silver (plating) on an old tarnished silver platter looks, with those warm tones and black areas.
tarnished-patina-Laurel-Leaf-Farm-item-no-m92639-2.jpg

image_9c1ebc10-d72c-4c88-b4bf-2c8b92643fc8.jpg


For my finish, I didn't sand it any further, it looked pretty reflective once I had the 2K on there.
 
OddViking that's a good suggestion.

Adam Savage mentioned in the Tested video I linked earlier that aluminum was the most common metal for vacuum metalizing (as it's very stable and resistant to tarnish and oxidation I presume), but I see that silver can also be used, so it might be that the original prop was vacuum metalized with silver. That would explain the tarnishing, and I have to say it matches pretty well with the example pictures you posted.
 
I brought all three prototypes up to the same standard and created a new custom (subtle) base to display them on.

IMG_20230212_220229.jpg
IMG_20230212_220341.jpg

Next up is getting some lights in them, just for display purposes. I ordered some tiny Seeeduino boards for that.

And I also ordered a KR X-Plode Soundboard so I'll have at least one Thermal Detonator with sound and motion activation!

And when the Alclad Aqua Gloss arrives I'll try out some weathering as well. (I might even do some test before that on a spare sphere I have)
 
Last edited:
After studying still images from Return of The Jedi I think they either painted the sphere a bright silver, masked off the damage/chipping with liquid mask and had it vacuum metalized and then removed the liquid mask to reveal the chipping, or they vacuum metalized the sphere and carefully painted on the chipping with a silver colour paint.

IMG_20230217_102843.jpg


They might have also applied a light brownish filter of ink through an airbrush, but I think the brown colour we see in later images are from the vacuum metalized coating (which might have been silver) becoming tarnished and oxidizing. And of course we have all the chipping of the metal coating which leaves the black spots (actually transparent, we can see the inside of the clear acrylic sphere in some pictures).

I decided to do a quick weathering test on a spare 3D print, first applying silver paint (Vallejo Model Air Aluminum to be exact) carefully with a fine tipped brush:

IMG_20230217_102439.jpg


I then did a light filter of 2:1 Liquitex Transparent Burnt Umber Ink and Carbon Black through an airbrush to give it a brown tint as seen in later pictures of the original prop, I had some spots be darker than others to give it a bit of variety:

IMG_20230217_102540.jpg


I think less is more in this step, so I might adjust the ratio of Burnt Umber and Black ink for the next test and go a little lighter, but I really like the result and think this is the way to go forward.

What do you think?
 
I did a quick Arduino sketch and flashed it to the Seeeduino XIAO board I got to get some lights in the Thermal Detonator.
Screenshot_2023-02-20-09-36-33-28_92460851df6f172a4592fca41cc2d2e6.jpg

IMG_20230220_093751.jpg


It's great to see it come alive. The thumb switch isn't functional at the moment, so I'll have to figure that out.

As you can see I have also started to paint in the chipped areas with Vallejo Model Air Aluminum and a fine tipped brush.
I have scoured the internet for reference pictures of the original prop to use as reference for the chipping, but have yet to find any showing the back right of it. I found  one picture from the back left, which is "relatively" recent so a lot of the metalized coating has flaked off (showing the internals of the prop!), and I'll use that.
signal-2023-02-20-09-43-34-067.jpg


I think it's looking very cool so far! The chipping takes ages though (I've spent 2 hours on it to get this far), and I thought this was just going to be a test before I did it on another model, but I don't think I'll do this paint job on more than two Thermal Detonators, this one and a final one when I have everything dialed in (functioning switch and tweaked all the details in the 3D model).
IMG_20230220_091232.jpg
 
MartinSivertsen ... any more updates?

I found this picture in my files :

View attachment 1674392

... which seems the original position of the one you posted in post#22 ;)

Chaïm
Yep! I have some updates, I'll post them below.

I have that picture in my folder of reference pictures as well ;)
I have also noticed that it's the same one that I posted, just rotated 90°. I don't know the origin of the picture you posted, but the one I posted is from one of the books I have with Star Wars props, I'm not sure if it's Costumes, Sculpting a Galaxy or something else (I'm too lazy to go up in the loft to check :p).

Now for updates:
I have painted a bit more chipping, following pretty closely what reference I could find.
IMG_20230227_235210.jpg


I also realized I didn't have a battery charger for the battery I had used together with the Seeeduino so I made a custom battery charger and LED control board to mate with the Seeeduino, which is produced (10 of them I think) at PCBWay and on its way in the mail.
signal-2023-02-28-00-16-18-186.png
signal-2023-02-28-00-15-27-201.png


I also found a toggle switch I have tried to implement mechanically. I made a holder for the toggle switch and a new thumb switch with an insert that keeps the thumb switch locked into its track and has a hole for the toggle switch lever.
IMG_20230227_235254.jpg
IMG_20230227_235316.jpg

It works, but I have encountered an issue where when I want to slide the thumb switch the toggle switch lever pushes against the thumb switch guide insert (the one with the screw in the image above) which again tilts and causes the thumb switch to push down on the end I'm trying to push it towards, causing the thumb switch to dig into the paint on the outside and cause scratches (free weathering? :p). I'd like to fix this but will have to think about it for a bit. I'll have to create a thumb switch guide insert that remedies it somehow.
 
That already looks quite neatly organised and tidy inside ... compared to what I have seen up close ... o_O ... I hope you can fix that lever issue soon and then start to produce these like cup cakes ;)

Chaïm
 
This is a nicely lit photo of the thermal detonator prop in the upcoming 100 objects book.
I got an advanced copy in yesterday, and though I'd share at least this page :)
The accompanying text is all in-universe, so not worth sharing for prop replicating purposes.
 

Attachments

  • IMG_5346.jpeg
    IMG_5346.jpeg
    4.2 MB · Views: 86
Last edited:
This is a nicely lit photo of the thermal detonator prop in the upcoming 100 objects book.
I got an advanced copy in, yesterday, and though I'd share at least this page :)
The accompanying text is all in-universe, so not worth sharing for prop replicating purposes.
Thanks a lot!

That's a nice, well lit picture, and it gives me some reference for the paint chipping in this area which I don't think I've seen (clearly) in any other images.
1677570454289.png


It also looks like the acrylic has gotten a nasty crack, that's a shame. Perhaps some handlers have dropped it :(
 
Why did you decide to design the engraved lines to end into an engraved circle? See close-up :

Schermafbeelding 2023-02-28 om 15.25.24.png


Unlike the Master Replicas thermal detonator which has all the lines come together on the bottom :

Star-Wars-Episode-6-Return-of-the-Jedi-Thermal-Detonator-Limited-Edition-1.jpg

Picture courtesy johnnyjedi311 at yourprops.com

Or, since these are still prototypes, will you alter the design slightly before 3D-printing the definitive spheres?

Boushh TD-01.jpg


Boushh TD-02.jpg


Chaïm
 
Last edited:
Sym-Cha the picture with the engraved circle is of one of the 3D prints of RVeldhuyzen 's 3D model, but I also added that detail to my 3D model as I liked it and hadn't seen any pictures of the bottom of the original prop (and it could plausibly look like that). I can easily change it in the 3D model though, for accuracy's sake as the original one likely had lines that converged, even though I have to say I personally like the look of the circle better. :lol:

I hadn't noticed that the prop had that crack when displayed in the hands of the Boushh costume! I have those pictures in my folder as well. So the crack is some years old then.
 
To quote George Lucas : ' Ultimately you just do what deep inside makes you feel good and it will always guide you in the right direction as long as you are honest about it.'

That said you could always make 2 samples one with an engraved circle and one with converged lines ... then let the people choose which one they prefere ;)

Chaïm
 

Your message may be considered spam for the following reasons:

If you wish to reply despite these issues, check the box below before replying.
Be aware that malicious compliance may result in more severe penalties.
Back
Top