Sym-Cha
Master Member
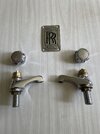
So ChrisRWars ... once your Balance Pipe is emasculated and becomes a proper Obi-Wan emitter, will you now consider brazing it onto your precious Hales?

Chaïm
Chaïm
Yeah - so I don’t know exactly, but Inconel is a very hard to machine alloy. It’s not the sheet metal clamp, so the idea of crimping the lower emitter (or attempting to) lost favor with me when I realized the material.Chaim kindly mentioned this to me and yeah I see it and agree lol. Anywho, fun for the discussion I suppose! I love to reach Haha
")
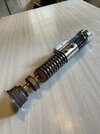
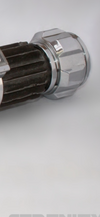
Wow even if the original wasn't done that way yours looks pretty close to what we see! Great job!Most of the it looks to me more like a sloppy brazing to me, that is then sloppily cleaned with a dremel or something like that. But sometimes i think I see what could be marks from hammering, although probably not directly with the hammer, but something with a sharp tip. Trying to hit the lower step of the balance pipe with a decent size hammer will be kind of tricky without hitting the upper step or smashing the windvane.
I cannot imagine why anyone would think either is a good idea when things like glue, epoxy, tape, etc. exist, but we can only guess from what we see. If the grenade was really rented, I bet they had some hard time returning it in this condition.
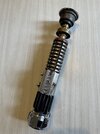
I did the "Dave P parts test" myself a while ago. but I chose to go with the "sloppy brazing/dremeling" look as dremeling might explain the dents in the BP upper step better than hammering.
View attachment 1809112
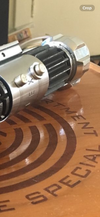
No, parts were heated and soldered together. The material is regular silver solder wire.Yeah that is excellent work - is that JB weld?! The dremel idea is precisely what I was thinking too. If you go down at an angle to get in there you could easily scrape the main section
Might have to try this nowNo, parts were heated and soldered together. The material is regular silver solder wire.
Thank you,Hello DarthBra and welcome,
The origin of any of the D-rings for ANH lightsabers is not known ... however I have found several possible sources which were around in 1976 ... one of which is a G R A F L E X camera case :
View attachment 1812815
View attachment 1812816
or perhaps they came from medical cases :
View attachment 1812817
One thing is certain they were more round than a regular D-ring i.e. :
View attachment 1812819
... it's even possible they were handmade ... I had this one made for my Luke ANH :
View attachment 1812820
And Roy from wannawanga.com is selling loose D-rings of the correct shape ... choose option ANH D-ring :
View attachment 1812821
And if you're getting the vintage Marconi ME-transistors than scottjua can provide some vintage washers with your order
View attachment 1812824
I hope this info helps.
Chaïm
P.S. And when your build is done do send me 2 large pictures so I can make you a Mechanismo Blueprint and add you to the new Picture Index
The handle is flipped depending on the filming version (aka Chronicles or Tunisia) I believe.Guys have a made a boo boo ?
Is the tap wheel around the wrong way on the Obi saber ?
The more I see, the more I am seeing them like this ?