Too Much Garlic
Master Member
Cool. Yeah, just checked the HopeOfTheFuture skull posted many pages back, which is similar to Gizmo's, and the temple details seems intact there too.
To start with, we need to obtain a scan of these details from Gizmo, or from someone else who also has similar details, if they decide to share them at all. After all, rare props are valuable. Even just to hold and study the timeless skull details in hand... And then we can think about replicating defects or making them perfectly smooth. I was thinking of making a remastered version in CAD (like in T1, but as clean as possible). In the meantime, today I also made scans of three additional details, and I still have two more to make (since I identified new details).The question then is... should we recreate it with the actual model kit part or should we recreate it with the air-bubble voids?

 www.capturingreality.com
") and great!
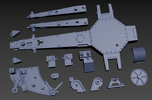
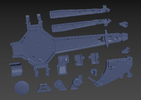
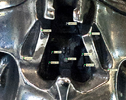
and great!These parts only use one half of the gearbox. But a portion of this part has been cut off, and on one side, the part is flipped upside down, while on the other side, it is not.Thought I'd bring this back around. I asked before... far back in the thread, but no one seemed to know at the time, or maybe it was buried by fast moving posts. But seeing that the temple insert motorcycle parts are also part of the shoulder motor setup... I was wondering what the round part was and is the third part in towards the center of the chest also a found part? And then when looking at the picture I can see the sixth neck piece looks like it is shaped to the sit on the shoulder motor part. I wonder why they decided to remove that piece? Was it so that they could move the shoulders and the bottom neck piece getting in the way?
View attachment 1804629
Why is the tip of the nose unacurate on all reproductions and replicas?I've been up for almost a day, studying the structure of the T1 skull. Decided to condense all the important information about the nasal structure into two pictures.
Thanks for that link Too Much GarlicUnsure if I posted a link to the site before, but this place has a lot of cool images of the various productions:
Exclusive high-quality unique imagery of the Terminator saga... collected on the best Terminator fanportal in the whole wide world.
Interested in that special image you once saw, but cant quite find it? Then look no further and check out in-depth stack of exclusive Terminator images. Only at TerminatorFiles.com!www.terminatorfiles.com
Many pics I hadn't seen before!!